If you’re not happy with the design of your website and your chosen theme doesn’t offer the level of customization options required then it might be time to consider creating your own custom template! Depending on your needs, this WordPress template can be a custom post template or page template or category view.
One of the exciting things about WordPress is, that no matter how your WordPress website was built, you’re always free to alter the layout or design at any time. This can be done by overriding a premade template or by creating your own. WordPress offers a huge amount of flexibility and gives you the ability to create your own template for anything.
Despite the fact that creating your own template opens up a wealth of design possibilities, most WordPress users would probably shy away from the challenge as they worry that creating your own WordPress Custom Template is too complex. In this two-part series, we will be looking at both options that are open to you. Firstly in this article, we’ll look at how you can code a custom WordPress template manually (which offers the ultimate in flexibility), and then to follow on we’ll examine how you can use popular page builders to shoulder some of the heavy lifting needed when creating a WordPress custom template.
In this article, we’ll look at ways of creating custom templates for pages, posts and even post categories. Let’s get going by first looking at why you might want a custom template.
Note: This article assumes a working knowledge of HTML, CSS and PHP.
When Do You Need a Custom WordPress Template?
Perhaps you’re not yet sure why you’d actually need to use a WordPress custom template. The easiest way to explain this is with an example.
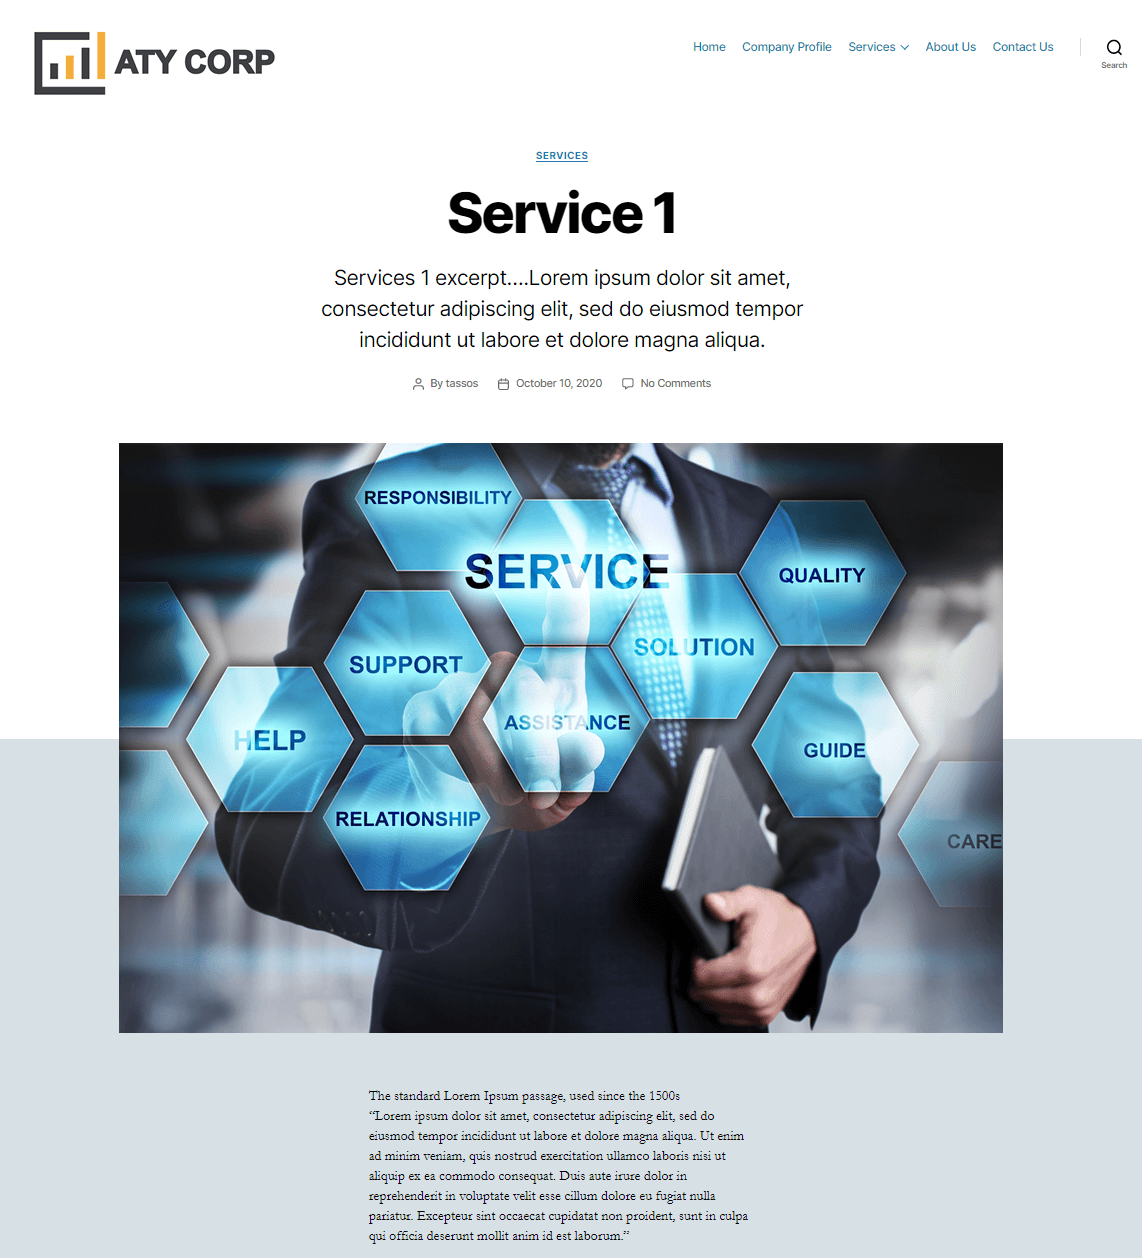
Let’s imagine you have a website for your business. The theme ‘Twenty Twenty’ is activated and all necessary pages and posts are already created and filled with content (text and images), an excerpt and a featured image.

The General settings are also configured and you have made a number of changes via the Customizer (such as link colors, cover template overlay color, etc.)
A menu has also been created with 5 items: Homepage – Company Profile – Services – About Us – Contact Us
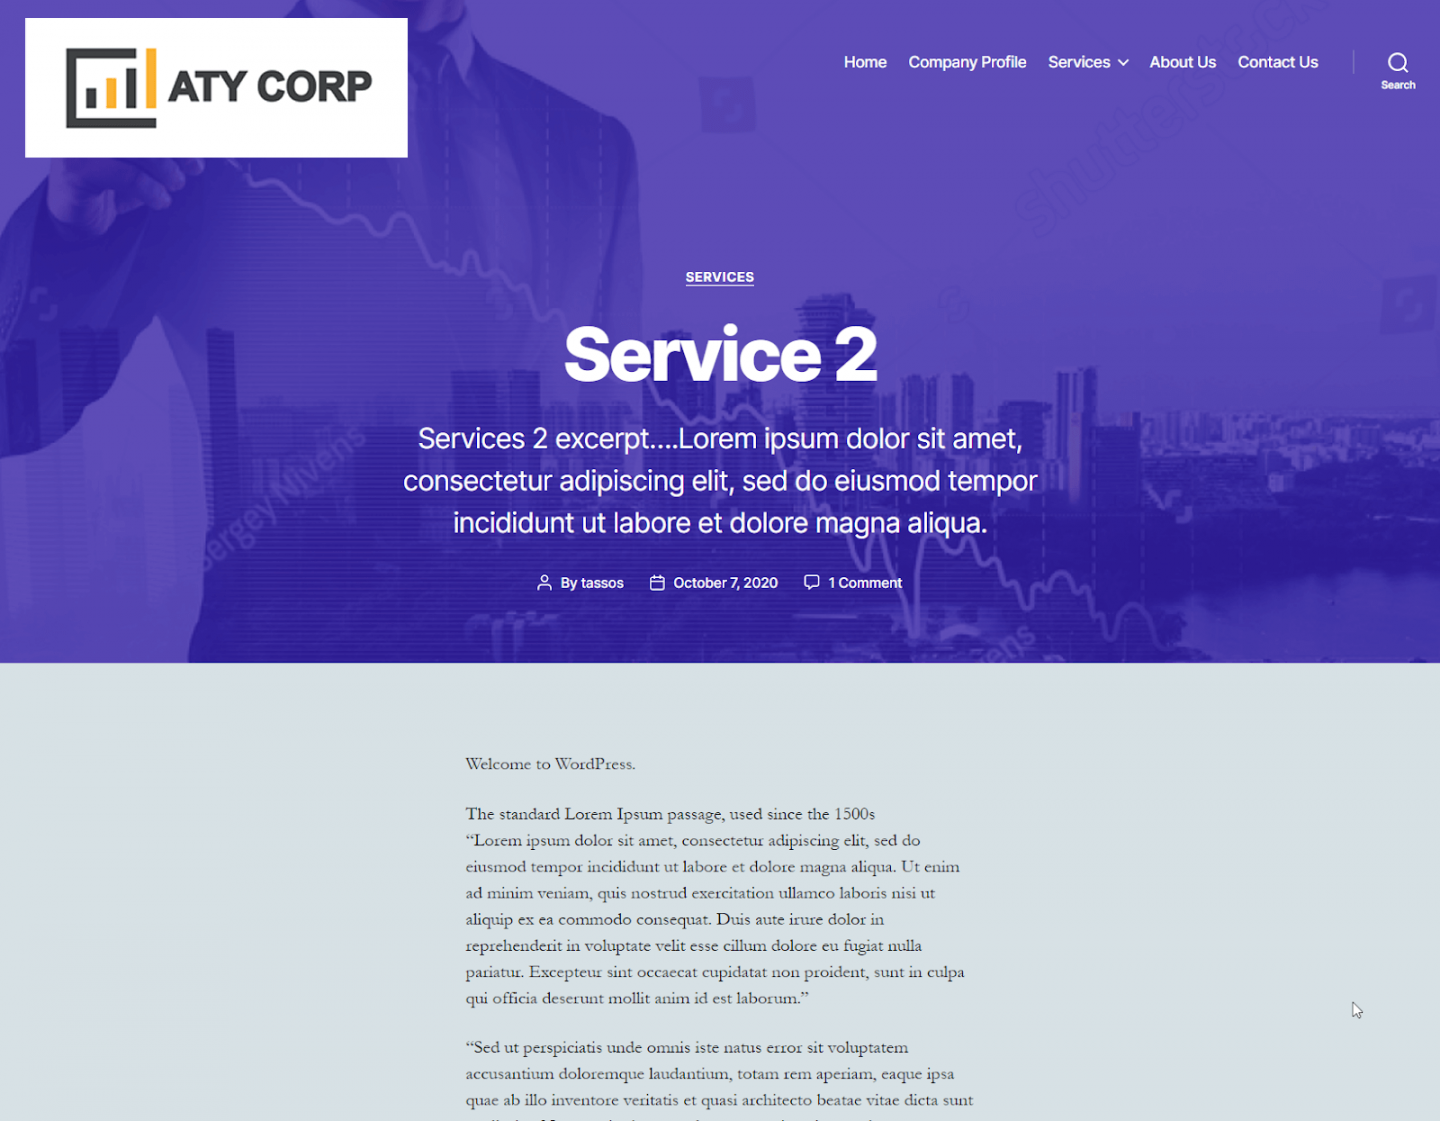
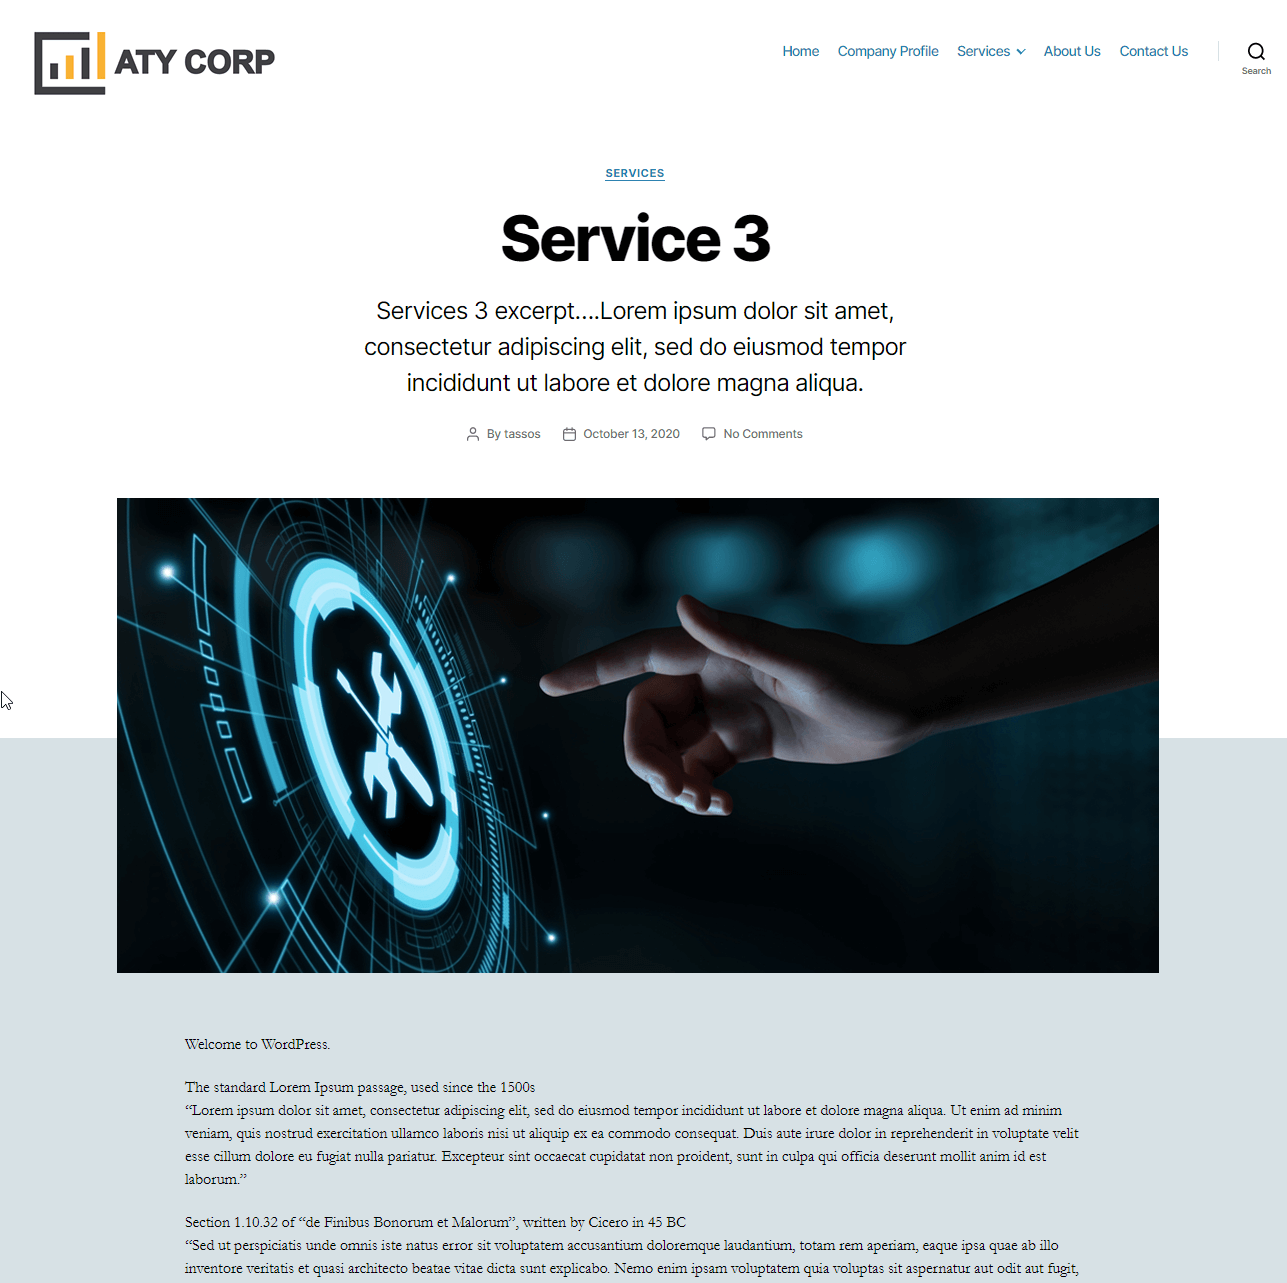
In the Services section, there is a submenu: Service 1 – Service 2 – Service 3.

So, from a WordPress developer’s perspective you essentially have:
- Four standard pages ( Homepage – Company Profile – About Us – Contact Us )
- One archive page ( Services )
- Three post pages ( Service 1 – Service 2 – Service 3 )
By default all 3 of the Service Post pages will have the same layout. The only option you currently have to differentiate these posts individual layouts is by selecting one of the three templates provided via the Post Attributes setting.

If we select each of the different templates we’ll see that they look like this:
Default Template
Full-Width Template
Cover Template
If you’re lucky, one of these styles will work for you and you can choose to use these for your website. If not, however, and you find yourself frustrated that certain elements don’t look ‘just how you want’, then not to worry… this is where building your own custom WordPress Template manually come in.
Try our Award-Winning WordPress Hosting today!


Let’s crack on and see just what can be achieved with a custom template.
How to Manually Create a Custom WordPress Post Template
In the following tutorial, we will create a single post view that is completely personalized and will be specified inside its own PHP file. We will also add an option called ‘My Custom Post Template’ to the drop-down templates menu in the post attributes that will correspond to the custom post layout and present our unique structure.
Step One: Introducing our Template to WordPress
To begin we need to create a PHP file named something like “my-custom-post.php” in your WordPress theme root folder (in our example this is located in /themes/twentytwenty/).
Open the file with your favorite text editor (like Sublime) and add the content below:
<?php

/*
 * Template Name: My custom post template
 * Template Post Type: post
 */
 get_header();
This line * Template Name: My custom post template defines the name that will be displayed in the template drop-down menu. Take a look at the screenshot below and you’ll see how this would appear.

The * Template Post Type: post is optional and defines the post type the template will appear as an option for. As we’ve defined this as ‘post’, this template won’t appear in the template options menu for a page as can be seen in the example below.

The last line: get_header(); ?> retrieves the header content.
At this point, if you choose “My custom post template” as an active template for let’s say our ‘Service 1’ post, the output will be blank. This is as we would expect as we have yet to add any structure to the page. You would see something like this:

Adding structure to our WordPress Custom Template
Whilst it’s entirely possible to build the structure for our page entirely from scratch, it can sometimes be easier to take the existing post structure that’s being used in our theme template and then modify this.
If we take a look at the WordPress template hierarchy we can see that, depending on the theme, the single post template comes from the singular.php or single.php file located inside the theme folder.
To further clarify – when posts and pages use the same structure, the singular.php file is used, otherwise (like in the popular Astra theme for example) you will see a single.php, page.php, archive.php files which are coded to provide different structures for posts, pages and blog layouts respectively.
In this instance, using the Twenty Twenty theme, we can see the singular.php file uses the get_template_part function to retrieve the requested layout from template-parts folder.
<main id="site-content" role="main">
<?php
    if ( have_posts() ) {
        while ( have_posts() ) {
            the_post();
            get_template_part( 'template-parts/content', get_post_type() );
        }
    }
?>
</main><!-- #site-content -->
What the above code cleverly does is check if there is content in the post and if so, prints the content using the structure specified by the selected template. This applies in all cases regardless of whether a post, page or archive is being used.
Now we can see how our theme is pulling layout data from existing templates we are now ready to begin building our own template. In order to define how our template looks we first need to actually design it. You might want your post page to be laid out in the following format:

Once you’ve decided on a layout design you’ll need to code this using HTML, CSS and PHP. This article assumes you have a working knowledge of these languages and can create the required layout. Taking the above design we would write some initial code that, added to your my-custom-post.php file would look like this:
<?php
/*
* Template Name: My custom post template
* Template Post Type: post
*/
get_header();
?>
<main id="site-content" class="mcpt-post" role="main">
<?php
if ( have_posts() ) {
while ( have_posts() ) {
the_post();
?>
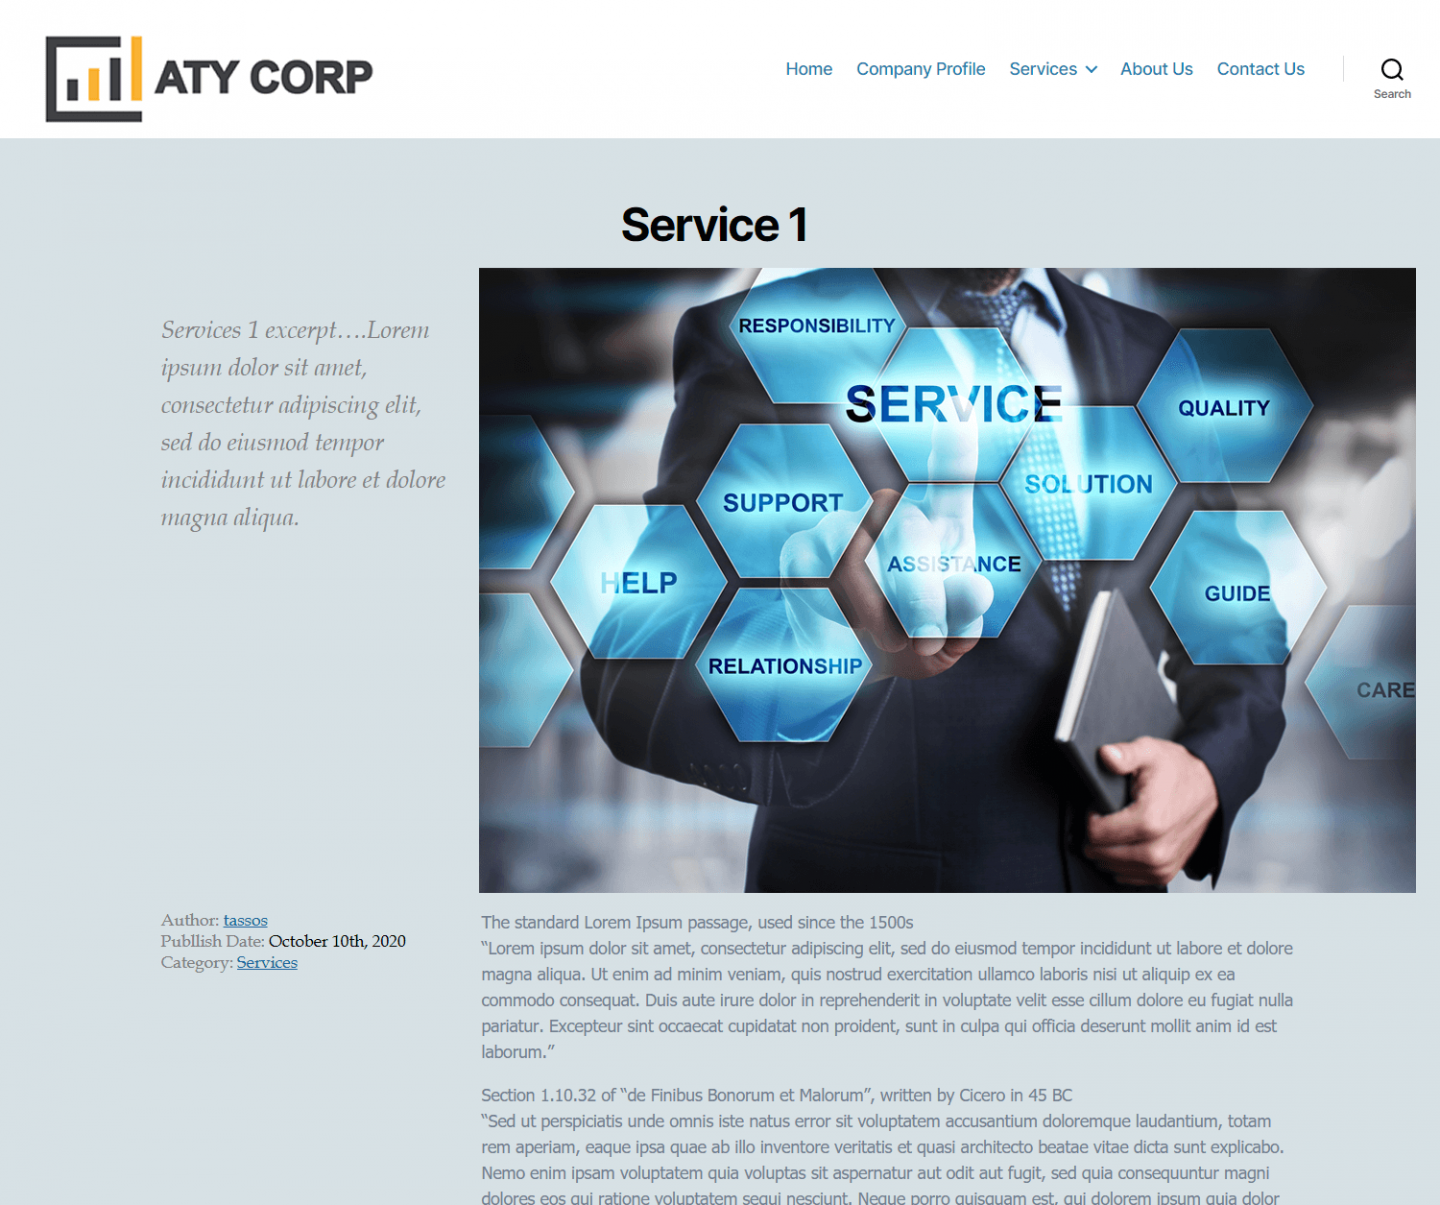
<h2><?php the_title(); ?></h2>
<div id="content-top">
<div id="content-top-left"><?php the_excerpt(); ?></div>
<div id="content-top-right"><?php the_post_thumbnail(); ?></div>
</div>
<div id="content-main">
<div id="content-main-left">
<span class="metakey">Author: </span><?php the_author_posts_link(); ?><br>
<span class="metakey">Publish Date: </span><?php the_time('F jS, Y'); ?><br>
<span class="metakey">Category: </span><?php the_category(', '); ?>
</div>
<div id="content-main-right"><?php the_content(); ?></div>
</div>
<?php }
}
?>
</main><!-- #site-content -->
<style>
.mcpt-post { width: 80%; margin: 0 auto; }
h2 { text-align: center; }
div#content-top-left { width: 30%; float: left; font-size: 26px; font-family: book antiqua; font-style: italic; padding: 30px; color: grey; }
div#content-top-right { width: 70%; float: left; }
div#content-main-left { width: 30%; float: left; padding: 30px; font-family: book antiqua; }
div#content-main-right { width: 70%; float: left; padding-top: 30px; font-family: tahoma; color: slategray; }
span.metakey { color: grey; }
</style>
<?php get_template_part( 'template-parts/footer-menus-widgets' ); ?>
<?php get_footer(); ?>There are shortcut functions that our Twenty Twenty theme provides for post meta and other data we may want to publish. Instead of using these though we’re going to use the default WordPress functions so that your template will work on any theme. One’s we will work with are as follows:
- the_title() – echoes the post title
- the_excerpt() – echoes the post excerpt
- the_post_thumbnail() – outputs the default post thumbnail size. You can use the the_post_thumbnail() options to output a specific featured image size
- the_content() – Outputs the post content
If we save our updates and now take a look at the ‘Service 1’ post we will see our custom template layout applied.
How to Create a WordPress Custom Post Category Template
Now we’ve seen how relatively easy it is to create our own post template layout we can move on and apply similar principles to create our own Category View layout.
An easy way to do this is to directly edit the index.php file (located in our /themes/twentytwenty/ root folder). Whilst editing this file directly is fine for tutorial purposes, if the website is live then you might want to use a child theme to ensure that any updates aren’t overwritten the next time you update your theme.
If we look at the index.php code we will notice that it is mostly filled with PHP “if” conditions that specify the available outputs depending on the type of content. For example, the following code checks if the content includes posts (it is a post, page, or archive) or if it is a search results page and displays the appropriate content accordingly.
if ( have_posts() ) {
    .
    .
    .
} elseif ( is_search() ) {
    .
    .
    .
}
If you’re following this tutorial using the Twenty Twenty theme then find the following code in your index.php file:
$i = 0;
while ( have_posts() ) {
    $i++;
    if ( $i > 1 ) {
        echo '<hr class="post-separator styled-separator is-style-wide section-inner" aria-hidden="true" />';
    }
    the_post();
    get_template_part( 'template-parts/content', get_post_type() );
}
In the template-parts/content.php we can see that the content is retrieved using the ‘get_template_part’ function.
Instead of using these theme-specific functions to specify the layout of our post category page, we’re going to use the default WordPress functions for each element instead. This will mean we’ll change the code above to the following:
while ( have_posts() ) {
    the_post();
    include 'my-custom-category-view.php';
}
If you’re eagle-eyed you’ll see that we’re referencing a file called my-custom-category-view.php which we now need to create and add to our theme’s folder (an alternate approach would be to add this info directly to our index.php file but having this saved as a separate file is much neater.
Create a my-custom-category-view.php file and add the following code:
<div class="article" id="post-<?php the_ID(); ?>">
    <div class="featured-image"><!-- FEATURED IMAGE -->
        <?php the_post_thumbnail(); ?>
    </div>
    <div class="content"><!-- ARTICLE HEADER -->
        <?php
        the_title( '<h3><a href="' . esc_url( get_permalink() ) . '">', '</a></h3>' );
        ?>
        <div class="intro-text"><?php the_excerpt(); ?></div>
        <div class="post-meta">
            <div><span class="metakey">Author: </span><?php the_author_posts_link(); ?></div>
            <div><span class="metakey">Publish Date: </span><?php the_time('F jS, Y'); ?></div>
            <div><span class="metakey">Category: </span><?php the_category(', '); ?></div>
        </div>
    </div>
</div>
You’ll see that we’ve been able to use the more advanced format of the the_title() function to specify the post title. The link to the single post page has been generated using the get_permalink() function.
To finish off you’ll now need to add some additional styling to your style.css file:
.article {
    width: 80%;
    margin: 0 auto;
    font-family: book antiqua;
    clear: both;
    height: 320px;
    border-bottom: 1px solid darkgrey;
}
.article:nth-child(odd) .featured-image {   float: right; }
.featured-image {
    width: 40%;
    display: block;
    padding: 30px;
    float: left;
}
.article .content { display: block;    padding: 30px; }
.post-meta {   margin: 0; }
.post-meta div {   width: 100%; }
.article .content h3 { margin: 0; }
.article .content h3 a { text-decoration: none; }
Let’s see what we’ve accomplished so far:
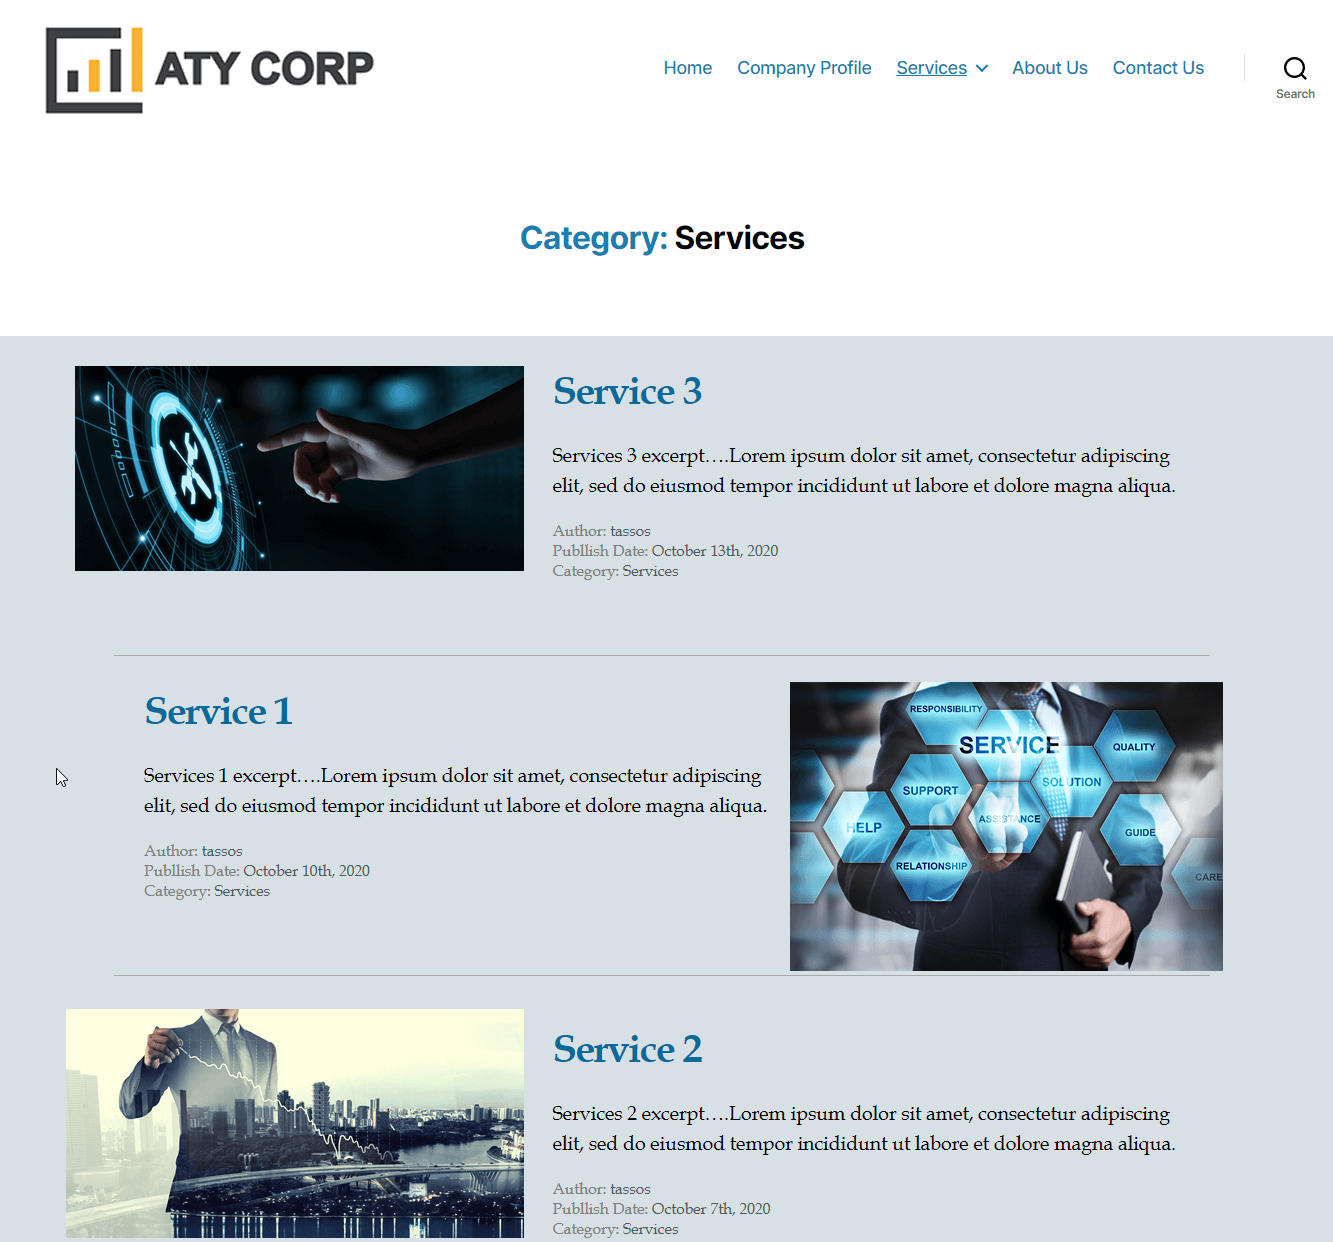
Nice!
As you can see though there are still some issues regarding the image adjustment as they are of different proportions. We can easily fix this by adding some more lines to our CSS in order to center-crop the images and give fixed dimensions:
.featured-image img {
    width: 350px;
    height: 250px;
    object-fit: cover;
}
This way we are still using the original images which isn’t necessarily optimal from a performance-wise perspective. The best practice here is to use WordPress image sizes. If you’d like to make your new page layout responsive, then also take a look at this extensive guide for more information.
And that’s it, well done! You’ve now successfully managed to create your own personalized layout and design for the post category view.
How to Create a WordPress Custom Page Template
So far we’ve created a custom layout for our posts page and also a custom layout for category results. You’ll be able to apply the methods used when creating a custom template for pages as well as exactly the same principles apply.
Before we end this article though, let’s have a quick look at a slightly more complex page template. In this example, we’ll pull our posts pages into our template so that we can display them much in the way that they would look on a category page but with the added benefit of the editability offered by a page (rather than a category page).
Our goal will be to create an overview ‘Services’ page that lists our three business services (in this example, Service 1, Service 2, and Service 3). Rather than manually having to add these to our page, they’ll be dynamically pulled onto the page. Whilst in practice you might not need to worry about this, the coding principles are useful to understand and further demonstrate the flexibility offered by WordPress.
To get started, create a new file inside your theme’s folder and name it something like my-services-template.php. With this done we’ll now add in some necessary declaration comments as we did before with the single post template. We’re also going to use the get_template_part() function.
<?php
/*
 * Template Name: My post category template
 * Template Post Type: page
 */

get_header();   ?>

<div class="clear"></div>
</header> <!-- / END HOME SECTION -->

<div id="content" class="site-content">

<div class="container">

    <div class="content-left-wrap col-md-9">
        <div id="primary" class="content-area">
            <main id="main" class="site-main" role="main">

                <?php while ( have_posts() ) : the_post(); // standard WordPress loop. ?>

                <?php get_template_part( 'template-parts/content', 'cat_services' ); // loading our custom file. ?>

                <?php endwhile; // end of the loop. ?>

            </main><!-- #main -->
        </div><!-- #primary -->
    </div>
    <div class="sidebar-wrap col-md-3 content-left-wrap">
        <?php get_sidebar(); ?>
    </div>

</div><!-- .container -->

<?php get_footer(); ?>
The get_template_part() function is basically a mechanism that allows us to load reusable pieces of code. In this instance, it will grab the contents of template-parts/content-cat_services.php. It’s in this file that we will insert some code that will output the ‘Services’ category posts.
In summary, what the code in this file will do is :
- Give a title to the category page.
- Query the specified category’s posts from the database.
- Loop through the posts and display a layout for each.
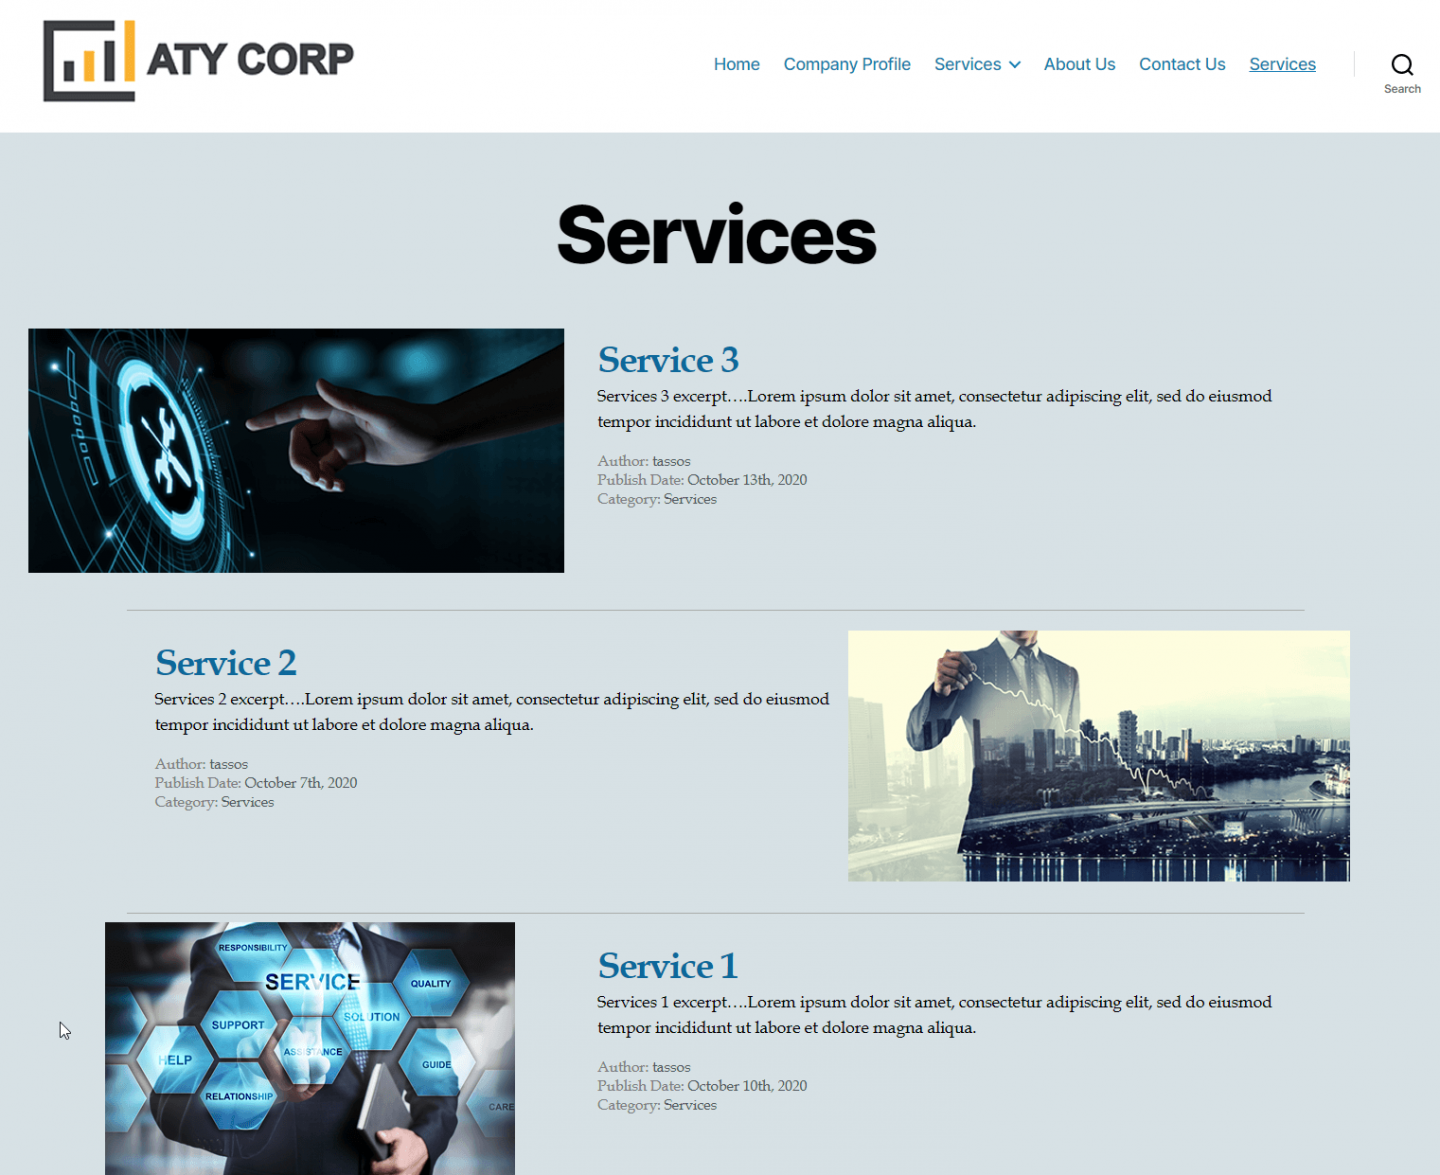
<h1 align="center"><?php the_title(); ?></h1><!-- category page title -->

<?php

$args = array( 'cat'=>4, 'orderby' => 'title' );
$cat_query = new WP_Query( $args ); //Query the specified category’s posts

if($cat_query->have_posts()) {

    while( $cat_query->have_posts() ) {  $cat_query->the_post(); //Loop through the posts
    ?>

    <div class="article" id="post-<?php the_ID(); ?>">
        <div class="featured-image"><!-- FEATURED IMAGE -->
            <?php the_post_thumbnail();	?>
        </div>
        <div class="content"><!-- ARTICLE HEADER -->
            <?php
            the_title( '<h3><a href="' . esc_url( get_permalink() ) . '">', '</a></h3>' );
            ?>
            <div class="excerpt-text"><?php the_excerpt(); ?></div>
            <div class="post-meta">
                <div><span class="metakey">Author: </span><?php the_author_posts_link(); ?></div>
                <div><span class="metakey">Publish Date: </span><?php the_time('F jS, Y'); ?></div>
                <div><span class="metakey">Category: </span><?php the_category(', '); ?></div>
            </div>
        </div>
    </div>
    <?php
    wp_reset_postdata();
    }

}
?>
We will examine queries more thoroughly in a future article. What you need to know for the purposes of this article is that $args = array( 'cat'=>4, 'orderby' => 'title' ); retrieves the post category with the ID Number of 4 (ID=4). This category number relates to our ‘Services’ category.
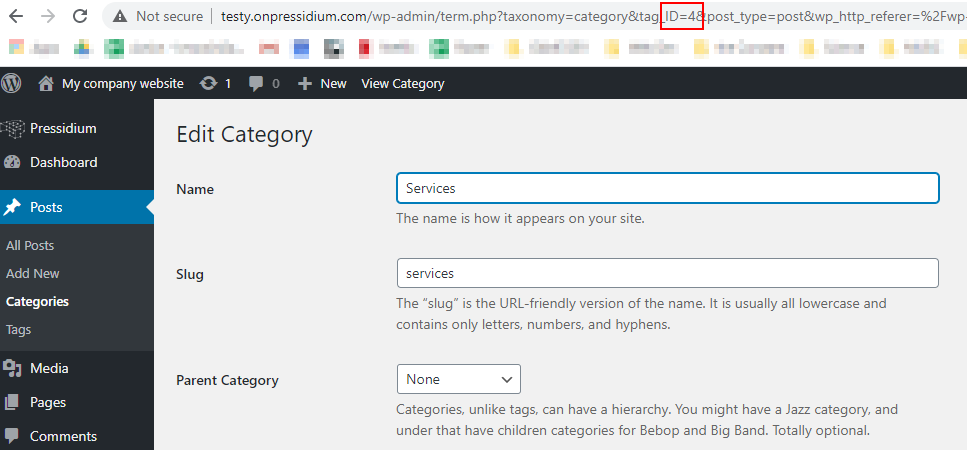
So, how can you see the ID for each category? It is quite simple actually. Go to Menu Posts > Categories and open any category to edit. The ID is in the URL of the category edit page as shown below:
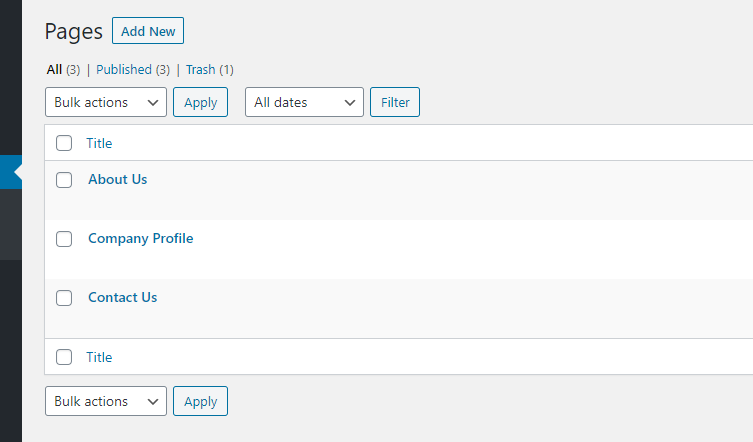
To view our new template we need to go to Pages and create a new page. In the page edit area, you don’t need to enter any content. Instead, just select the ‘My post category template’ option under the Page Attributes drop-down template menu.
Lastly, go to the menu and add a “Services” item for our new page to replace the current Services category item. The menu should now look like this

Let’s see what we did:
The method above shows how to create a WordPress custom page template that pulls in a specific category (in this example our ‘Services’). If you select the same template for another category page you will again see the Services category posts as we specifically requested this with the category ID (ID=4). So, if you wanted a new page template that pulled in a different category you’d need to create a separate template file to do so (and update the Category ID accordingly).
Conclusion
Being able to create your own custom template for your WordPress website gives you the ultimate control over how your website looks. Creating custom templates for the single or category view of your post types is well worth the effort. Not only does it of course allow full control over the design elements of your site but it allows you to quickly replicate a certain layout for future pages.
See Also
Start Your 14 Day Free Trial
Try our award winning WordPress Hosting!