

Introduction
In modern web development, there are often multiple steps you have to do to build and deploy your code to production. For a WordPress theme or plugin, that might mean installing Composer and/or Node.js dependencies, compiling CSS, transpiling JavaScript, and uploading files to your server.
In this article, we’ll explore how you can streamline your WordPress deployment process using GitHub Actions. We’ll create a GitHub Actions workflow to automatically build and deploy a WordPress theme to your Pressidium WordPress site.
If you only clicked for the workflow, scroll to the bottom of this post and dive in right away. However, we’d encourage you to read the entire article, where we explain how everything works in detail!
Prerequisites
- A basic understanding of Git (creating a repository, committing and pushing code, creating branches, etc.)
- Familiarity with the GitHub’s interface
What’s “deployment” in web development?
Deployment in web development is the process of pushing changes to a remote environment, making a website or application available for use.
Sometimes we use the term “deployment” to refer to a set of activities—that include building, testing, and transferring files—while other times we use it synonymously with file transferring. In this article, we always distinguish between building and deploying.
There are many ways to push your website’s files to a hosting provider. In our case, we’ll utilize the Secure File Transfer Protocol (SFTP) which, as the name suggests, is a network protocol for transferring files over a secure channel, such as SSH.
What’s GitHub Actions?
GitHub Actions is a continuous integration and continuous delivery (CI/CD) platform that allows you to automate your build and deployment pipeline.
In the following paragraphs, we’ll explore how to create a GitHub Actions workflow to build and deploy a WordPress theme leveraging a hosting provider that supports staging environments.
Staging is a pre-production environment for testing that’s nearly an exact replica of a production environment. It seeks to mirror an actual production environment as closely as possible, so changes can be tested there before they’re applied to a production environment.
If you’re already using Pressidium, staging environments are included for free in all plans. Read this KB article for more information.
What’s a GitHub Actions workflow?
A workflow is an automated process that gets triggered by one or more events, and runs one or more jobs. Each job contains one or more steps. Finally, each step can either run a script or a GitHub Action. A repository can have multiple workflows, performing different tasks.
There are many benefits to using a GitHub Actions workflow.
- You spend less time doing manual, labor-intensive, repetitive work; more time adding value
- It’s easier to be consistent across environments by enforcing a specific deployment process
- It integrates with your GitHub repository, allowing you to track changes, access deployment logs, etc.
- It’s reusable, which means that you can use the same workflow in all your repositories
Getting started
Let’s get started with your very first workflow by creating a new YAML file in the .github/workflows/ directory in your GitHub repository. We’ll start with a simple workflow to automatically deploy to production, so let’s name this file deploy.yml.
# .github/workflows/deploy.yml

name: deploy
on:
  push:
    branches:
      # Pushing to the `main` branch
      # will trigger our workflow
      - main
We use the on keyword to define which events may trigger the workflow. In this example, the workflow will run when a push is made to the main branch.
We probably don’t need to deploy at all when certain files change, like README.md. We can use on.push.paths-ignore to exclude file path patterns.
name: deploy
on:
  push:
    branches:
      - main
    paths-ignore:
      - 'bin/**'
      - 'README.m
Creating your first job
A workflow is made up of one or more jobs. In this example, you’ll use a single deploy job to upload your files to your website’s production environment.
name: deploy
on:
  [...]

jobs:
  deploy:
    runs-on: ubuntu-latest
    steps:
       [...]
Each job runs in a runner environment, specified by runs-on. In the YAML block above, we use ubuntu-latest which is an Ubuntu Linux virtual machine (VM), hosted by GitHub with the runner application and other tools preinstalled.
You can either use a GitHub-hosted runner or host your own runners and customize the environment used to run jobs. However, the latter is out of the scope of this article.
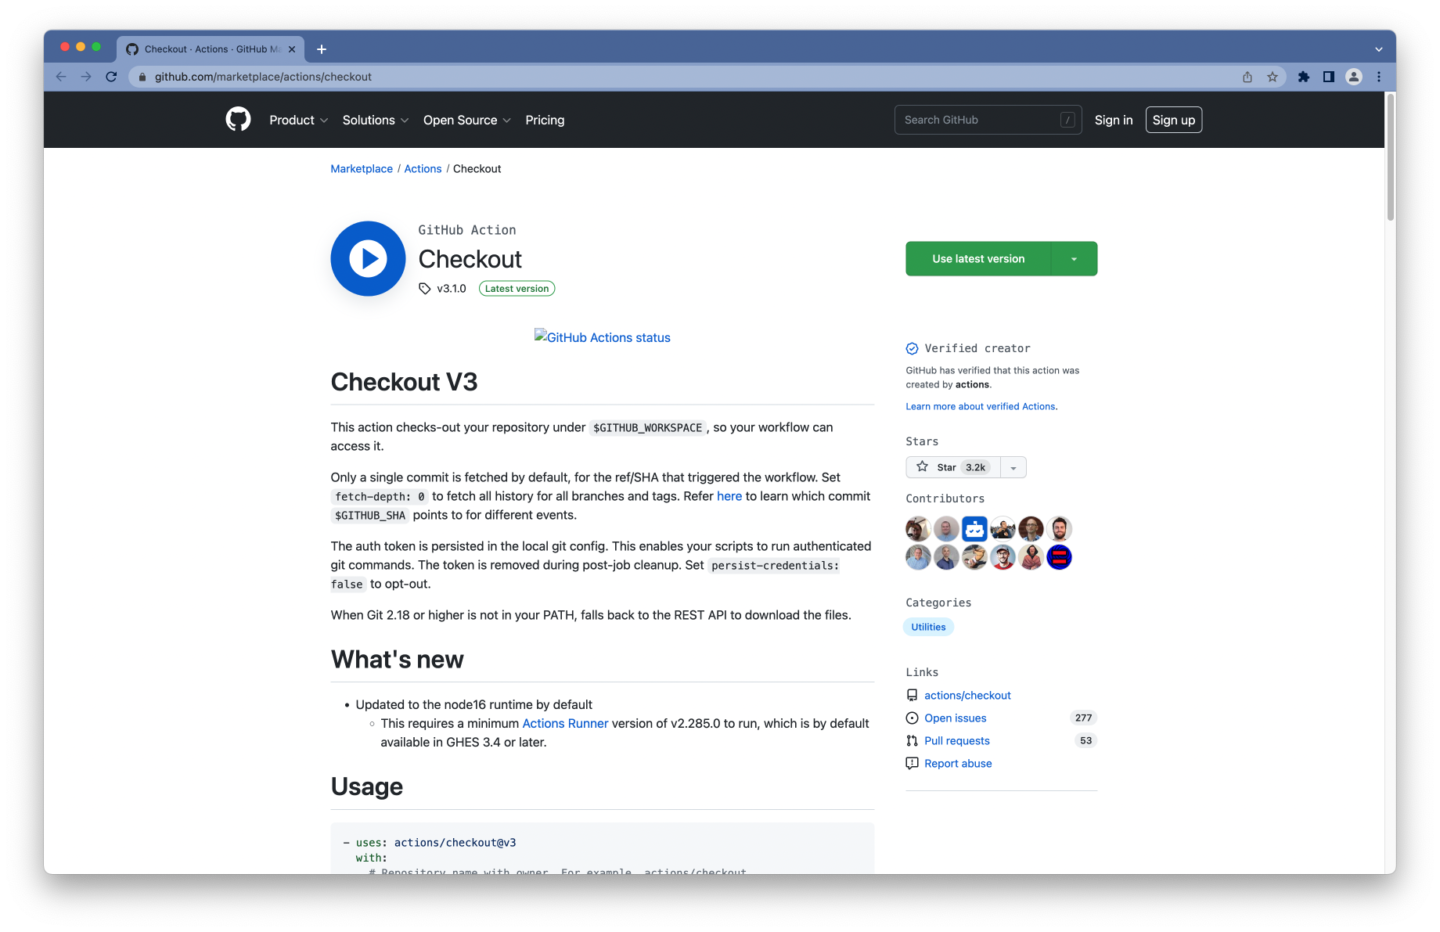
Checking out your Git repository
Before you can do anything meaningful with your code, you have to check out your repository, so your workflow can access it. You can use the checkout action for that.
jobs:
  deploy:
    runs-on: ubuntu-latest
    steps:
      - name: Checkout
        # Checkout our repository under `${GITHUB_WORKSPACE}`,
        # so our workflow can access it
        uses: actions/checkout@v3
        with:
          # Fetch the entire Git history
          fetch-depth: 0
We specify a fetch-depth of 0, which will result in fetching the entire Git history. We need this to upload only files that have changed in subsequent runs.
Creating an SFTP user
To upload your files to your hosting provider, you’ll need your SFTP connection details (i.e. host, network port, and path) and an SFTP user.
Try our Award-Winning WordPress Hosting today!


Most of the time, you can find these details and create an SFTP user via your hosting provider’s dashboard. Some web hosts will also email you these details.
If you’re already using Pressidium, follow these steps:
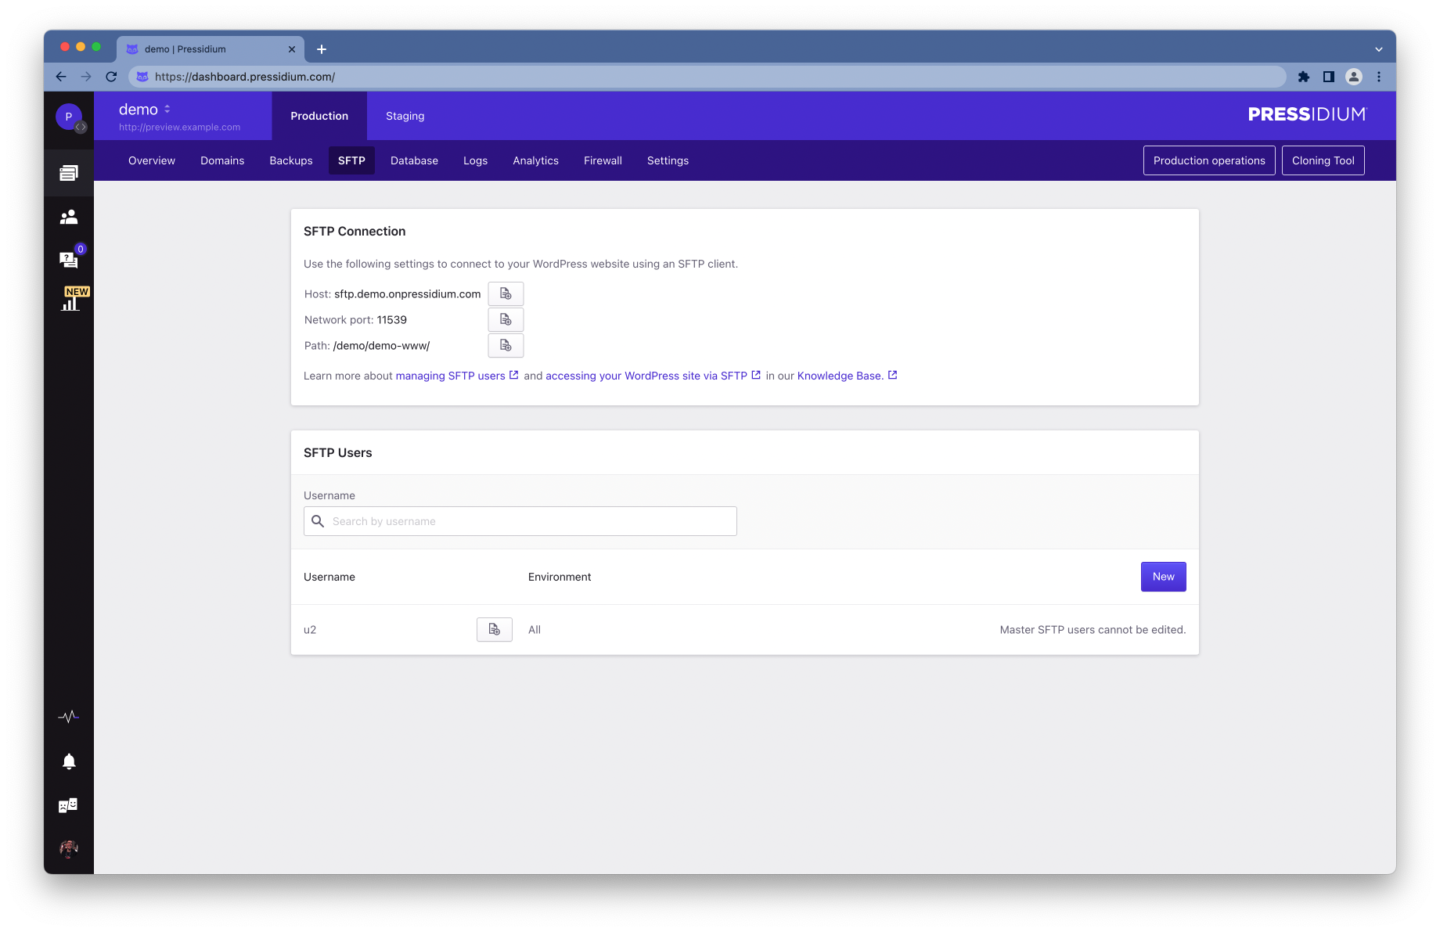
- Log in to your Pressidium Dashboard
- Select the Websites menu option from the Dashboard sidebar
- Click on your website’s name
- Navigate to the SFTP tab by clicking the link on the navigation bar
- Keep a note of your SFTP Connection details
- Create a new SFTP user
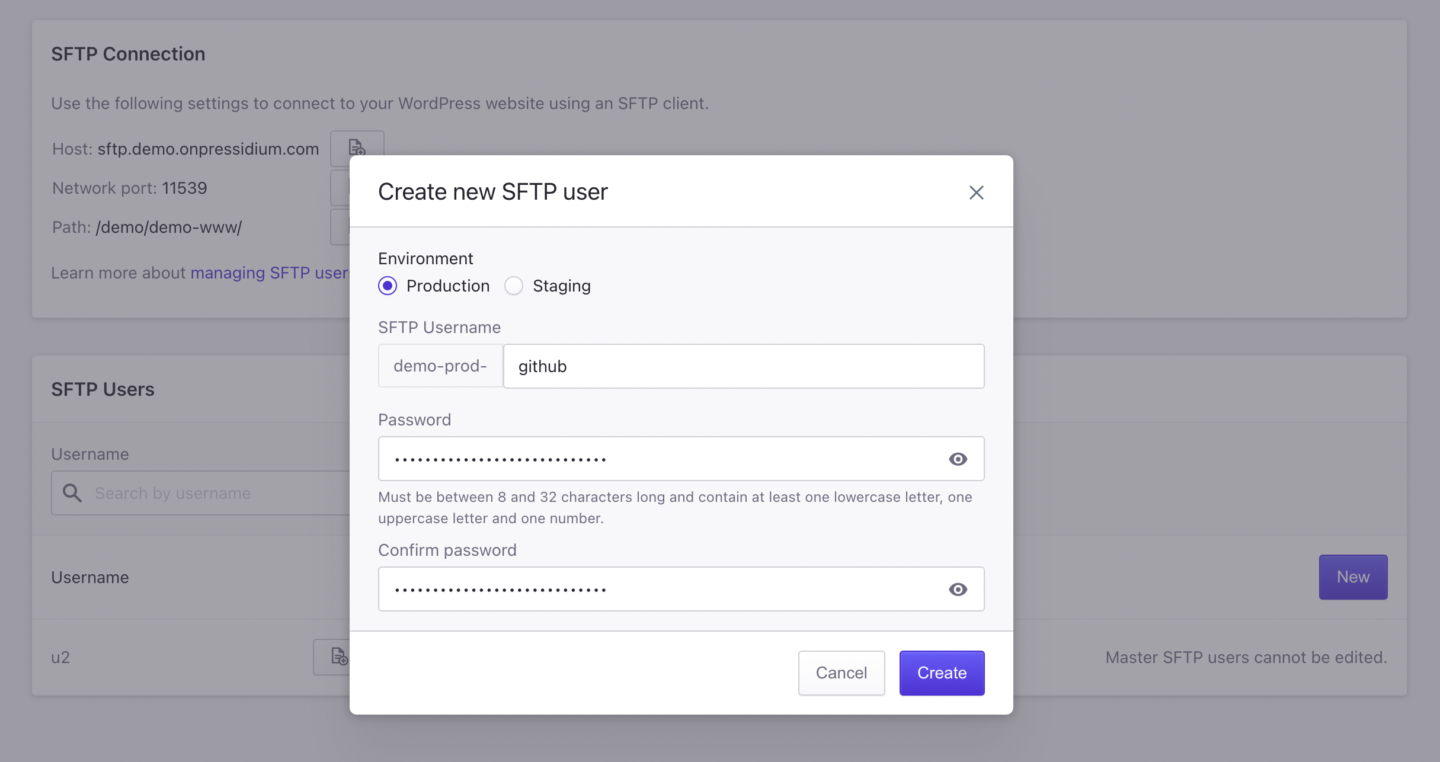
To create a new SFTP user:
- Click New
- Select the Environment (Production or Staging)
- Provide a username and a password (a strong password, mixed lowercase and uppercase Latin characters, numbers, and special characters is recommended)
- Keep a note of the username and password you entered
- Click Create to create the user
At the second step, you should choose the environment you want to deploy to. For this example, we’ll create a user for each environment.
For more information about accessing your Pressidium WordPress site via SFTP, refer to this KB article.
Storing sensitive information
You could enter your SFTP connection details and SFTP user credentials directly in your GitHub Actions workflow. However, storing sensitive information in your repository is a bad idea.
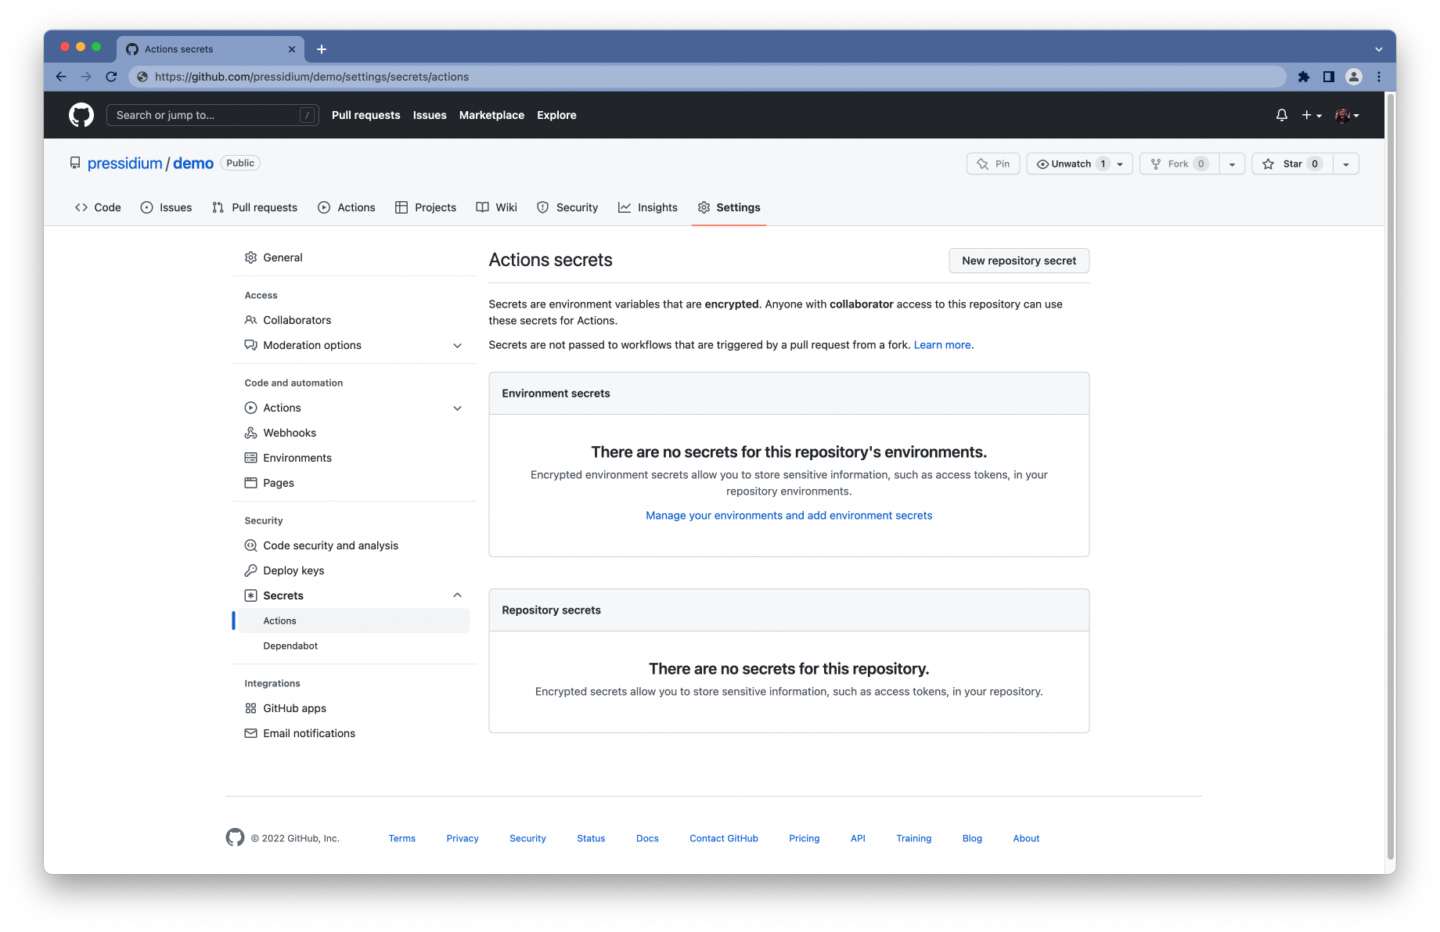
GitHub offers encrypted secrets as a way to store sensitive information in your organization, repository, or repository environment.
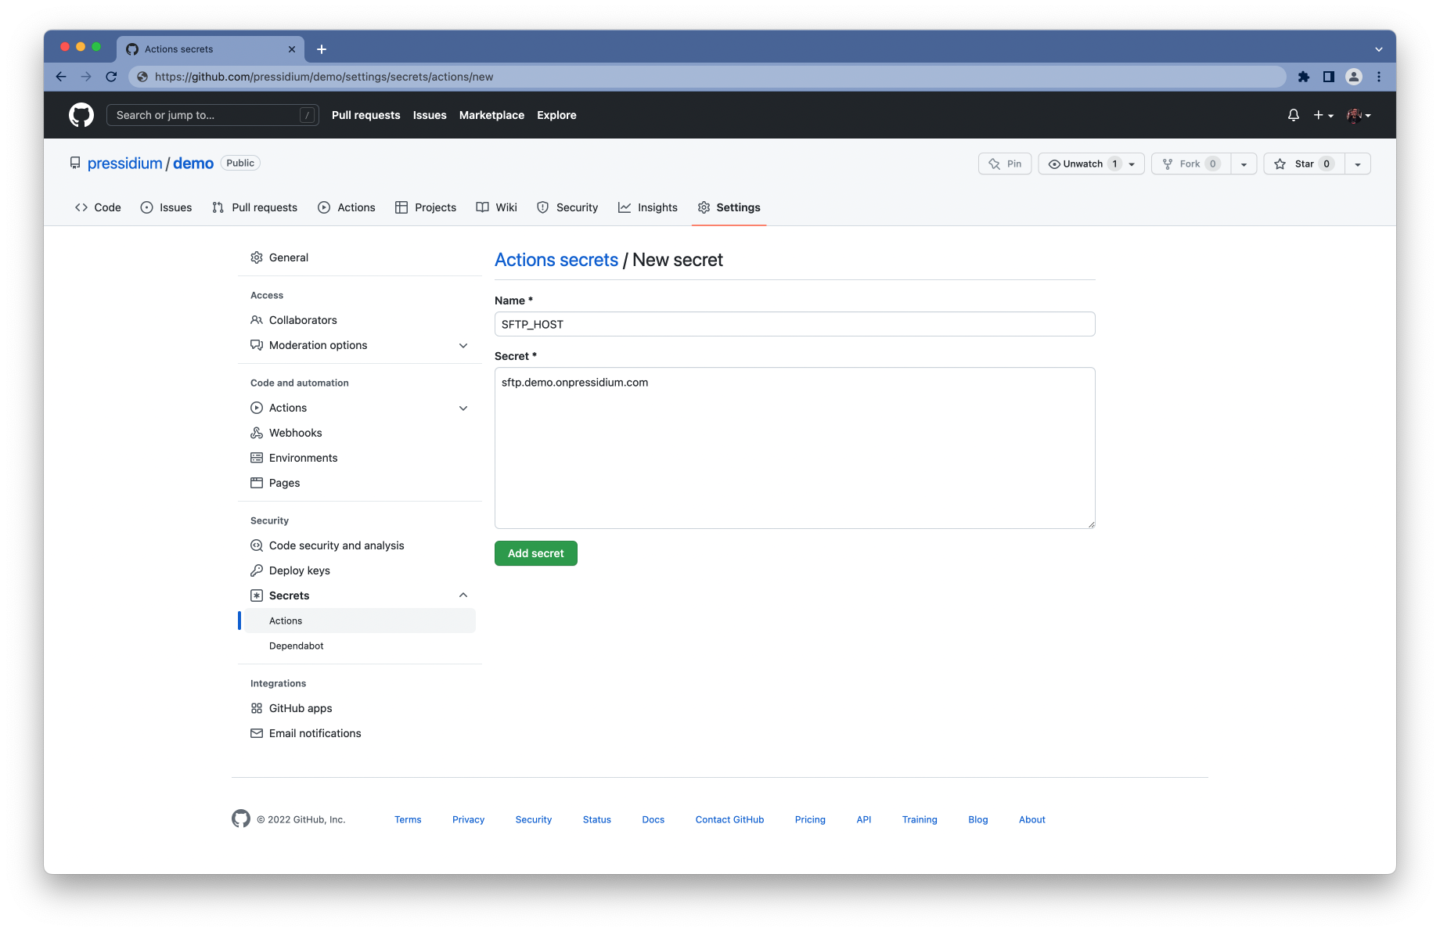
To create an encrypted secret for a repository:
- Log in to your GitHub account
- Navigate to the main page of your repository
- Under your repository name, click Settings
- Select Secrets and click Actions, under the Security section of the sidebar
- Click the New repository secret button
- Type the secret name and its value
- Click Add secret
You should end up with a list of secrets similar to this one:
SFTP_HOSTThe hostname of the SFTP serverSFTP_PORTThe port of the SFTP serverSFTP_USERThe username to use for authenticationSFTP_PASSThe password to use for authentication
Uploading files via SFTP
To upload your files via SFTP, you can use—you guessed it—another GitHub Action.
There are multiple SFTP clients and GitHub Actions to choose from. We went with our own lftp-mirror-action, which uses lftp under the hood. A file transfer tool that supports SFTP and can transfer several files in parallel.
- name: Deploy via SFTP
  uses: pressidium/lftp-mirror-action@v1
  with:
    host: ${{ secrets.SFTP_HOST }}
    port: ${{ secrets.SFTP_PORT }}
    user: ${{ secrets.SFTP_USER }}
    pass: ${{ secrets.SFTP_PASS }}
    remoteDir: '/demo-www/wp-content/themes/my-theme'
    options: '--verbose'
Configuring the inputs of the lftp-mirror-action is pretty straightforward:
- Your SFTP Connection details and SFTP user credentials can be accessed through the
secretscontext (e.g.${{ secrets.SFTP_HOST }}) - The
remoteDiris the path to your theme’s directory - The
'--verbose'option will enable verbose output, which is going to log all file transfers (useful for troubleshooting)
On Pressidium, paths are formatted like this:
YOUR_INSTALLATION_NAME-www/as the root path of the production environmentYOUR_INSTALLATION_NAME-dev-www/as the root path of the staging environment
where YOUR_INSTALLATION_NAME is the name of your installation. Note that the account owner has an SFTP account, displayed as a “master” account, that has access to all websites, so their paths will differ from the ones above. It’s recommended to avoid using this account and instead create a separate account for each website you want to access.
Optionally, you can create a .lftp_ignore file in your repository, including any file patterns you wish to exclude from deploying.
Here’s an example of what this might look like:
## Directories to ignore
.vscode/**
.env.**
.git/
.github/

## Files to ignore
.gitignore
package.json
package-lock.json
composer.json
composer.lock
Putting it all together
name: deploy
on:
  push:
    branches:
      - main
    paths-ignore:
      - 'bin/**'
      - 'README.md'

jobs:
  deploy:
    runs-on: ubuntu-latest
    steps:
      - name: Checkout
        uses: actions/checkout@v3
        with:
          fetch-depth: 0

      - name: Deploy via SFTP
        uses: pressidium/lftp-mirror-action@v1
        with:
          host: ${{ secrets.SFTP_HOST }}
          port: ${{ secrets.SFTP_PORT }}
          user: ${{ secrets.SFTP_USER }}
          pass: ${{ secrets.SFTP_PASS }}
          remoteDir: '/demo-www/wp-content/themes/my-theme'
          options: '--verbose'
That’s it! Your workflow can now automatically deploy your WordPress theme.
Building and deploying your WordPress theme
So far, we kept things simple by focusing on just deploying your files while ignoring any dependencies you might need to install, build scripts you might need to run, and so on and so forth.
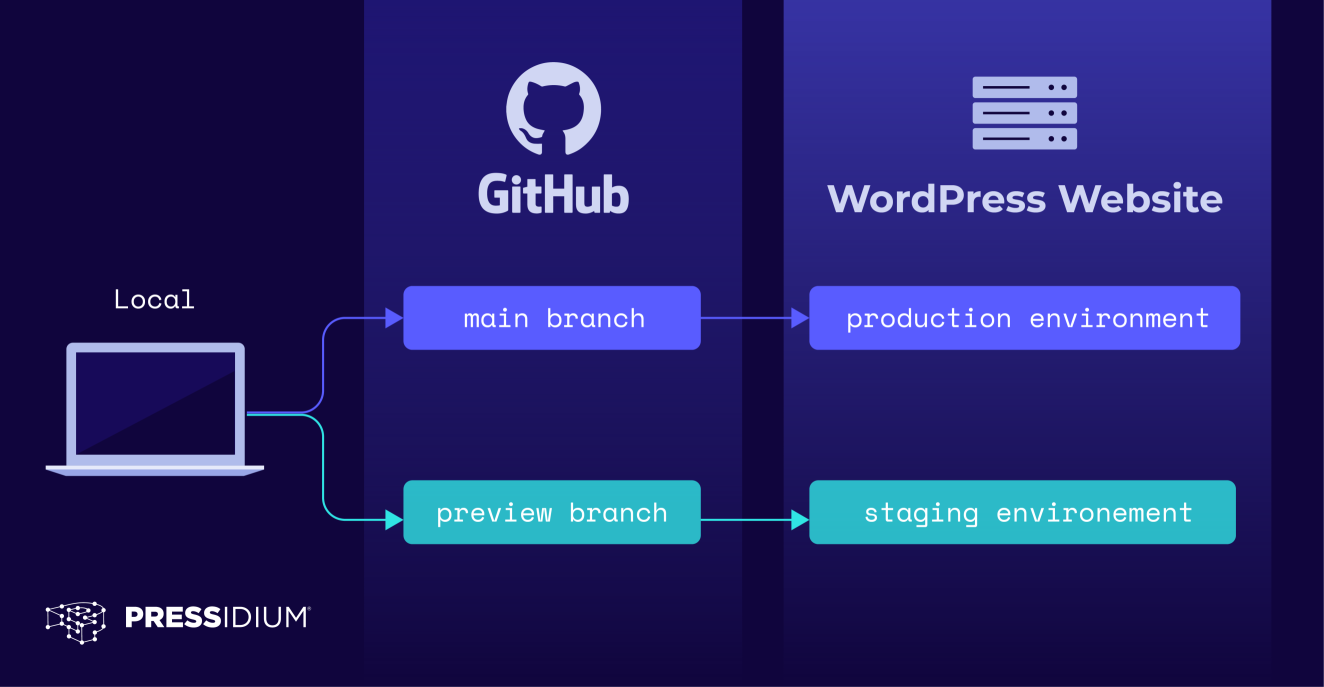
As an example setup, we’ll use a GitHub repository with two branches:
- the stable, production-ready
mainbranch, which will be deployed to a production environment - the untested
previewbranch, which serves as an integration branch for features and will be deployed to a staging environment
Time to introduce a build job and rename our workflow to build-deploy, since it’s going to be responsible for building and deploying our code.
name: build-deploy
on:
  push:
    branches:
      - main
    paths-ignore:
      - 'bin/**'
      - 'README.md'
jobs:
  build:
    runs-on: ubuntu-latest
    steps:
      [...]

  deploy:
    [...]
Checking out your Git repository
Each job runs in a fresh instance of a runner image, so you have to check out your GitHub repository once again in the build job.
build:
  runs-on: ubuntu-latest
  steps:
    - name: Checkout
      uses: actions/checkout@v3
You don’t have to fetch the entire Git history in the build job, so you can stick with the default values for the action’s inputs.
Installing dependencies
Some themes utilize third-party packages and libraries. If your theme requires any PHP and/or JavaScript packages you may want to use a package manager, like Composer, npm or yarn.
For the sake of this example, we’ll assume that you need to install both Composer and Node.js dependencies. Fortunately for us, there are ready-to-use actions for that.
steps:
  - name: Checkout
    uses: actions/checkout@v3

  - name: Install Composer dependencies
    uses: php-actions/composer@v6

  - name: Install Node.js LTS
    uses: actions/setup-node@v3
    with:
       node-version: 'lts/*'
       cache: 'yarn'

  - name: Install Node.js dependencies
    run: yarn install
The composer action will run composer install by default, so you don’t have to configure any of its input parameters.
For the setup-node action, we set custom values for the node-version and cache inputs to specify that we want to:
- get the long-term support (or LTS) version of Node.js
- cache any dependencies fetched via the yarn package manager
Then, the next step will run yarn install to install the Node.js dependencies. Remember, a step can either run a script or a GitHub Action.
Note that caching can significantly speed up your workflow. Downloading dependencies every time your workflow runs will result in a longer runtime. You can cache dependencies for a job using the cache action (which is what the setup-node action also does under the hood), speeding up the time it takes to recreate files.
Running your build process
Once again, we’ll assume that you need to execute a “build” process—you might need to run a preprocessor to compile your stylesheets, transpile your ES6+ scripts, etc. That usually means that you’ve defined a build script in your package.json file.
So, you’ll need another step to run that build process.
- name: Build theme
  run: yarn run build
If you need to run a different script for the main and preview branches (e.g. build for the main branch, and staging for preview), you can do it like so:
- name: Build theme
  run: |
    if [[ "${{ github.base_ref }}" == "main" || "${{ github.ref }}" == "refs/heads/main" ]]; then
      yarn run build
    else
      yarn run staging
    fi
Finally, since each job runs in a fresh instance of a runner image, jobs in your workflow are completely isolated. That means, you need a way to temporarily store the files you just built, so they can be accessed by the deploy job. Enter artifacts.
Artifacts
Artifacts allow you to persist data after a job is complete, so you can share data between jobs in a workflow.
Let’s introduce an additional step to your build job to persist data produced during the build steps with a retention period of 1 day, using the Upload-Artifact action. We’ll assume that Composer installs its dependencies in the vendor/ directory, and our build script exports files into the dist/ directory.
- name: Upload artifact
  uses: actions/upload-artifact@v3
  with:
    name: my-theme-build
    path: |
      dist/
      vendor/
    retention-days: 1
Depending on the size of your repository and how frequently you push, you might want to take a look at GitHub’s Usage limits, billing, and administration.
At the time of writing, by default, GitHub stores build logs and artifacts for 90 days and provides 500 MB of storage on the “GitHub Free” plan.
Running jobs sequentially
A workflow is made up of one or more jobs, which run in parallel by default. In our case, we have to build our theme before we can deploy it. To run your build and deploy jobs sequentially, you have to define a dependency using the jobs.<job_id>.needs keyword.
deploy:
  runs-on: ubuntu-latest
  needs: build
In the example below, we state that the build job must complete successfully before the deploy job can run.
name: build-deploy
on:
  [...]

jobs:

  build:
    runs-on: ubuntu-latest
    steps:
       [...]

  deploy:
    runs-on: ubuntu-latest
    needs: build
    steps:
      [...]
Downloading the artifact
Before you can upload any data built during the build steps, you have to download them. Let’s revisit the deploy job and introduce an additional step.
- name: Download artifact
  uses: actions/download-artifact@v3
  with:
    name: my-theme-build
    path: .
You can use the Download-Artifact action similarly to Upload-Artifact. Make sure that you specify the same name―my-theme-build, in this instance―for both actions.
Putting it all together
name: build-deploy
on:
  push:
    branches:
      - main
    paths-ignore:
      - 'bin/**'
      - 'README.md'

jobs:
  build:
    runs-on: ubuntu-latest
    steps:
      - name: Checkout
        uses: actions/checkout@v3

      - name: Install Composer dependencies
        uses: php-actions/composer@v6

      - name: Install Node.js LTS
        uses: actions/setup-node@v3
        with:
          node-version: 'lts/*'
          cache: 'yarn'

      - name: Install Node.js dependencies
        run: yarn install

      - name: Build theme
        run: |
          if [[ "${{ github.base_ref }}" == "main" || "${{ github.ref }}" == "refs/heads/main" ]]; then
            yarn run build
          else
            yarn run staging
          fi

      - name: Upload artifact
        uses: actions/upload-artifact@v3
        with:
          name: my-theme-build
          path: |
            dist/
            vendor/
          retention-days: 1

  deploy:
    runs-on: ubuntu-latest
    needs: build
    steps:
      - name: Checkout
        uses: actions/checkout@v3
        with:
          fetch-depth: 0

      - name: Download artifact
        uses: actions/download-artifact@v3
        with:
          name: my-theme-build
          path: .

      - name: Deploy via SFTP
        uses: pressidium/lftp-mirror-action@v1
        with:
          host: ${{ secrets.SFTP_HOST }}
          port: ${{ secrets.SFTP_PORT }}
          user: ${{ secrets.SFTP_USER }}
          pass: ${{ secrets.SFTP_PASS }}
          remoteDir: '/demo-www/wp-content/themes/my-theme'
          options: '--verbose'
Now you have a GitHub Actions workflow that can automatically build and deploy your code to production when you push to the main branch! However, at the beginning of this article, we described a workflow that’d be able to deploy to both production and staging environments, depending on the branch you’re pushing to. If you’re still up for it, just keep reading!
Deploying your theme to multiple environments
Deploying to multiple environments may require changing your workflow a bit. For instance, having separate SFTP users for each environment is often recommended and considered a best practice. In Pressidium, SFTP users are different for the production and staging environments of a website.
So, let’s create different secrets for the username/password of each user. That means, that our updated list of encrypted secrets should look like this:
SFTP_HOSTSFTP_PORTSFTP_PROD_USERSFTP_PROD_PASSSFTP_STAG_USERSFTP_STAG_PASS
You might also have to update the host and network port. Though, in this case, there’s no need to change those, since they’re identical for both environments.
Setting environment variables
An environment variable is a variable, made up of a name/value pair, and it’s part of the environment in which a process runs.
In a GitHub Actions workflow, you can use the env keyword to set a custom environment variable that’s scoped for:
- The entire workflow, by using
envat the top level of the workflow - A job within a workflow, by using
envat the level of that job - A specific step within a job, by using
envat the level of that step
You can also append environment variables to $GITHUB_ENV, which makes that variable available to any subsequent steps in a workflow job.
As you can see, there are multiple ways to build your workflows. So, feel free to use whichever makes the most sense to you.
In our case, we set environment variables within a step of a job to temporarily store values and access them from another step that runs later in our workflow. We’ll append environment variables to $GITHUB_ENV within steps that run for push events to specific branches to showcase how you can conditionally set your custom variables.
- name: Set environment variables (main)
  if: github.ref == 'refs/heads/main'
  run: |
    echo "SFTP_USER=${{ secrets.SFTP_PROD_USER }}" >> $GITHUB_ENV
    echo "SFTP_PASS=${{ secrets.SFTP_PROD_PASS }}" >> $GITHUB_ENV
    echo "DEPLOY_PATH=/demo-www/wp-content/themes/my-theme" >> $GITHUB_ENV

- name: Set environment variables (preview)
  if: github.ref == 'refs/heads/preview'
  run: |
    echo "SFTP_USER=${{ secrets.SFTP_STAG_USER }}" >> $GITHUB_ENV
    echo "SFTP_PASS=${{ secrets.SFTP_STAG_PASS }}" >> $GITHUB_ENV
    echo "DEPLOY_PATH=/demo-dev-www/wp-content/themes/my-theme" >> $GITHUB_ENV
We use the if keyword to limit each step to a specific branch. That way, Set environment variables (main) will run only if changes were pushed to the main branch.
The $DEPLOY_PATH might also differ for each environment.
For instance, on Pressidium:
- Paths for production environments follow the
/<WEBSITE_NAME>-www/format - Paths for staging environments follow the
/<WEBSITE_NAME>-dev-www/format
Setting outputs
We’d like to use the environment variables we just set as inputs to the GitHub Action that’s going to transfer files via SFTP.
Unfortunately, at the moment, it doesn’t seem to be possible to reference environment variables as inputs of a GitHub Action. You can work around that by creating an additional step that will output the values you’ll need to use as inputs later on.
- name: Set outputs
  # Workaround to reference environment variables as inputs
  # using step outputs, since we can't pass environment
  # variables as inputs at the moment.
  id: sftp_details
  run: |
    echo "user=${SFTP_USER}" >> $GITHUB_OUTPUT
    echo "pass=${SFTP_PASS}" >> $GITHUB_OUTPUT
    echo "deploy_path=${DEPLOY_PATH}" >> $GITHUB_OUTPUT
You now have user, pass, and deploy_path outputs for the sftp_details step, which you can use to reference these values as the inputs of your next step.
Uploading files to different environments
Uploading files via SFTP is pretty much the same as before, but instead of referencing the secrets context and hard-coding the remoteDir, you’ll use the outputs of the previous step.
- name: Deploy via SFTP
  uses: pressidium/lftp-mirror-action@v1
  with:
    host: ${{ secrets.SFTP_HOST }}
    port: ${{ secrets.SFTP_PORT }}
    user: ${{ steps.sftp_details.outputs.user }}
    pass: ${{ steps.sftp_details.outputs.pass }}
    remoteDir: ${{ steps.sftp_details.outputs.deploy_path }}
    options: '--verbose'
Use ${{ steps.<step_id>.outputs.<output_name> }} to access the output of a step. For example, ${{ steps.sftp_details.outputs.user }} to access the user output of the sftp_details step.
Phew, finally! Your workflow can now build and deploy your WordPress theme to both your production and staging environments.
Putting the complete workflow together
name: build-deploy
on:
  push:
    branches:
      # Pushing to any of the following
      # branches will trigger our workflow
      - main
      - preview
    paths-ignore:
      # When all the path names match patterns in `paths-ignore`
      # the workflow will not run. We don't want to do anything
      # if we have changed *only* (some of) these files
      - 'bin/**'
      - 'README.md'

jobs:
  build:
    runs-on: ubuntu-latest
    steps:
      - name: Checkout
        # Checkout our repository under `${GITHUB_WORKSPACE}`,
        # so our workflow can access it
        uses: actions/checkout@v3

      - name: Install Composer dependencies
        # This will run `composer install`
        # since that's its default command
        uses: php-actions/composer@v6

      - name: Install Node.js LTS
        # We use the LTS version of Node.js
        # and cache packages installed via yarn
        uses: actions/setup-node@v3
        with:
          node-version: 'lts/*'
          cache: 'yarn'

      - name: Install Node.js dependencies
        run: yarn install

      - name: Build theme
        # Run the `build` script for production,
        # and the `staging` script for staging
        run: |
          if [[ "${{ github.base_ref }}" == "main" || "${{ github.ref }}" == "refs/heads/main" ]]; then
            yarn run build
          else
            yarn run staging
          fi

      - name: Upload artifact
        # Persist data produced during the build steps
        # with a retention period of 1 day
        uses: actions/upload-artifact@v3
        with:
          name: my-theme-build
          path: |
            dist/
            vendor/
          retention-days: 1

  deploy:
    runs-on: ubuntu-latest
    needs: build
    steps:
      - name: Checkout
        uses: actions/checkout@v3
        with:
          # Fetch the entire Git history
          fetch-depth: 0

      - name: Download artifact
        uses: actions/download-artifact@v3
        with:
          name: my-theme-build
          path: .

      - name: Set environment variables (main)
        if: github.ref == 'refs/heads/main'
        run: |
          echo "SFTP_USER=${{ secrets.SFTP_PROD_USER }}" >> $GITHUB_ENV
          echo "SFTP_PASS=${{ secrets.SFTP_PROD_PASS }}" >> $GITHUB_ENV
          echo "DEPLOY_PATH=/demo-www/wp-content/themes/my-theme" >> $GITHUB_ENV

      - name: Set environment variables (preview)
        if: github.ref == 'refs/heads/preview'
        run: |
          echo "SFTP_USER=${{ secrets.SFTP_STAG_USER }}" >> $GITHUB_ENV
          echo "SFTP_PASS=${{ secrets.SFTP_STAG_PASS }}" >> $GITHUB_ENV
          echo "DEPLOY_PATH=/demo-dev-www/wp-content/themes/my-theme" >> $GITHUB_ENV

      - name: Set outputs
        # Workaround to reference environment variables as inputs
        # using step outputs, since we can't pass environment
        # variables as inputs at the moment.
        id: sftp_details
        run: |
          echo "user=${SFTP_USER}" >> $GITHUB_OUTPUT
          echo "pass=${SFTP_PASS}" >> $GITHUB_OUTPUT
          echo "deploy_path=${DEPLOY_PATH}" >> $GITHUB_OUTPUT

      - name: Deploy via SFTP
        uses: pressidium/lftp-mirror-action@v1
        with:
          host: ${{ secrets.SFTP_HOST }}
          port: ${{ secrets.SFTP_PORT }}
          user: ${{ steps.sftp_details.outputs.user }}
          pass: ${{ steps.sftp_details.outputs.pass }}
          remoteDir: ${{ steps.sftp_details.outputs.deploy_path }}
          options: '--verbose'
You can also find an example WordPress theme and GitHub Actions workflow on this GitHub repository.
Conclusion
There you have it! GitHub Actions are a powerful tool that makes it easy to automate building and deploying your WordPress themes and plugins.
We’ve barely scratched the surface of what you can achieve with GitHub Actions. Your next steps could be automatically running any tests you might have, opening issues or notifying on Slack when a deployment is done, and the list goes on.
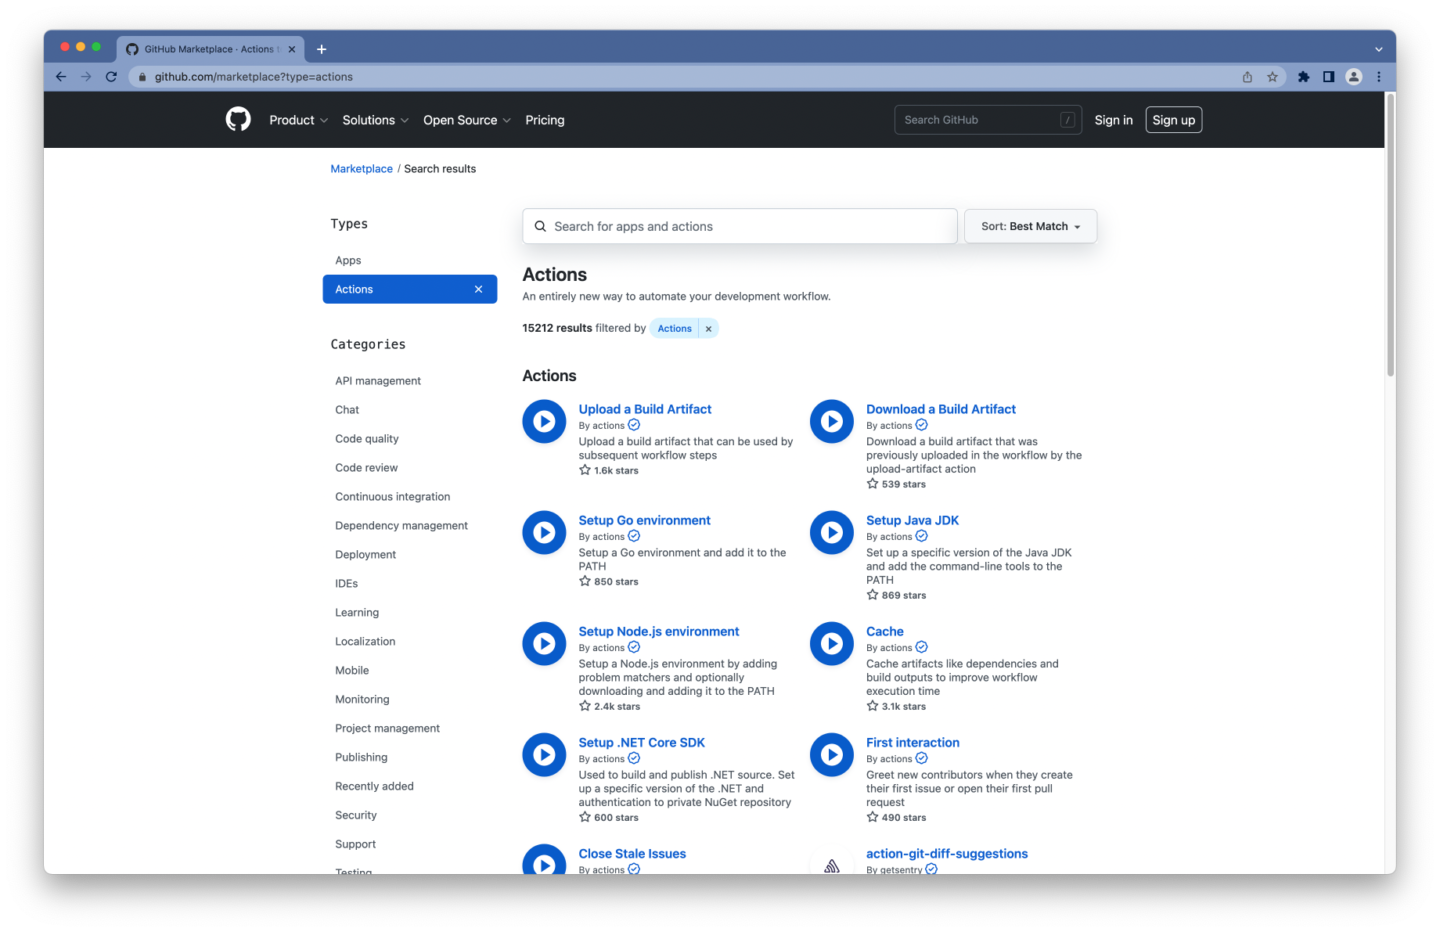
Take a look at the GitHub Marketplace where―at the time of writing―you can find over 15,000 actions to use in your GitHub Actions workflows.
So, what are you waiting for?
- Take a look at the workflow of this repository on GitHub
- Create a new YAML file under
.github/workflows/in your Git repository - Enjoy automated builds and deployments
Happy deployments!
Start Your 14 Day Free Trial
Try our award winning WordPress Hosting!


