

Everyone who uses WordPress will be familiar with the WordPress Admin Tables that appear in all core overview areas such as Pages and Posts. The same format is used for these types of tables throughout WordPress meaning you quickly become adept at using these. But did you know that you can modify the WordPress Admin Tables and alter the displayed information or add your own extra columns?
In this article we will explain how you can do this. Let’s get started!
The Hooks
In order to show the admin tables data, WordPress extends the WP_List_Table built-in Class. The WP_List_Table Class is introduced as a private class in the wp-admin/includes/class-wp-list-table.php file. Private classes are named private as they are only intended for use by other core classes and functions and not by developers.
WordPress offers you the ability to alter admin tables. To manipulate the tables columns you have to use one of the filter hooks that WordPress provides in the wp-admin/includes/class-wp-posts-list-table.php file.
In this file, the WP_Posts_List_Table Class extends the WP_List_Table Class and redefines its properties and methods in order to populate the admin tables according to its post type. You can use the manage_posts_columns hook for the posts table, the manage_pages_columns for the pages and manage_{$post_type}_posts_columns if you want to manipulate the columns of a custom post type table.
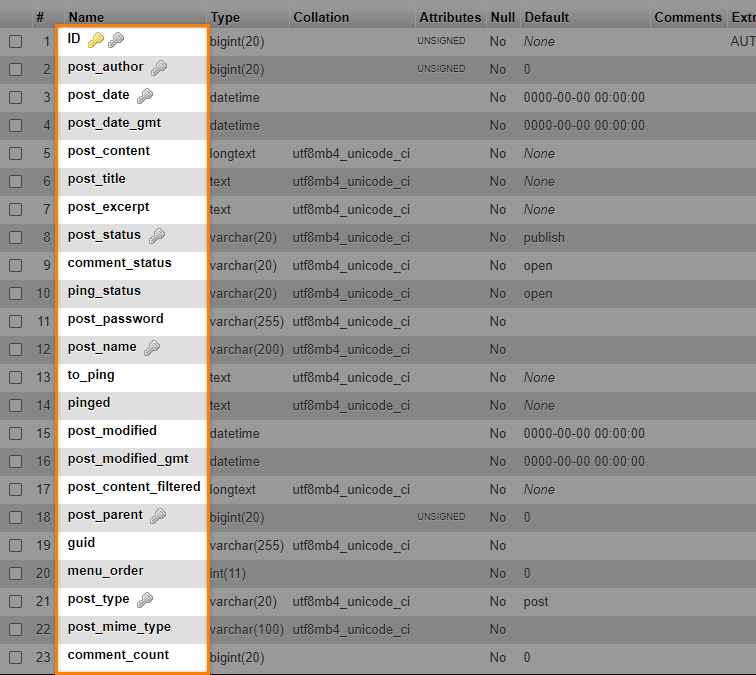
The columns that are used by default for the table data are also described in this file. Around line 616 the $posts_columns array is introduced and the following columns are added:
- The ‘cb’ checkbox column for bulk actions
- The post ‘title’ column
- The ‘author’ column for the Post author
- The ‘categories’ column for the Categories the post belongs to
- The post’s ‘tags’ column
- The ‘comments’ column
- The published ‘date’ column
Adding a Custom Column to the Admin Tables
Adding a custom column to a table is something that developers frequently need to do. In addition, being able to sort your columns is also very handy when organizing content. We will demonstrate how a custom column is implemented for posts, pages and custom post types and how we can make these custom columns sortable.
The Posts List Tables
As an example let’s see how we could add a column that describes when a post was last modified. This could be a really useful feature to have, especially if you run a blog with lots of posts and want to be able to check when each was last updated. Let’s see how this can be implemented.
To begin, we have to add the new column’s name to the array of column header names. Let’s take a closer look at line 663 of the class-wp-posts-list-table.php file.
if ( 'page' === $post_type ) {
	$posts_columns = apply_filters( 'manage_pages_columns', $posts_columns );
} else {
	$posts_columns = apply_filters( 'manage_posts_columns', $posts_columns, $post_type );
}
In this part of code it is clear that we should use the manage_posts_columns filter (see here for more info on this) since we want to make the changes to the posts list table. To add the column’s name to the array of column headers we will edit the functions.php file of our active theme and insert this piece of code:
add_filter('manage_posts_columns','add_custom_columns');
function add_custom_columns( $columns ) {
    $columns['last_modified'] = 'Last modified';
    return $columns;
}
Now if we refresh the admin posts list page we can see the extra column. There will be no data in this column at this stage.
In our next step we need to tell WordPress what content will be displayed in the column. To do this, we will use the manage_posts_columns action which is part of the column_default public function that is responsible for the columns output. This action corresponds only to post types that are non-hierarchical, such as posts, and you can spot it around line 1258.
Try our Award-Winning WordPress Hosting today!


What we will actually do here to fill the content is run a switch statement for all the custom columns and, as the header name is ‘last_modified’ (as we registered it in our initial step above) we will echo our content. To echo the content we will use the WordPress built-in get_post_field function and return the desired field which could be any column from the wp_posts table in the database. In case of a failure it will return empty string.
So in the functions.php file we will add the code below:
add_action( 'manage_posts_custom_column','custom_columns_content', 10, 2 );
function custom_columns_content ( $column_id, $post_id ) {
    switch( $column_id ) {
        case 'last_modified':
            echo get_post_field('post_modified', $post_id);
        break;
   }
}
You can confirm this is working as expected by refreshing the page once again.
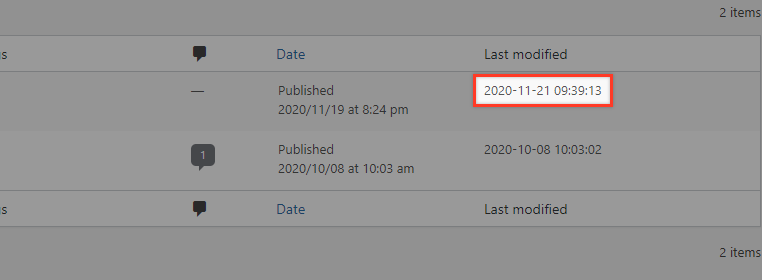
Notice, that the ‘Last modified’ value for the second post which has never been modified after its initial publication is the same as the published date.
The Pages List Table
To do the same thing in the pages list table, we add the column’s name the same way to the array of column header names. The difference this time is that we will use the manage_pages_columns hook as shown below:
add_filter('manage_pages_columns','add_custom_page_columns');
function add_custom_page_columns( $columns ) {
    $columns['last_modified'] = 'Last modified';
    return $columns;
}
Next we’ll add the contents using the manage_pages_custom_column hook instead of manage_posts_custom_column we used before.
add_action( 'manage_pages_custom_column','custom_columns_content', 10, 2 );
function custom_columns_content ( $column_id, $post_id ) {
switch( $column_id ) {
case 'last_modified':
echo get_post_field('post_modified', $post_id);
break;
}
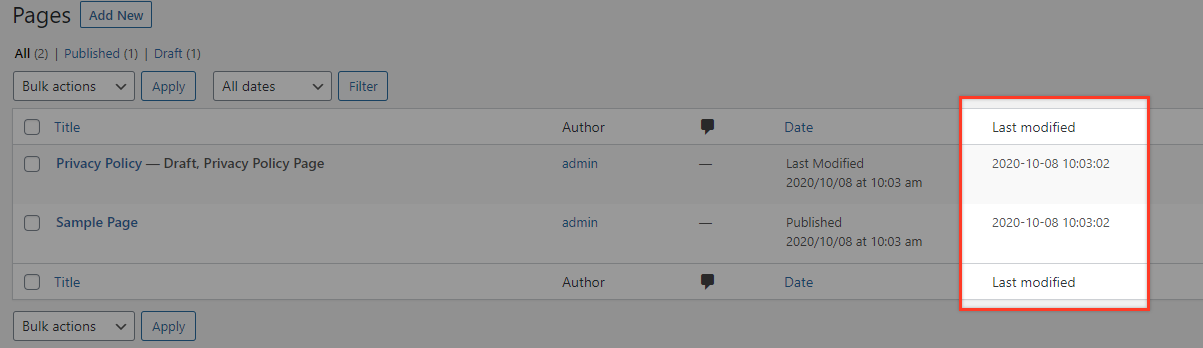
}After inserting the above code into our functions.php file we can confirm things are working as expected by visiting the Pages Admin table in our admin area where we should now see a ‘Last Modified’ column.
The Custom Post Type Table
We will first create a custom post type by inserting the code below in our functions.php file:
function my_custom_post_type() {
    register_post_type( 'mycpt',
        array(
            'labels' => array(
                'name' => __( 'Custom Post Types' ),
                'singular_name' => __( 'Custom Post Type' )
            ),
            'public' => true,
            'has_archive' => true,
            'rewrite' => array('slug' => 'mycpt'),
            'show_in_rest' => true,
        )
    );
}
add_action( 'init', 'my_custom_post_type' );
In our admin menu we will notice that a new item has been added called ‘Custom Post Type’.
If you do not know how custom posts types are created and want to know more, you can check out our related article on creating custom post types.
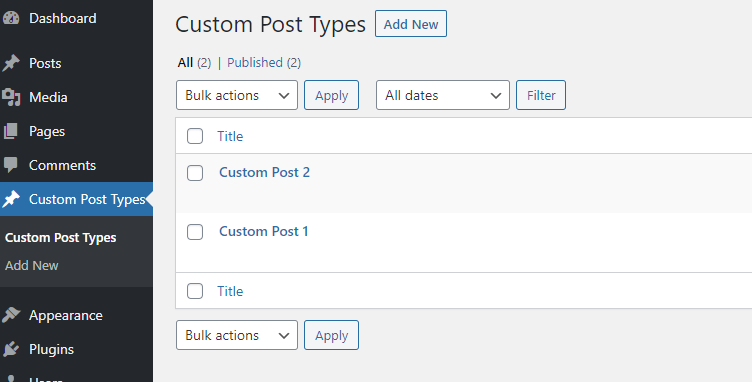
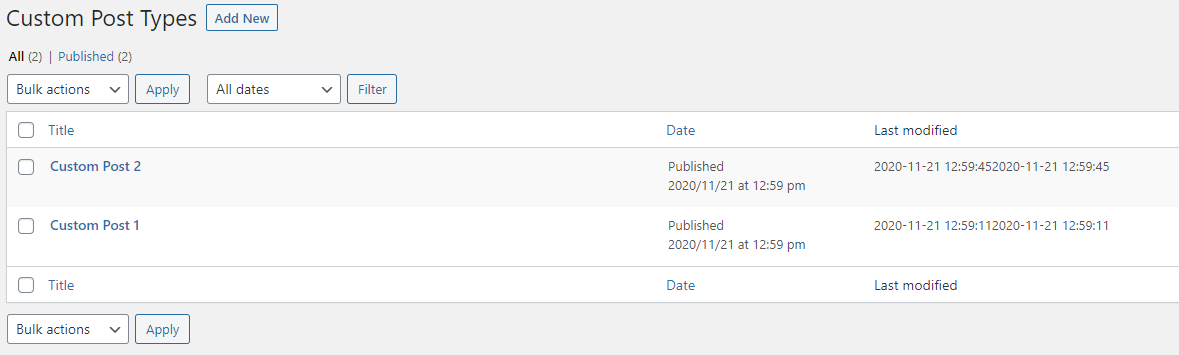
Now we’ve got our Custom Post Type setup will proceed with adding our new column header with its content. As mentioned before, in case of a CPT (Custom Post Type) we have to use the manage_{$post_type}_posts_columns to add our custom column.
The {$post_type} must be identical to the first argument of the register_post_type() function which in this case is ‘mycpt’.
So, the piece of code we will use in the functions.php file to add our column header will be as follows:
add_filter( 'manage_mycpt_posts_columns','add_mycpt_custom_columns');
function add_mycpt_custom_columns( $columns ) {
    $columns['last_modified'] = 'Last modified';
    return $columns;
}
And to fill the column content:
add_action( 'manage_mycpt_posts_custom_column','fill_mycpt_posts_custom_column');
function fill_mycpt_posts_custom_column( $column_id, $post_id ) {
    switch( $column_id ) {
        case 'last_modified':
            echo get_post_field('post_modified', $post_id);
        break;
   }
}
The results should be something like this:
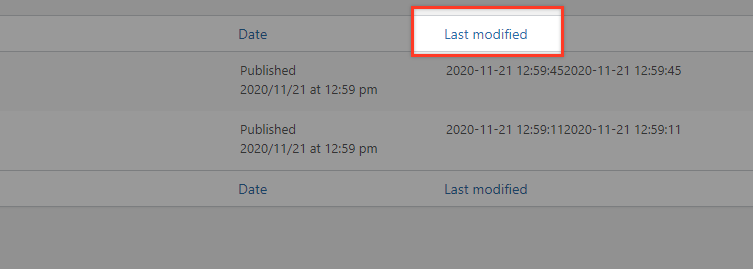
Make Columns Sortable
In order to make the column sortable we have to define which custom columns are be allowed to sorted. To accomplish this we use the manage_edit-{post-type}_sortable_columns filter with a callback function.
So, in each post type case we will append the same code (with unique function names of course).
For posts:
add_filter( 'manage_edit-post_sortable_columns', 'sortable_post_columns' );
function sortable_post_columns( $columns ) {
    $columns['last_modified'] = 'Last modified';
    return $columns;
}
For pages:
add_filter( 'manage_edit-page_sortable_columns', 'sortable_page_columns' );
function sortable_page_columns( $columns ) {
    $columns['last_modified'] = 'Last modified';
    return $columns;
}
For our custom posts type (mycpt):
add_filter( 'manage_edit-mycpt_sortable_columns', 'sortable_mycpt_posts_columns' );
function sortable_mycpt_posts_columns( $columns ) {
    $columns['last_modified'] = 'Last modified';
    return $columns;
}
Now, if you visit one of your Admin tables you should see that the custom column’s header is displayed as a link. If you click this it should then sort by modified date.
Disable Sorting for Columns
To remove the sorting feature for a column we just have to remove it from the array. If for example we want to do this for the ‘date’ column we would add in an extra line of code unset($columns['date']). This would look like this:
For posts:
add_filter( 'manage_edit-post_sortable_columns', 'sortable_post_columns' );
function sortable_post_columns( $columns ) {
    $columns['last_modified'] = 'Last modified';
    unset($columns['date']);
    return $columns;
}
For pages:
add_filter( 'manage_edit-page_sortable_columns', 'sortable_page_columns' );
function sortable_page_columns( $columns ) {
    $columns['last_modified'] = 'Last modified';
    unset($columns['date']);
    return $columns;
}
For our custom posts type (mycpt):
add_filter( 'manage_edit-mycpt_sortable_columns', 'sortable_mycpt_posts_columns' );
function sortable_mycpt_posts_columns( $columns ) {
    $columns['last_modified'] = 'Last modified';
    unset($columns['date']);
    return $columns;
}
Now, if you visit the appropriate table, you will notice that the Date label is no longer clickable (and hence that column is no longer sortable).
At this point, it’s worth highlighting a detail that often confuses WordPress developers. Take a look at the table below, which shows the hooks we used for Posts, Pages, and Custom Posts.
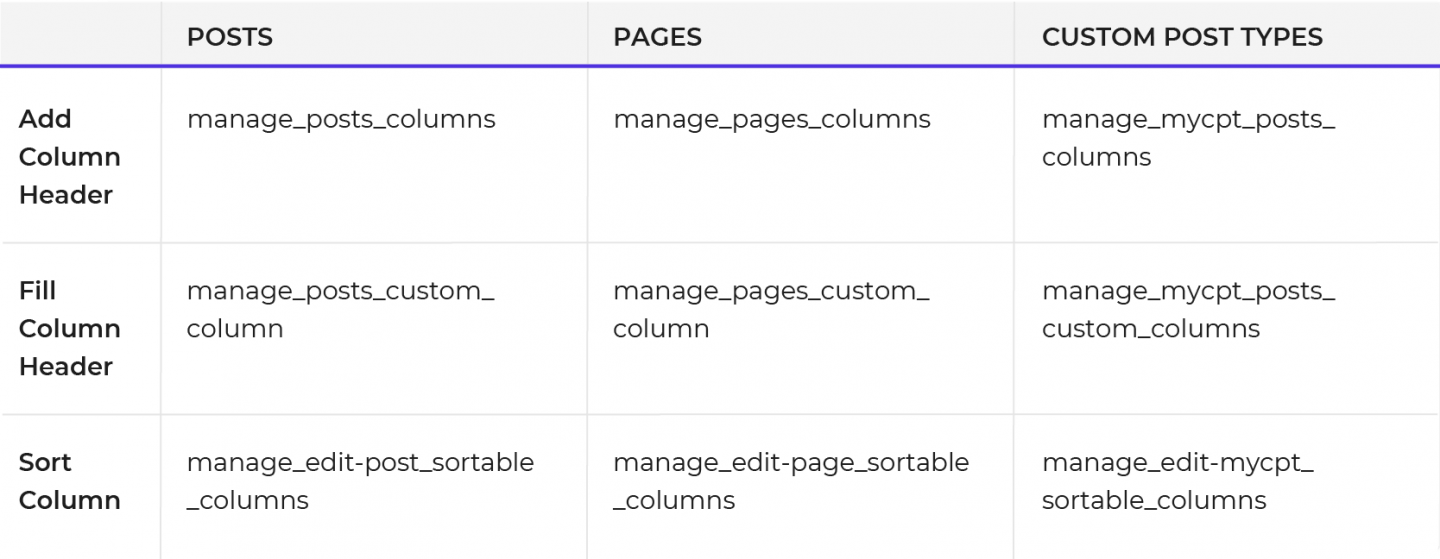
You may have noticed that the hooks we use for sorting columns do not really follow the pattern. You would expect them to be manage_posts_sortable_columns, manage_pages_sortable_columns and manage_mycpt_posts_sortable_columns respectively. Unfortunately, this is just a matter of bad naming. It is very helpful, nonetheless, to keep a summary table like this as an easy reminder.
Changing the Column Width
To adjust a column’s width, we will use the admin_head action hook that WordPress provides and executes in the head section for all admin pages that include CSS or JS.
As an example, try entering the code below in the functions.php file:
add_action('admin_head', 'my_column_width');
function my_column_width() {
    echo '<style type="text/css">';
    echo '.table-view-list.posts .column-title { width:120px !important; overflow:hidden }';
    echo '</style>';
}
Here, we used the .column-title class of the title column, which is common for all admin tables, and the .table-view-list.posts classes. Combined, these ensure that the CSS will be applied only in the posts list table.
To achieve the same thing for our other Admin screens (such as Pages), we will use table-view-list.pages instead.
Take Your WordPress Further
There are a lot of possibilities when it comes to manipulating the WordPress Admin Tables columns. If you want to learn more useful tricks you can use to get more out of your Admin tables, read the “WordPress Admin Tables: Advanced Modifications” article.
By the way, while you’re busy customizing how WordPress works behind the scenes, remember that some jobs are better handled at the platform level. With Pressidium EDGE, performance tuning and security hardening are already built in, from dynamic caching to an intelligent Edge WAF. That way, you can spend more time crafting features like these and less time worrying about scale, speed, or attacks.
👉 Learn more about Pressidium EDGE
Or click below to try it for free and feel the difference of stress-free coding firsthand!
Start Your 14 Day Free Trial
Try our award winning WordPress Hosting!


