

WordPress Custom Fields are a really great feature that are often neglected. They allow you to add ‘metadata’ to an area of your page or post that is repeated across all pages or posts. This can save you a ton of time if you have a website where you want to publish the same kind of information on multiple pages.
For example, take a look at a regular blog post on your WordPress website. Odds are that, somewhere on the page, you’ll see an author name and a date which shows when the article was published. This is metadata and will appear on each post on your website.
So, how can you add your own metadata to your posts or pages? Easy… using a WordPress custom field!
Of course you could add this information in each post manually via the page/post editor but this is both time consuming and typically requires careful formatting if you are to ensure that all posts look the same. If you’re publishing a lot of content it can get tiresome having to do this each time.
The WordPress page and post editors offer a lot of functionality and flexibility right out of the box when it comes to the core content that appears on a page or post. But, did you know that WordPress also provides users with a way to add content that sits ‘outside’ of the main post or page content? In this article we’re going to speed through how to use WordPress custom fields which will help you both better organise your posts and also add useful information for your readers in a great looking format.
Let’s get started!
What are Custom Fields and Metadata?
Content like posts, pages, users, comments, and custom post types include metadata that is stored in your database under the postmeta table in a key/value pair.

The information you usually see under a post or page title like, the admin name, date or comment counter are included in the post’s metadata.
The custom field is an additional field where you can add extra information for your post, and also forms part of the post’s metadata.
Custom fields apply to Pages, Posts, or Custom Post Types and consist of key/value pairs as well. The key is the ‘name’ of the metadata element and the value is the data that associates with the key and may differ for each post.
In WordPress, you can add custom fields by using the built-in custom field feature or you can take it a step further y utilizing a custom field plugin that will further enhance the control available over a custom field. We’ll look at both options in this article.
Add Custom Fields using WordPress Custom Fields
The in-built WordPress Custom Fields settings are hidden by default which explains why you might not have been aware this function existed. To use it we’ll first need to enable it.
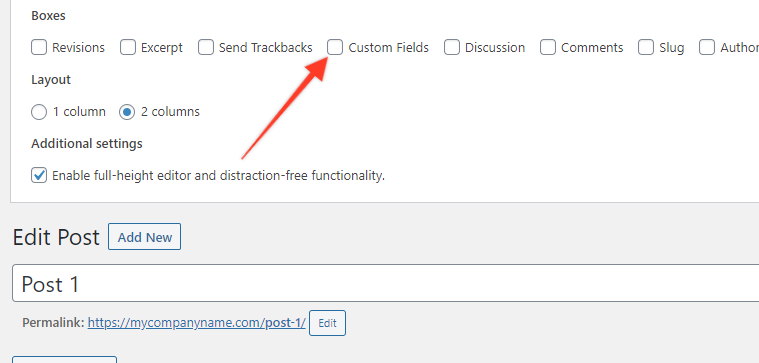
If you are using the Classic WordPress editor (i.e. not Gutenberg), open a new post and head to the top of this post. You’ll see a box on the right hand side that says ‘Screen Options’. Click this and a dropdown menu with checkboxes in it will appear. In this you should see one that says ‘Custom Fields’. Tick this to enable them.
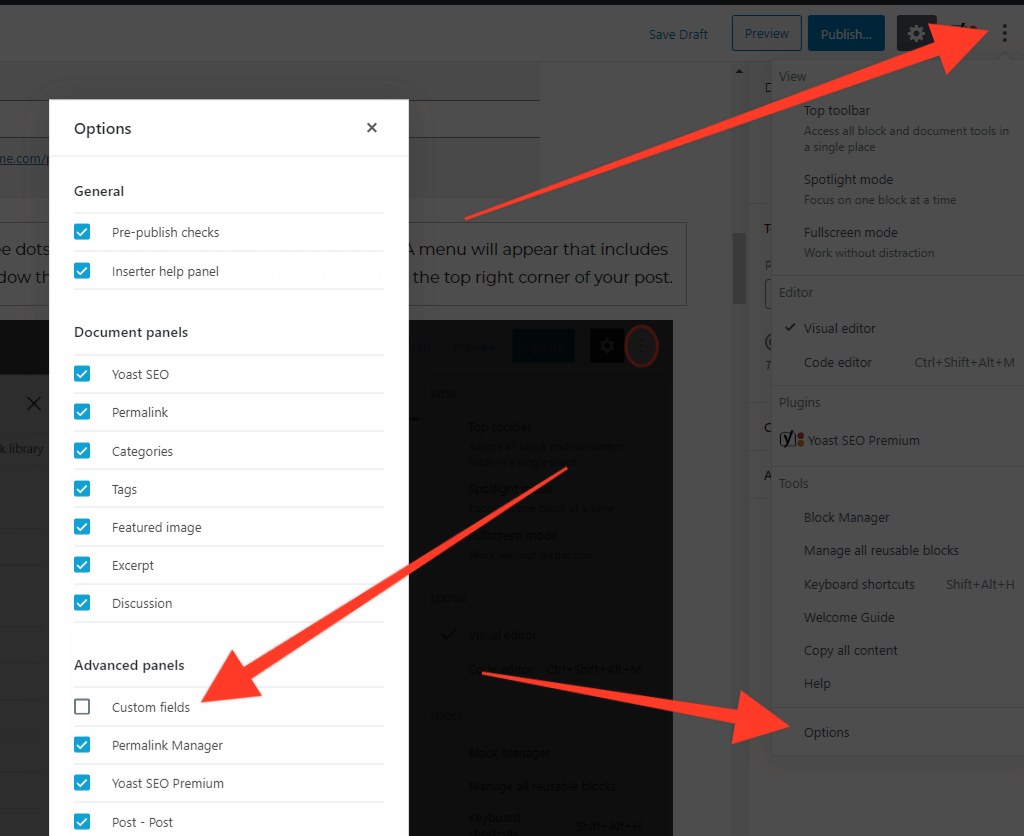
If you are using Gutenberg, click on the ‘three dots’ icon that appears in the top right of a post. A menu will appear and at the bottom of this menu it should say ‘Options’. Click this and a new popup menu with checkboxes will appear. In this list you should see one that says ‘Custom Fields’. Tick this box and then close the popup menu.
Next Steps – Adding Your Custom Fields
Adding your custom fields is actually pretty easy. After enabling them as described above, head to the bottom of your post and you should see a new section called (you guessed it) ‘Custom Fields’.
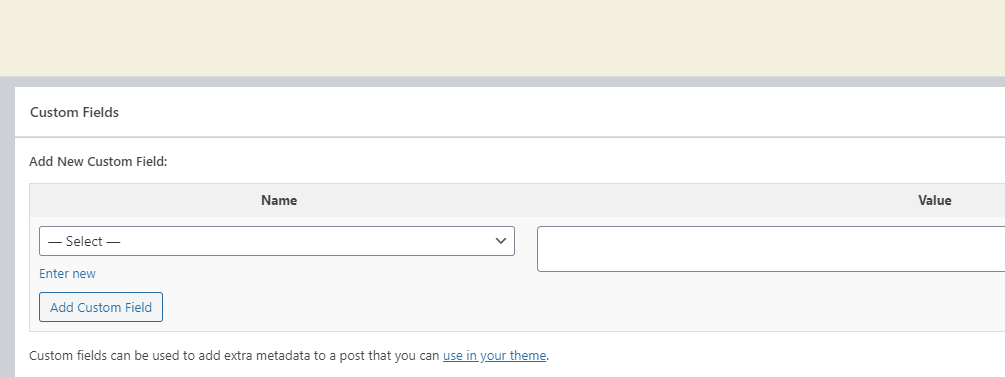
You’ll see two boxes in the Custom Fields section, ‘Name’ and ‘Value’. The Name field has some pre-populated defaults that relate to existing fields that have been added to your WordPress website. In our case, we want to add our own new field. To do this click on the ‘Enter new’ text that is located under the Name field.
Try our Award-Winning WordPress Hosting today!


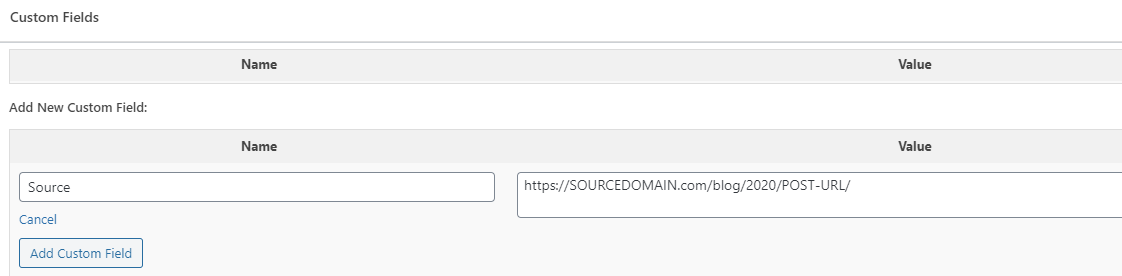
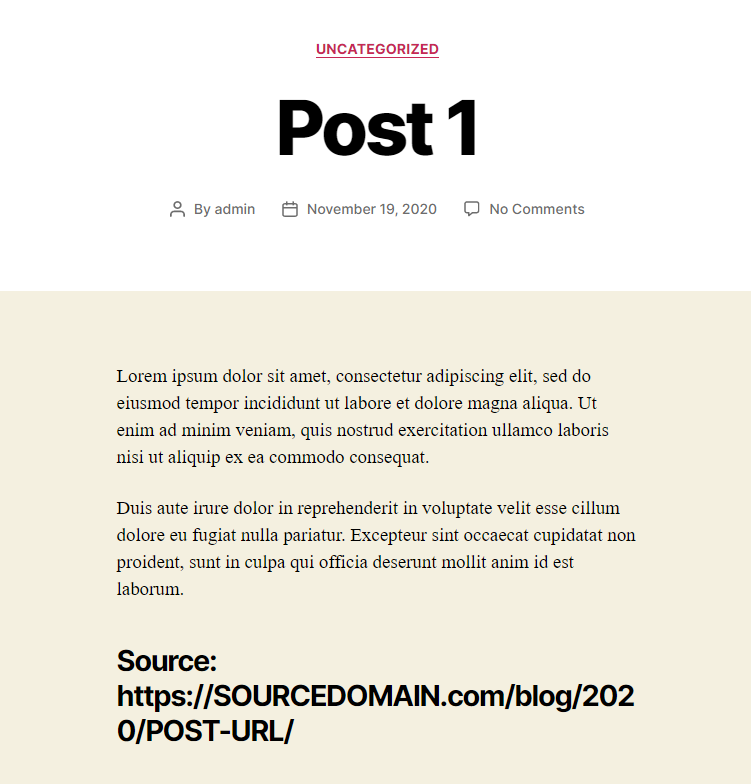
In this example, we want to create a link to an external website that was used as a source for an article we wrote. We’ll call this field ‘Source’. Click on the ‘Enter new’ text and then type in ‘Source’ followed by a url to a website of your choice in the Value section. This will look like this:
Next time around you won’t need to click the ‘Enter new’ text and manually type in ‘Source. It will now appear in the dropdown list of values.
If you have access to your database (eg: via phpMyAdmin) you can open the postmeta table, filter the table by the post id you edited and you should see the new custom field with its value.

Now that we have confirmed that the custom field is properly stored for the post, let’s see how we can display it on the front end of our post where our website visitors will be able to see it!
Displaying the Custom Fields Values
To display our new Custom Field value on our post we need to add some code to our single posts template file. Usually, this can be found in the singular.php file which is located in the theme’s main folder. In our case (Twenty Twenty theme) it is located in /wp-content/themes/twentytwenty/template-parts/content.php file.
We will utilize the core get_post_meta function that WordPress provides for retrieving a post’s meta field from the database. The function’s structure is as follows:
get_post_meta( $post_id, $key, $single )The only required argument is the $post_id. The $key argument is the meta key to retrieve and the $single argument defines whether a single value is returned and is useless if the $key is not defined at all.
If only the $post_id is declared, the result will be an array with all the keys related to the particular post. So, if you just insert get_post_meta( $post_id ) you will get something like this:
Array (
    [field1_key] => Array ( [0] => value1 )
    [field2_key] => Array ( [0] => value2 )
    [field3_key] => Array ( [0] => value3 )
)
If you use get_post_meta( $post_id, 'filed1_key' ) you will get something like Array ( [0] => value1 ) and if you use get_post_meta( $post_id, 'filed1_key', true ) like we did before you will just get value1.
Also, in some posts you may not want to define the source field, so we have to include in the code a check to see whether the field exists for the post.
So, with all of this in mind, the code we need to use would be as follows:
$source = get_post_meta( get_the_ID(), 'source', true);
if( !empty( $source ) ) {
    echo '<h3>Source: ' . $source . '<h3>';
}
?>
We will insert the code right after the post’s content so that inside the HTML div with class “entry-content”, the code will look like this:
<div class="entry-content">
<?php
	if ( is_search() || ! is_singular() && 'summary' === get_theme_mod( 'blog_content', 'full' ) ) {
		the_excerpt();
	} else {
		the_content( __( 'Continue reading', 'twentytwenty' ) );
	}
$source = get_post_meta( get_the_ID(), 'source', true);
if( !empty( $source ) ) {
	echo '<h3>Source: ' . $source . '<h3>';
}
?>
</div><!-- .entry-content -->
Now let’s see what we’ve accomplished by opening a new post and taking a look at how this content would appear on the front end.
We remind you that if you are having difficulties locating the template file corresponding to your single post view, you can consult the WordPress template hierarchy diagram.
Clearly there will be some work to do in order to style this output. This is beyond the scope of this article but something we’ll cover in a future post.
Adding Custom Fields using a Plugin
While WordPress provides built-in custom fields, using a dedicated custom field plugin can significantly enhance flexibility, usability, and control over your metadata. Plugins like Advanced Custom Fields (ACF) and JetEngine allow users to create, manage, and display custom fields effortlessly, making them essential for building dynamic, structured content.
Below, we’ll explore two powerful solutions to help you decide which plugin best suits your needs.
Create Your Custom Fields using ACF
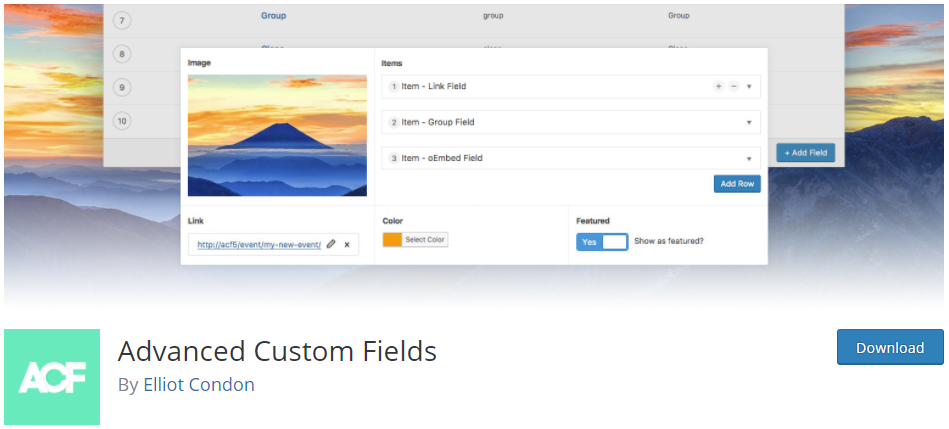
The Advanced Custom Fields plugin is one of the best plugins available that allows you to quickly add custom fields to your WordPress website and provides further control of your custom field data. Using its builder you can easily create custom fields which can then be added to your posts, users, taxonomies, media, comments and even custom options pages.
After installing and activating the ACF plugin go to ‘Custom Fields > Field Groups’ where the registered fields are shown.
Press the ‘Add New’ button to start creating your fields. These can then also be added into groups.
There are a ton of options provided for you that will enhance your custom fields behavior. Apart from the basic configuration that includes the field label and name, you can also define the type of the field, define whether the field is required, change default value, the placeholder text and of course choose the post types where it will be included by using logic argument.

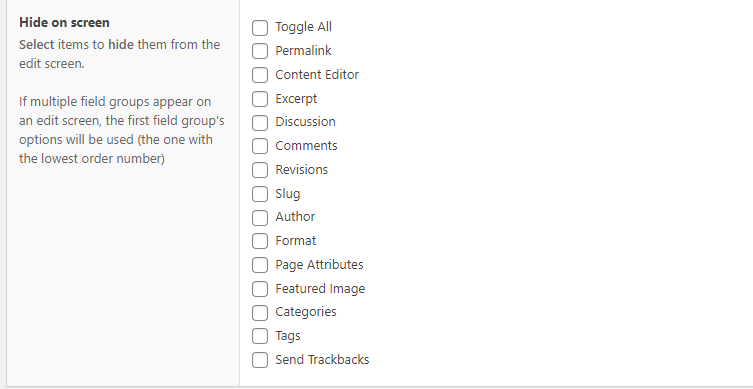
Also, there are some more settings available that allows you to change the field’s appearance (super helpful) and a list of checkboxes for you to define what should be hidden on the corresponding edit screens.
Awesome, right?
Also, in the ACF Tools menu you can export or import groups of fields in a JSON format to speed things up if these have already been created elsewhere.
A Worked Example using Advanced Custom Fields
Let’s say we have created a Custom Posts Type named ‘Books’ and we would like to add some custom fields on each Book Post like Genre, Book Author and Year Published. The first things we should do is create the group of fields and the containing fields like this:
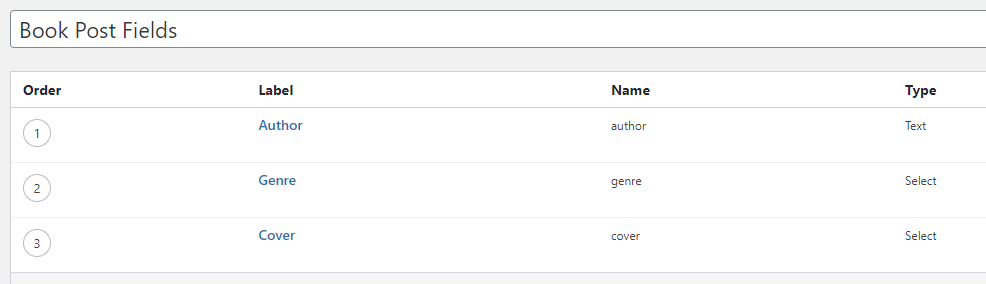
As you can see not all fields use the same type.
- The Author field is a simple text field were we will be filling the author’s full name.
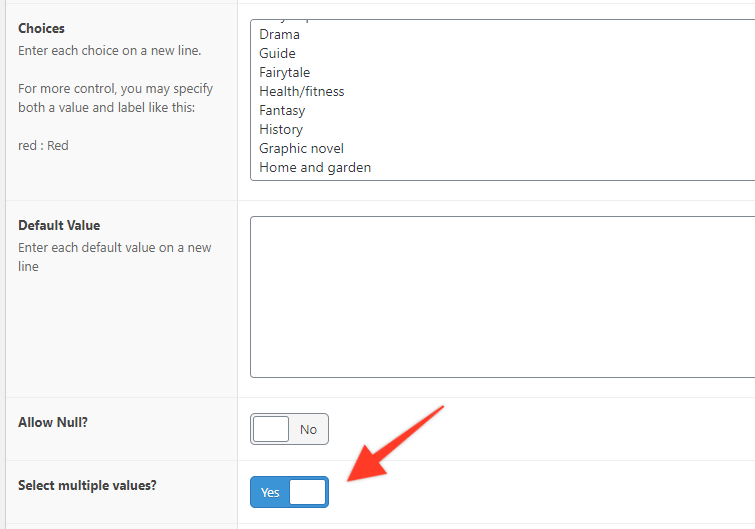
- The Genre field is a select field and has to accept multiple values. A book can be related to more that one genre.
- The predefined choices for the genre needs to be inserted in the Choices box each one in its own line.
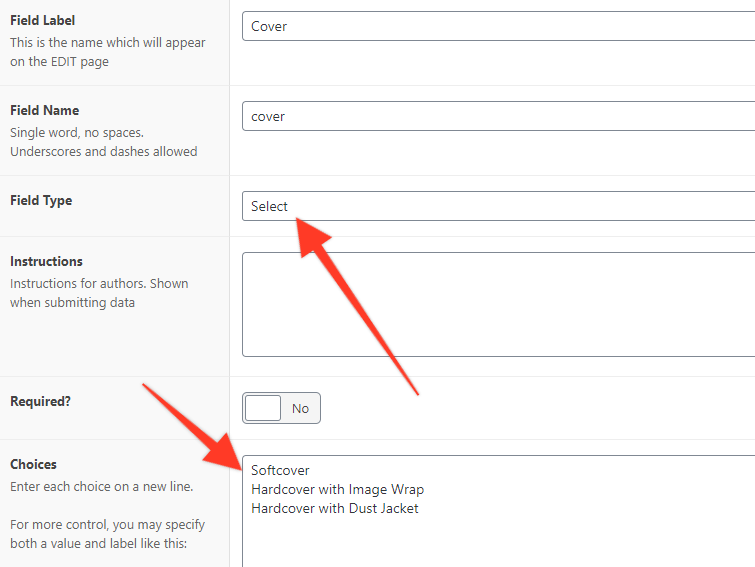
The cover field should be a single value select field with the predefined choices as well.
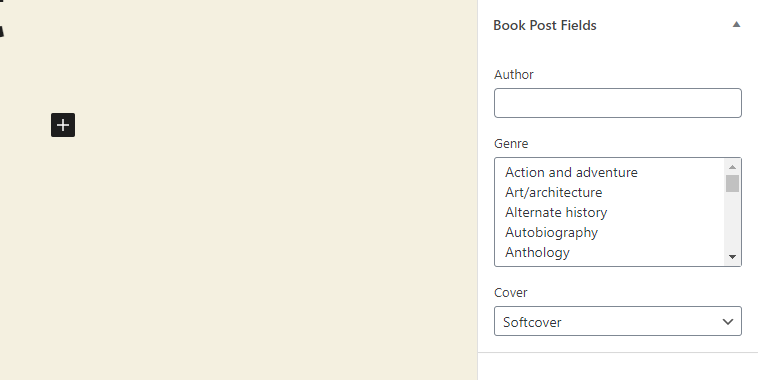
Now let’s go and edit a Book Post. The fields will appear nicely grouped in the sidebar.
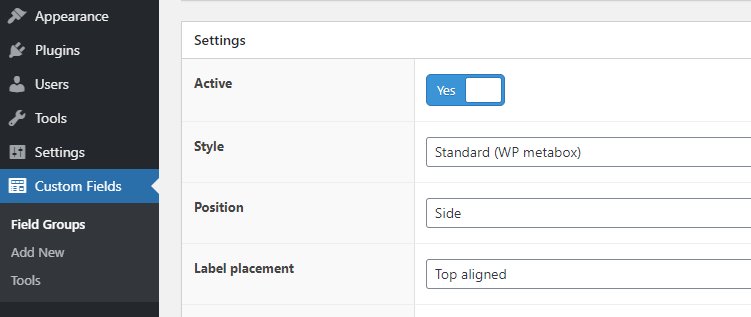
If you want to change the position of the fields group please go to the corresponding settings:
Fill in the fields as well as some test content for the article and update the post. At this point if you visit the front view of the Book Post you will notice that still nothing is displayed regarding our custom fields.
Display your ACF Custom Fields
You can easily show the custom fields in your theme’s template by using the friendly functions the ACF plugin provides. Two of these are:
get_field()– Returns the value of a specific field.the_field()– Displays the value of a specific field.
These are the most commonly used functions with the ACF plugin. If you want to see the full list of the plugin functions you can visit the official documentation to find out more.
So, to output your custom field in the post view template you’ll need to add some code much as we did when using the default WordPress custom fields. Instead however, this time we’ll be using the ACF plugin’s functions. Since we are using the Twenty Twenty theme, we have to edit the content.php file under the twentytwenty/template-parts/ folder. Right after the inner section closing we added the following lines:
<div class="entry-content">
    <?php
        if( get_field( 'author' ) ) {	echo '<p><b>Author:</b> ' . get_field( 'author' ) . '<p>'; }
        if( get_field( 'genre' ) ) {	echo '<p><b>Genre:</b> ' . get_field( 'genre' ) . '<p>'; }
        if( get_field( 'cover' ) ) {	echo '<p><b>Cover:</b> ' . get_field( 'cover' ) . '<p>'; }
    ?>
</div>
In the front view we can now see the custom fields.
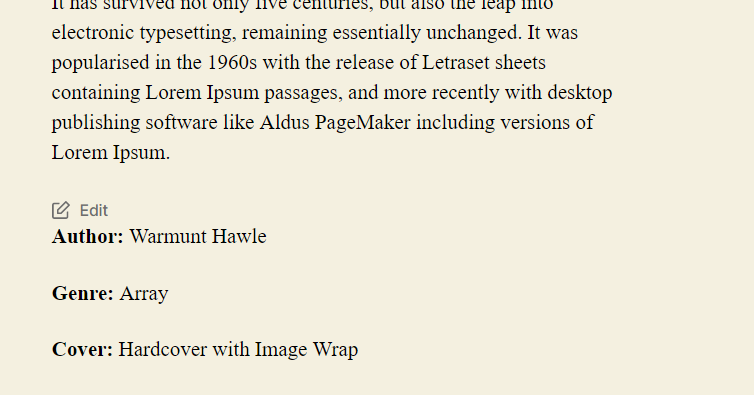
However the genre field is not displayed correctly. That is because it contains multiple values, therefore the get_field function returns an array. To fix this we will have to convert the array to a series of its values. This is easy in PHP by using the implode() function.
<div class="entry-content">
    <?php
        if( get_field( 'author' ) ) {	echo '<p><b>Author:</b> ' . get_field( 'author' ) . '<p>'; }
        if( get_field( 'genre' ) ) {	echo '<p><b>Genre:</b> ' . implode( ", ", get_field( 'genre' ) ) . '<p>'; }
        if( get_field( 'cover' ) ) {	echo '<p><b>Cover:</b> ' . get_field( 'cover' ) . '<p>'; }
    ?>
</div> 
If you want to selectively display some fields but not all of them in certain posts you can do this by using some ACF shortcodes. To do this, open your post and then add one shortcode Gutenberg block for each field and put in a shortcode like this:
[acf field="MY_CUSTOM_FIELD"/]Replace the MY_CUSTOM_FIELD with the name of the field and that should work perfectly.
As we can see, using the Advanced Custom Fields plugin gives us fantastic flexibility to create custom fields and display them where we want.
Create Your Custom Fields using JetEngine (Paid)

JetEngine is a dynamic content management plugin for WordPress, offering advanced custom post types, taxonomies, meta fields, and dynamic listings. Designed as a powerful alternative to Advanced Custom Fields (ACF), JetEngine simplifies the creation of structured content for custom post types, user-generated content, and interactive layouts.
Unlike ACF, which primarily focuses on custom fields, JetEngine expands capabilities by providing query builders, dynamic templates, and visibility conditions, making it ideal for complex WordPress websites, such as directories, marketplaces, and membership sites.
Installing and Setting Up JetEngine
- Go to Plugins > Add New in your WordPress dashboard.
- Upload and activate JetEngine after purchasing it from Crocoblock.
- Navigate to JetEngine > Modules and enable the components you need, such as Custom Post Types, Taxonomies, Meta Boxes, and Relations.
Creating Custom Fields with JetEngine
To add custom fields, follow these steps:
- Go to JetEngine > Meta Boxes and click Add New.
- Choose where to apply the fields (Posts, Pages, CPTs, Users, Taxonomies, etc.).
- Add custom fields by defining:
- Field Label – The name displayed in the admin panel.
- Field Type – Text, number, media, date, select, repeater, etc.
- Default Value – Predefined data.
- Visibility Conditions – Show fields based on user roles or post types.
- Click Save Meta Box to apply the fields.
Displaying JetEngine Custom Fields Using Elementor
- Open a post/page with Elementor.
- Drag and drop a Dynamic Field widget.
- Select Meta Field as the source and choose the custom field created.
- Save and preview the dynamic content.
Using PHP for Theme Integration
If you prefer manual coding, use this PHP snippet to display a custom field:
<?php
$custom_field = get_post_meta( get_the_ID(), 'your_meta_key', true );
if( !empty( $custom_field ) ) {
    echo '<p><b>Custom Field Data:</b> ' . esc_html( $custom_field ) . '</p>';
}
?>
Replace 'your_meta_key' with the actual JetEngine meta field key.
Advanced JetEngine Features
- Custom Post Types & Taxonomies – Create structured content like Portfolios, Real Estate Listings, or Reviews.
- Query Builder – Fetch and display content dynamically without writing SQL queries.
- Dynamic Visibility – Show/hide fields based on user roles, post status, or custom conditions.
- Listing Grid & Data Repeater – Display collections of posts, users, and taxonomies in a structured layout.
- Front-End Forms – Allow users to submit and edit content from the front end.
While ACF is great for basic custom fields, JetEngine is the better choice if you need a fully dynamic, query-driven content system.
Conclusion
Developers across the industry rely on the Custom Fields function in WordPress to deliver better structure and readability to their websites. It’s another standout WordPress function which yet again helps explain why WordPress is so popular. Hopefully, this article has given you the information you need to add your own custom fields to your website. Happy developing!
See Also
WordPress Admin List Tables: Add Custom Filters
Adding Custom Fields to WordPress Menu Items
Start Your 14 Day Free Trial
Try our award winning WordPress Hosting!


