

Have you ever experienced the scenario where you visit a page and the content you see seems outdated or partially missing or even no content at all? If so, then during troubleshooting, one of the things you should check is whether the culprit for these problems is your device DNS cache.
You’re perhaps aware that your browser might ‘cache’ content (save content so it’s easier and faster to retrieve in the future) but did you also know that your computer/laptop does the same? Today we will show you how to clear/flush the DNS cache that is stored on your computer whether you run Windows, are working on a Mac or run a Linux Distribution System.
So, before we get stuck in, let’s quickly take a more detailed look at what DNS caching is exactly.
Why DNS Cache Exists
As you may already know, the Domain Name System (DNS) is essentially an address book that matches domain names to the IP of the server that holds the website’s content. So when you are visiting a website, the DNS converts the domain name to the corresponding IP address(es) so that the browser can render the correct resources.
The diagram below shows how the domain is converted to a computer-friendly IP format and returns the website content.
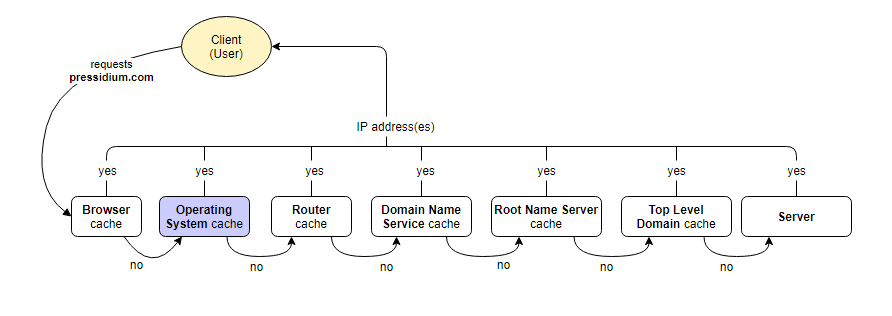
It can take a while for this process to run and send a response. That is why DNS cache is included in each step of the lookup process and the operating system DNS cache is one of them. This way, when the user revisits a website, instead of looking up the information and following the process of looking up an IP address via the DNS system (as per the diagram) the browser will simply retrieve the information from cache and return the results. This can significantly speed up the process of loading websites.
Why flush the DNS Cache on your Operation System?
There are several reasons why you might want to flush your operating system DNS cache.
Although the DNS on your system should (in theory) update when required (for example a website moves to a new IP address), this doesn’t always happen. Because of this you could end up either seeing outdated content, or, getting a 404 error. This can be seriously frustrating!
Flushing your DNS cache can also come in handy when developing a website or setting its domain name records. This is when DNS cache can cause conflicts and prevent you from viewing the correct content or the whole site.
Also, If you do not want to use the incognito mode browsers offer, you can still keep your search private by flushing the DNS cache. If you do this, as well as clear your cookies, the information stored about the websites you visit will be deleted.
Try our Award-Winning WordPress Hosting today!


One last issue worth noting is called DNS Spoofing (also known as DNS cache poisoning). This is a form of computer hacking where someone gains access to your DNS cache and redirects the name server to an incorrect result record, like another IP address. This means you could unwittingly end up browsing a site that isn’t the site you thought it was. Clearly this has security implications as you could be tricked into entering login credentials or parting with other information useful to a hacker. By regularly clearing your DNS cache you reduce the likelihood of falling victim to this particular type of hacking attack.
Your DNS cache will normally be set to automatically expire after a period of time but manually flushing this on occasion does help ensure this process is fully carried out. It’s also a good step to undertake when you find yourself having issues connecting to a website (after you’ve ruled out obvious causes like internet connectivity!).
There are no real downsides to flushing your cache, bar perhaps a slight time penalty when you first visit websites. This ‘lag’ will probably be barely noticeable however and, as the site gets cached, isn’t something you’ll experience the second time you visit the same site.
How to flush the DNS Cache on Windows 10
Here are the steps you have to follow to clear the DNS cache on a Windows 10 Operating System.
Step One: Open a DOS command window. To do this, click the search icon and type “run” (or hold the Windows button and press R)

Step Two: In the popup Run window that will appear type “cmd” without the quotes and press Enter. A command prompt window should now be opened in front of you.
The last thing you have to do is type the following command and then press Enter:
ipconfig /flushdnsThat’s it. Your DNS cache is now flushed.
How to flush the DNS Cache on Windows 11
To clear the DNS cache on Windows 11, you can follow two routes.
Use The Command Prompt
If you go this way, Command Prompt should be run in Administrator mode. In your Windows 11 search bar, type “cmd”. When the Command Prompt options appears, right-click on it and select “Run as Administrator”.
Next, enter (or copy-paste) this command:
ipconfig /flushdnsand press the Enter key. Wait a few seconds and you should get notified that the DNS is now cleared.
Use Windows Powershell
Again, in Administrator mode, you can flush DNS by using Windows Powershell. Type “Powershell” in the Search bar and follow the same pattern as before. Right-click the “Windows Powershell”, and select “Run as Administrator”.
Next, enter (or copy-paste) this command:
Clear-DnsClientCacheand press the Enter key. That’s it. DNS is now cleared.
How to flush the DNS Cache on a Mac
Depending on the version of macOS you’re using, the process of flushing DNS cache may differ.
Clear DNS cache on the latest macOS versions
For macOS version 10.11 or above, open the terminal and enter the command below:
sudo killall -HUP mDNSResponderThen you will be asked to enter your password, and after you do that’s it. Your DNS cache should now be clear.
Clear DNS cache on old macOS versions
For old versions, the command varies on each version:
OS X Mavericks:
sudo killall -HUP mDNSResponderOS X Yosemite:
sudo discoveryutil udnsflushcachesMac OS X Snow Leopard, Mac OS X Leopard:
sudo dscacheutil -flushcacheMac OS X Tiger:
lookupd -flushcacheNOTE: You can check what macOS version you are running by clicking on the ‘apple’ icon at the top-left corner and pressing the “About This Mac” option.
How to flush the DNS Cache on Linux Distributions
Before clearing the DNS cache on a Linux distribution, you need to make sure that systemd-resolved is active. To check this, enter the following command in a terminal window:
sudo systemctl is-active systemd-resolvedIf “active”, then you can proceed and enter the command to flush the DNS cache.
Now, if you are using Ubuntu, this is what should be entered:
sudo systemd-resolve --flush-cachesYou won’t get a confirmation message that the DNS was successfully cleared. The way to check is by running the following command:
sudo systemd-resolve --statisticsIf the process has been successful you will see the “Current Cache Size” is 0.
If however you are not using Ubuntu, then insert the following command:
sudo /etc/init.d/dns-clean startNo systemd-resolved service?
If systemd-resolved is not active in your Linux distribution, it may be using nscd, BIND, or Dnsmasq to cache DNS queries, which also means that you should go another way in order to flush the DNS cache.
If you need to check which of these services is active on your system, you can use the corresponding commands.
For the BIND service:
systemctl is-active namedwhere “named” is the BIND service name. If “active” is returned, you can proceed with flushing the DNS.
NOTE: On older systems, the above command could be service named status
For Dnsmasq:
systemctl is-active dnsmasqNOTE: On older systems, the above command could be service dnsmasq status
If “active” is returned, you can proceed with flushing the DNS.
For nscd:
systemctl is-active nscdNOTE: On older systems, the above command could be service nscd status
If “active” is returned, you can proceed with flushing the DNS.
Now to finally flush the DNS cache, follow the steps below.
With BIND active:
sudo rndc flushThen run this command in order to dump the cache:
sudo rndc dumpdb -cacheIf the process was successful, the content of the cache_dump.db file, that is located in /var/named/data/, should be like this:
$ sudo cat /var/named/data/cache_dump.db

;
; Start view _default
;
;
; Cache dump of view '_default' (cache _default)
;
$DATE 20190711141232
;
; Address database dump
;
; [edns success/4096 timeout/1432 timeout/1232 timeout/512 timeout]
; [plain success/timeout]
;
;
; Unassociated entries
;
;
; Bad cache
;
When using Dnsmasq as a caching DNS server, you should run
sudo systemctl restart dnsmasqin order to restart the service and flush the DNS. On older versions, it should be sudo service dnsmasq restart
When using nscd, run
sudo nscd --invalidate=hostsin order to invalidate the hosts cache and flush the DNS cache, and then
sudo nscd -gto check if the DNS cache was flushed.
Conclusion
Flushing the DNS cache isn’t something you’ll have to do very often but it can be a quick way to resolve unexpected website browsing issues. As you can see from the above, it’s a pretty quick process no matter your operating system!
Start Your 14 Day Free Trial
Try our award winning WordPress Hosting!


