

Welcome to our Introduction to Ajax! In this article we will be running through the very basics of Ajax and how it’s used in a real world example. We’ll also look at an example of an Ajax-PHP call. Although we’ve done our best to simplify this tutorial, a working knowledge of Javascript, PHP and WordPress are very important in fully understanding what follows. With this in mind let’s get started!
What is Ajax?
Ajax stands for Asynchronous JavaScript and XML.
Ajax is not a programming language, but an array of techniques that combine existing web technologies in order to create better web applications.
Improving Websites with Ajax
Ajax has a huge array of uses. Among these, one of the top functions are Ajax calls. Ajax calls allow a website to update part of its content upon a user action without the need to reload the page. As such, in contrast with a normal HTTP request, we do not have to wait for the server response to continue interacting with the website.
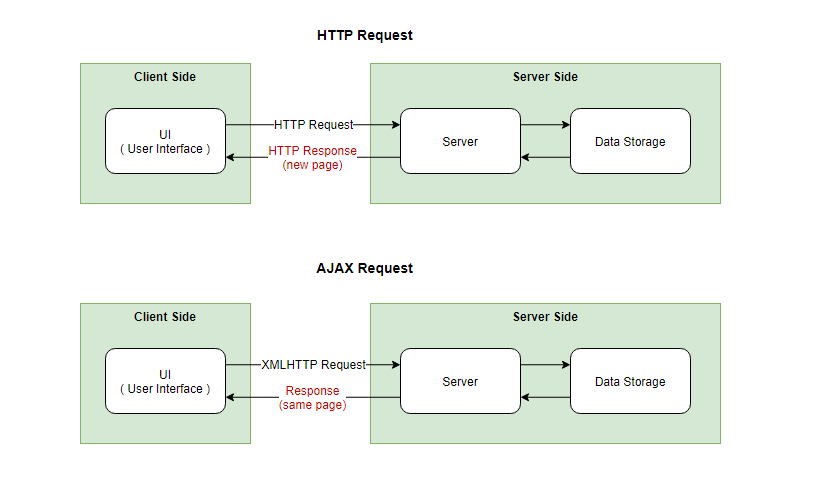
Traditionally, HTTP requests are made to a web server and after they are processed the server returns the updated output in a new page load. In an Ajax request, this sequence of actions happens behind the scenes, asynchronously, so that the user is not interrupted. That improves the interactivity and responsiveness and makes the website more dynamic.
How Does An Ajax Call Function?
An Ajax call starts with the end user performing an action on the front end of a website (for example, clicking a button). When that action is performed, a Javascript event is triggered and its listener calls a function.
Inside the function, the Ajax call is fired and, with the help of XML, the information is packaged and the request is sent to a server script.
NOTE: Nowadays, in almost all occasions, JSON is preferred over XML as it is faster, easier to read and program and more.
Inside the script, the request is processed with the help of a server-side scripting language like PHP, Java, Ruby, Python etc.
The response is sent back to the client, and a callback function updates the corresponding content part with the received data.
Let’s take a look at how this works in an example
A Simple Ajax Call Example
Let’s create a Search application that allows you to see the search results in real time when searching through a list of article titles.
We will use PHP as the server-side scripting language, and will walk you through this, from the end users point of view.
Step 1: The HTML Form
First, we need a text box that the user will fill with text and somewhere to display the outcome. So let’s create a simple HTML form and an element that will show the results.
<html>
   <body>
        <p><b>Search in articles:</b></p>
        <form>
            <input type="text" onkeyup="foundArticles(this.value)">
        </form>
        <p>Articles available: <span id="txtHint"></span></p>
   </body>
</html>
Step 2: Javascript Function
When a user enters text, we want to see real time results, if available. We will use the onkeyup Javascript event that fires a function when the user releases a key on the keyboard.
The function will have to get the current text as a parameter in order to continue the process.
<html>
   <body>
        <p><b>Search in articles:</b></p>
        <form>
            <input type="text" onkeyup="foundArticles(this.value)">
        </form>
        <p>Articles available: <span id="txtHint"></span></p>

	  <script type="text/javascript">
	      function foundArticles(str) {

	      }
	  </script>
   </body>
</html>
Let’s fill in the function.
Step 3: The Request
Inside the function, we first have to Create an XMLHttpRequest object in order to interact with the server and then call another function that will do something with the value passed in our foundArticles() function.
Try our Award-Winning WordPress Hosting today!


In the process described above, the interaction with the server is accomplished with the use of a Javascript XMLHttpRequest.onreadystatechange event handler, which is called when the readyState property is changed. Let’s clarify these steps further:.
- The
readyStateproperty returns the state anXMLHttpRequesta client is in. - Whenever the
readyStatechanges, thereadystatechangeevent is fired. - The
onreadystatechangeproperty contains the event handler to be called when thereadystatechangeevent is fired.
Step 4: What to do with the request
Now, we need to do something when the operation is complete, and after consulting what states are available, we set this to state 4.
So, when the operation is complete, the text inside the HTML element with id txtHint should be replaced with the server’s response. This is when we have to use the responseText property, which returns the text received from the server after the request is sent.
Now let’s add the code inside the foundArticles() function that corresponds to what we just described above.
function foundArticles(str) {

    var xmlhttp = new XMLHttpRequest();
    xmlhttp.onreadystatechange = function() {
        if ( this.readyState == 4 ) {
            document.getElementById("txtHint").innerHTML = this.responseText;
        }
    }

}
NOTE: We have to point out here that rendering HTML like this, without escaping it, is bad practice security-wise and we only do this for the sake of this tutorial in order the code is kept as simple as possible. Just to be safe, do not use any of the code provided in this article for real world use!
Next we have to send the request to the server and use the data that is returned.
Step 5: The Data
In this example the data will be stored in a PHP file. We create a data.php file under the same folder and include the following code:
<?php

// We fill in the posts array with the data to look up to
$posts = array(
    "C Language course",
    "C++ course",
    "About Bootstrap",
    "Learn to write HTML",
    "All about SS",
    "CSS3 course",
    "JAVA course",
    "JavaScript tutorials",
    "Learn PHP",
    "MySQL examples",
    "Learn Python",
    "AngularJS",
    "Photoshop Tutorials",
    "C#",
    "ASP.NET",
    "SAP",
    "ORACLE",
    "Wordpress CMS for beginners",
    "Build your own Android app",
    "All about SEO",
    "Illustrator",
    "Flash",
    "Action Script"
);

// We get the requested value from the URL and store it in a variable
$req = $_REQUEST["req"];

$autocomplete = "";

// Iterate $posts if $req is not empty
if ($req !== "") {
    $req = strtolower($req);
    foreach($posts as $name) {
        $lowname = strtolower($name);
        if ( strpos( $lowname , $req ) !== false ) {
            $autocomplete = $name;
        }
    }
}
// Output
echo $autocomplete === "" ? "no suggestion" : $autocomplete;
Do not get confused about the $req = $_REQUEST["req"]; line. This is how the script retrieves the query inside the custom.js file that we will look at shortly.
Step 6: Request Methods
We will use the open() method of our XMLHttpRequest object to initialize the request, and the send() method to exchange data with the server.
The parameters we use for the open() method are:
- The method. Meaning the HTTP request method ( “GET”, “POST”, “PUT”, “DELETE” etc).
- The URL to send the request to.
function foundArticles(str) {

    var xmlhttp = new XMLHttpRequest();
    xmlhttp.onreadystatechange = function() {
        if ( this.readyState == 4 ) {
            document.getElementById("txtHint").innerHTML = this.responseText;
        }
    }
    xmlhttp.open("GET", "data.php?req=" + str, true);
    xmlhttp.send();

}
As you can see, the open() method initializes a GET request to the “data.php?req=” + str URL.
The URL will be then used by the $req = $_REQUEST[“req”]; variable inside the data.php file to retrieve the value.
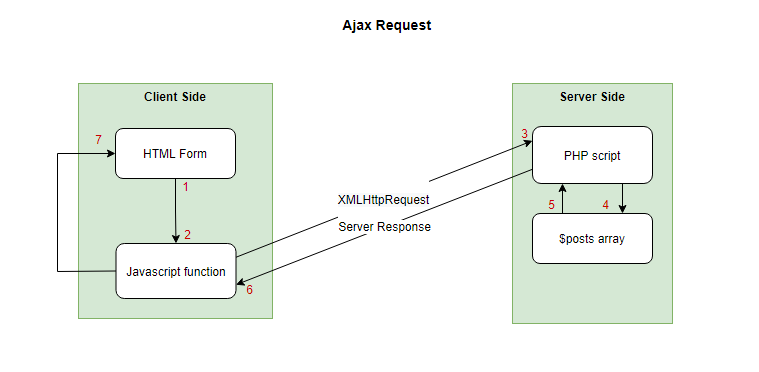
Let’s look at a visual of the example request:
At this point the form should work properly. If you enter, let’s say the word “course” the result should be:
“C Language course”,
“C++ course”,
“CSS3 course”,
“JAVA course”.
Conclusion
This was a very simple example of Ajax request which is a very popular technique to use when building websites. Although it’s simple, hopefully, we brought you closer to understanding the routing in such requests and this might help you begin coding your own. We recommend continuing this study by reading the Ajax and WordPress article, where we revisit Ajax, in a WordPress environment.
Start Your 14 Day Free Trial
Try our award winning WordPress Hosting!


