The .htaccess file is a configuration file used by Apache web servers to control how requests are handled for a website. In WordPress, it is commonly used to manage permalink and rewrite rules, but it can also be used for redirects, access restrictions, HTTP headers, and other server-level behavior.
Because .htaccess rules are processed by the web server, even a small syntax error can affect how your site loads or cause a server error. Before making changes, back up the existing file and, where possible, test your changes in a staging environment first.
In this guide, you’ll learn what the WordPress .htaccess file does, where to find it, how to edit it safely, and how to use it for common WordPress configuration tasks.
What is the .htaccess file?
The .htaccess file is a configuration file used by the Apache web server. Its name comes from “hypertext access,” although today it can control much more than access permissions.
In WordPress, .htaccess is most commonly used to manage URL rewriting and permalink behavior. WordPress can automatically add rewrite rules to the file so that human-readable URLs, such as /blog/example-post/, work correctly.
The file can also contain server-level rules for tasks such as:
- Redirecting URLs
- Forcing HTTP requests to HTTPS
- Restricting access to specific resources
- Controlling certain request behaviors
- Adding HTTP response headers
.htaccess is not a WordPress core file. It is an Apache configuration file that WordPress can use when the site is running on a server environment that supports it.
Because the web server processes these rules before WordPress handles the request, changes to .htaccess can affect your entire site. Always make a backup before editing the file.
Where is the WordPress .htaccess file located?
On most WordPress sites that use Apache, the .htaccess file is located in the root directory of the WordPress installation. This is usually the same directory that contains folders such as:
wp-adminwp-contentwp-includes
Depending on your hosting environment, the WordPress root directory may be named something like public_html, www, or another site-specific directory.
You can access the .htaccess file using an SFTP client, SSH, or your hosting provider’s file manager.
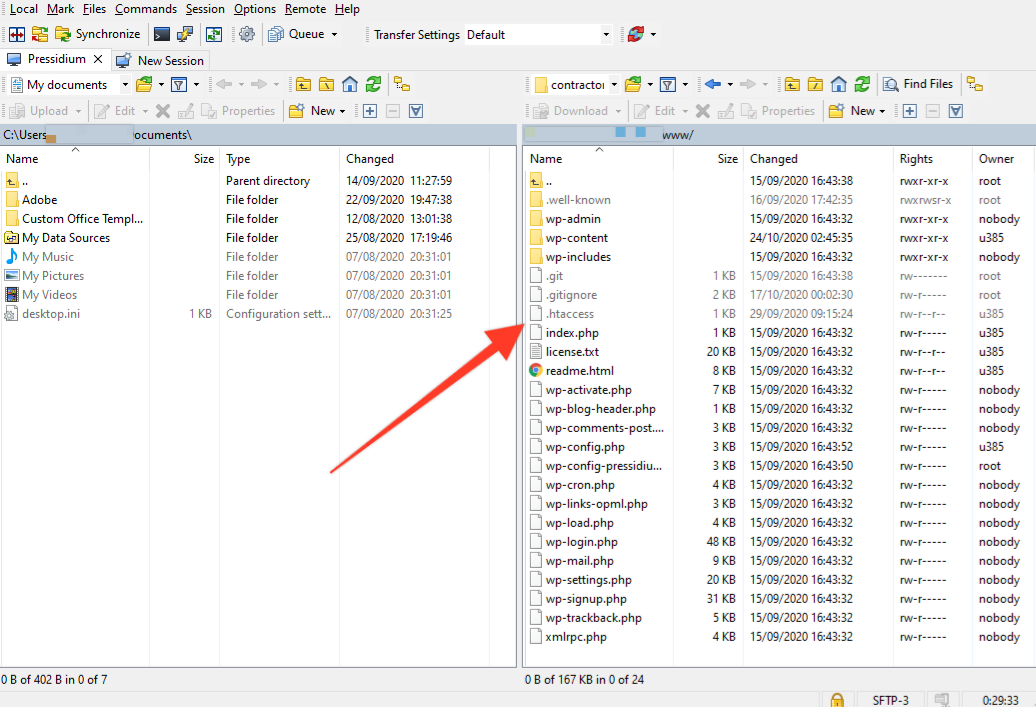
Because filenames beginning with a period are treated as hidden files on many systems, you may need to enable the option to show hidden files in your file manager or SFTP client before .htaccess becomes visible.
If you cannot find an .htaccess file, it does not necessarily mean something is wrong. The file may not have been created yet, or your server may use a configuration that does not rely on .htaccess.
Does every WordPress site have an .htaccess file?
No. Whether a WordPress site uses an .htaccess file depends on the web server and its configuration.
.htaccess is primarily associated with the Apache web server and other environments that support Apache-compatible configuration files. WordPress commonly uses it to manage permalink and rewrite rules on these servers.
If your WordPress site runs on Nginx, it does not use .htaccess. Nginx handles equivalent rules through its main server configuration instead.
You may also not see an .htaccess file on an Apache-based WordPress site if the file has not been created yet or if the server is configured so that WordPress does not need to use it.
For this reason, do not create or modify an .htaccess file unless you know that your hosting environment supports it.
What does the default WordPress .htaccess file look like?
For a standard WordPress installation using pretty permalinks, the WordPress-generated .htaccess rules typically look like this:
# BEGIN WordPress

RewriteEngine On
RewriteRule .* - [E=HTTP_AUTHORIZATION:%{HTTP:Authorization}]
RewriteBase /
RewriteRule ^index\.php$ - [L]
RewriteCond %{REQUEST_FILENAME} !-f
RewriteCond %{REQUEST_FILENAME} !-d
RewriteRule . /index.php [L]

# END WordPress
Lines beginning with # are comments. The # BEGIN WordPress and # END WordPress markers identify the section of the file that WordPress manages automatically.
Avoid adding custom rules between these markers because WordPress may overwrite them when it regenerates the rewrite rules. Place your own .htaccess rules outside the WordPress-managed block unless a specific tool or configuration instructs you otherwise.
How to create or regenerate the WordPress .htaccess file
If your .htaccess file is missing or its WordPress rewrite rules are corrupted, WordPress can usually regenerate them for you.
- Log in to your WordPress admin area.
- Go to Settings > Permalinks.
- Make sure your preferred permalink structure is selected.
- Click Save Changes.
If WordPress has permission to write to the .htaccess file, it updates or regenerates the required rewrite rules automatically.
If WordPress cannot write to the file, it may display the rewrite rules that need to be added manually. In that case, copy the provided rules into the .htaccess file in your WordPress root directory.
Important: Do not make the .htaccess file permanently writable just to allow WordPress to update it. If file permissions need to be changed, restore them to the appropriate secure setting afterward or follow your hosting provider’s guidance.
How to edit the WordPress .htaccess file safely
Because .htaccess rules are processed by the web server, an incorrect rule or syntax error can prevent parts of your site—or the entire site—from loading. Before editing the file, make sure you can restore the previous version if something goes wrong.
To edit .htaccess safely:
- Back up the existing file. Download a copy of
.htaccessto your computer or create a backup through your hosting provider. - Use a staging environment where possible. Test significant changes on a staging copy of your site before applying them to production.
- Open the file through SFTP, SSH, or your hosting provider’s file manager. Edit it using a plain-text editor.
- Keep custom rules outside the WordPress-managed block. Unless a specific configuration requires otherwise, do not add custom directives between
# BEGIN WordPressand# END WordPress, because WordPress may regenerate this section. - Make one change at a time. This makes it easier to identify and reverse a rule that causes unexpected behavior.
- Save the file and test your site. Check the front end, WordPress admin area, and any URLs or functionality affected by the rule you changed.
What to do if your site stops working
If the site returns a server error immediately after you edit .htaccess, restore your backup and test the site again.
If you cannot restore the original file, rename .htaccess temporarily – for example, to .htaccess_old – and check whether the site becomes accessible. You can then go to Settings > Permalinks in WordPress to regenerate the WordPress rewrite rules.
Important: Do not make .htaccess broadly writable as a permanent fix. File permissions depend on your server configuration, so use the permissions recommended by your hosting provider.
Useful WordPress .htaccess examples
Once you know how to edit .htaccess safely, you can use it for several common WordPress and server configuration tasks.
The examples below assume your site runs on an Apache environment that supports the required directives. Always replace example domains with your own and test each change before applying another.
Redirect between www and non-www
You may want visitors to use a single canonical version of your domain, such as example.com instead of www.example.com, or the other way around.
Before adding a redirect:
- Make sure both the
wwwand non-wwwhostnames are configured in DNS. - Decide which version should be your canonical domain.
- Make sure HTTPS is already configured for both hostnames if you use the HTTPS examples below.
To redirect www.example.com to example.com, add the following rule outside the WordPress-managed block, preferably before # BEGIN WordPress:
RewriteEngine On
RewriteCond %{HTTP_HOST} ^www\.example\.com$ [NC]
RewriteRule ^ https://example.com%{REQUEST_URI} [R=301,L]
For example: https://www.example.com/about/
redirects to: https://example.com/about/
To redirect example.com to www.example.com, use:
RewriteEngine On
RewriteCond %{HTTP_HOST} ^example\.com$ [NC]
RewriteRule ^ https://www.example.com%{REQUEST_URI} [R=301,L]
These examples use a 301 response because the preferred hostname is intended to be permanent.
After saving the change, test both versions of the domain and several internal URLs to confirm that they redirect to the correct hostname without creating a redirect loop.
Create a 301 permanent redirect
Use a 301 redirect when a URL has moved permanently and visitors should be sent to its new location.
For a simple redirect, Apache recommends using the Redirect directive rather than a more complex RewriteRule.
For example, to redirect: https://example.com/old-page
to: https://example.com/new-page
add:
Redirect 301 /old-page/ https://example.com/new-page/Apache treats the source path as a path prefix. This means URLs beneath that path can also be redirected, with the remaining path appended to the destination.
For example: /old-page/example/
would redirect to: https://example.com/new-page/example
Use a 301 only when the move is intended to be permanent.
Create a 302 temporary redirect
Use a 302 redirect when a URL should send visitors somewhere else temporarily but you expect the original URL to be used again.
For example:
Redirect 302 /temporary-page/ https://example.com/alternative-page/A 302 tells the client that the resource has moved temporarily. Apache also uses 302 as the default status when no redirect status is specified.
Use a temporary redirect for situations such as short-term maintenance, temporary campaign pages, or content that will later return to its original URL.
As with other custom .htaccess rules, place these redirects outside the # BEGIN WordPress and # END WordPress block and test the source and destination URLs after saving your changes.
Redirect HTTP traffic to HTTPS
If your site has a valid SSL/TLS certificate, you may want to redirect visitors who request the HTTP version of a URL to its HTTPS equivalent.
Before adding an .htaccess rule, check whether your hosting provider, reverse proxy, CDN, or edge platform already redirects HTTP traffic to HTTPS. Adding a second redirect at the origin can be unnecessary and, in some configurations, may contribute to redirect loops.
If HTTPS redirection is not already handled elsewhere, you can use:
RewriteEngine On
RewriteCond %{HTTPS} !=on
RewriteRule ^ https://%{HTTP_HOST}%{REQUEST_URI} [R=301,L]
For example: http://example.com/about/
redirects to: https://example.com/about/
The 301 status indicates that the HTTPS version is the permanent destination.
After saving the rule:
- Visit the HTTP version of your homepage.
- Test several internal HTTP URLs.
- Confirm that each request redirects once to the equivalent HTTPS URL.
- Check that the HTTPS pages load without certificate warnings or redirect loops.
Important: This rule assumes Apache can determine the original connection state through %{HTTPS}. If your site sits behind a reverse proxy, load balancer, CDN, or edge service, HTTPS may terminate before the request reaches Apache. In that case, use the HTTPS redirect method recommended by your hosting or edge provider instead of copying this rule blindly.
Block access from an IP address
You can use .htaccess to deny access to your site from a specific IP address when your Apache configuration supports the required authorization directives.
On Apache 2.4, use the Require syntax rather than the older Deny from rules.
For example, to block the IP address 203.0.113.25 while allowing everyone else:
<RequireAll>
    Require all granted
    Require not ip 203.0.113.25
</RequireAll>
To block more than one IP address, add them to the same rule:
<RequireAll>
    Require all granted
    Require not ip 203.0.113.25 198.51.100.14
</RequireAll>
Apache also supports IP ranges and CIDR notation when you need to restrict a network rather than a single address.
Important: If your site is behind a reverse proxy, CDN, load balancer, or edge platform, Apache may see the proxy’s IP address rather than the visitor’s real IP unless the server is configured to restore the original client address. In that setup, blocking visitors directly in .htaccess may not behave as expected.
For WordPress sites using a WAF or managed edge service, blocking unwanted IP addresses at that layer is usually preferable because the request can be rejected before it reaches the origin server.
Block unwanted bots with .htaccess
You can use .htaccess to block requests from a specific bot or crawler based on its User-Agent header.
For example, if a known crawler identifies itself as ExampleBadBot, you can mark matching requests and deny them:
SetEnvIfNoCase User-Agent "ExampleBadBot" unwanted_bot

<RequireAll>
    Require all granted
    Require not env unwanted_bot
</RequireAll>
Replace ExampleBadBot with the User-Agent pattern you want to block.
Apache recommends this type of approach when a persistent crawler ignores instructions such as those in robots.txt. (httpd.apache.org)
You can also match more than one known User-Agent:
SetEnvIfNoCase User-Agent "ExampleBadBot|AnotherCrawler" unwanted_bot

<RequireAll>
    Require all granted
    Require not env unwanted_bot
</RequireAll>
Important: User-Agent blocking provides only basic filtering. A bot can change or spoof its User-Agent header, so you should not rely on .htaccess rules as a comprehensive bot-protection mechanism. Apache specifically warns that User-Agent-based access control is unreliable for this reason. (httpd.apache.org)
Avoid copying large static lists of supposedly malicious bots into .htaccess. These lists can become outdated, add unnecessary configuration complexity, and will not stop bots that disguise themselves as legitimate browsers or crawlers.
For sustained bot attacks, scraping, scanning, or large volumes of automated traffic, a firewall or edge-level bot-protection system is generally more appropriate because it can identify and reject unwanted requests before they reach the WordPress origin.
Prevent image hotlinking
Image hotlinking happens when another website embeds an image directly from your site instead of hosting its own copy. Your server then handles the image request whenever that third-party page is viewed, which can consume bandwidth and other resources.
If you want to discourage hotlinking, you can reject image requests that contain a referring website other than your own:
RewriteEngine On
RewriteCond %{HTTP_REFERER} !^$
RewriteCond %{HTTP_REFERER} !^https?://([^.]+\.)?example\.com/ [NC]
RewriteRule \.(jpe?g|png|gif|webp|avif)$ - [F,NC,L]
Replace example.com with your own domain.
The first condition allows requests that do not contain a Referer header. This helps avoid blocking visitors or clients that request an image directly or do not send referral information. Requests that identify another website as the referrer are denied with a 403 Forbidden response.
The rule above covers common image formats including JPEG, PNG, GIF, WebP, and AVIF.
Important: Referer-based hotlink protection is not a security mechanism. The Referer header is optional and can be spoofed, so this approach should be used primarily to discourage unwanted third-party embedding rather than to protect sensitive files.
Restrict direct access to selected WordPress core files
Some files inside wp-admin and wp-includes are intended to be loaded by WordPress rather than requested directly by visitors. On Apache, you can add an extra layer of protection by rejecting direct requests to selected locations.
WordPress recommends the following rules for a standard single-site installation:
# Block direct access to include-only files.
<IfModule mod_rewrite.c>
RewriteEngine On
RewriteBase /
RewriteRule ^wp-admin/includes/ - [F,L]
RewriteRule !^wp-includes/ - [S=3]
RewriteRule ^wp-includes/[^/]+\.php$ - [F,L]
RewriteRule ^wp-includes/js/tinymce/langs/.+\.php - [F,L]
RewriteRule ^wp-includes/theme-compat/ - [F,L]
</IfModule>
Place these rules outside the # BEGIN WordPress and # END WordPress block so that WordPress does not overwrite them when it regenerates its rewrite rules.
The [F] flag tells Apache to deny matching requests with a 403 Forbidden response.
Important: Do not copy this configuration unchanged to a WordPress Multisite installation. WordPress notes that the rule targeting PHP files directly inside wp-includes can interfere with Multisite behavior. Follow WordPress Multisite-specific guidance or your hosting provider’s configuration instead.
As with any .htaccess security rule, test the site immediately after applying it and restore your previous configuration if normal WordPress functionality is affected.
Protect wp-config.php from direct access
The wp-config.php file contains important WordPress configuration data, including database connection details and security-related settings. It should not be directly accessible through a web request.
If your server supports .htaccess, WordPress recommends placing the following rule at the top of the file:
<Files "wp-config.php">
Require all denied
</Files>
The Require all denied directive tells Apache to reject web requests for wp-config.php. Apache 2.4 uses Require for access control instead of the older Order, Allow, and Deny directives.
Place this rule outside the # BEGIN WordPress and # END WordPress block so WordPress does not overwrite it.
This restriction affects direct HTTP access to the file. WordPress itself can still load wp-config.php internally as part of its normal operation.
After adding the rule, verify that your site and WordPress admin area continue to work normally.
Block direct access to PHP files in selected directories
Some WordPress directories are intended to contain uploaded or generated files rather than executable PHP code. Blocking direct web access to PHP files in those locations can reduce the risk of a malicious PHP file being executed through a web request.
This type of rule must be applied only to a directory where PHP execution is not required. Do not add it to the root .htaccess file unless you fully understand the effect, because it could prevent WordPress itself from running.
For example, if your server allows .htaccess files inside wp-content/uploads, you could place a separate .htaccess file in that directory containing:
<FilesMatch "\.php$">
    Require all denied
</FilesMatch>
This denies direct web access to PHP files within that directory and its applicable scope.
Important: Do not apply this rule broadly to directories such as the WordPress root, wp-admin, wp-includes, plugin directories, or theme directories. WordPress and its extensions may legitimately need to execute PHP files there.
Your hosting provider may already restrict PHP execution in upload or other writable directories at the server level. Check your hosting configuration before adding another rule.
After applying the restriction, upload and display a normal media file and verify that your WordPress site continues to work as expected.
Restrict or disable XML-RPC access
WordPress includes an XML-RPC endpoint at xmlrpc.php that allows external applications and services to communicate with your site. XML-RPC is enabled by default in WordPress and can be used for functions such as remote publishing and other integrations.
Because xmlrpc.php can also be targeted by automated brute-force requests, consider whether your site actually needs XML-RPC before deciding how to handle it. WordPress recommends disabling it if you do not use it, or restricting and rate-limiting it if you do.
If you are certain that your site does not need XML-RPC and want to block access at the Apache level, you can use:
<Files "xmlrpc.php">
    Require all denied
</Files>
Place the rule outside the # BEGIN WordPress and # END WordPress block.
Important: Blocking xmlrpc.php at the web-server level prevents all requests to the endpoint. Do not use this rule if your site depends on an integration or service that requires XML-RPC.
If you still need XML-RPC, blocking the endpoint entirely may not be appropriate. Consider using your hosting provider, firewall, or WAF to rate-limit or filter abusive requests instead.
After making a change, test any remote publishing, application, or integration functionality that communicates with your WordPress site.
Add custom HTTP response headers
Apache can use .htaccess to add or modify HTTP response headers when the mod_headers module is enabled and your server configuration allows the Header directive.
For example, you can add a custom response header with:
<IfModule mod_headers.c>
    Header set X-Custom-Header "Example value"
</IfModule>
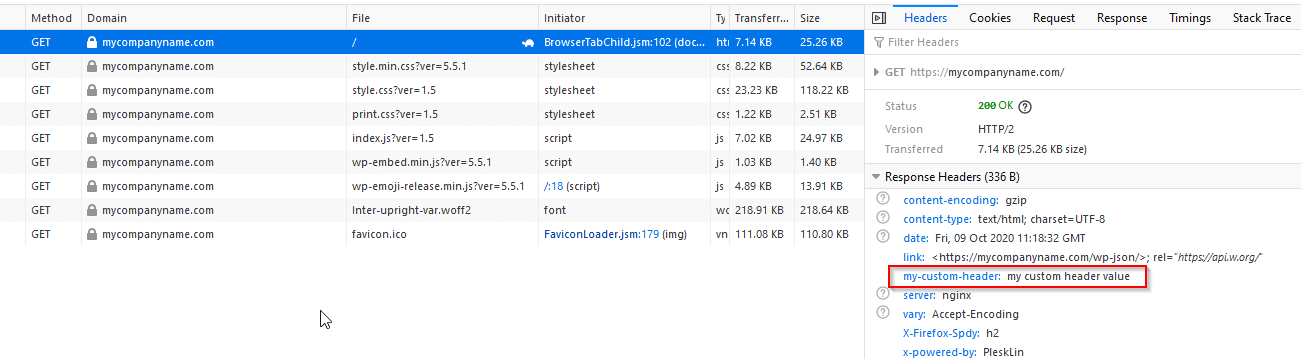
After saving the change, a response from your site should include:
X-Custom-Header: Example valueThe set action replaces any existing header with the same name rather than adding another copy. Apache also supports other actions such as add, append, merge, and unset for different header-management requirements.
Custom headers can be useful for tasks such as:
- Controlling certain browser behaviors
- Adding application-specific response metadata
- Configuring cache-related response behavior
- Applying security-related headers
Important: Do not copy security or caching header configurations without understanding their effect. Headers such as Content Security Policy or cache-control directives can change how browsers load resources or how content is cached and may break site functionality if configured incorrectly.
If the rule causes a server error or the header does not appear, your hosting environment may not allow the Header directive in .htaccess, or mod_headers may not be available. In that case, use the configuration method provided by your hosting provider.
You can verify the result in your browser’s developer tools by opening the Network panel, selecting a page request, and checking its Response Headers.
Common WordPress .htaccess problems and how to fix them
A missing, corrupted, or unsupported .htaccess rule can cause problems ranging from broken permalinks to server errors. If an issue starts immediately after editing .htaccess, restore your previous version before troubleshooting anything else.
500 Internal Server Error after editing .htaccess
A syntax error or unsupported directive in .htaccess can cause Apache to return a 500 Internal Server Error.
If the error appeared immediately after you changed the file:
- Connect to your site using SFTP, SSH, or your hosting provider’s file manager.
- Restore the backup you created before editing
.htaccess. - If you do not have a backup, rename
.htaccessto something such as.htaccess_old. - Reload your site.
If the site works after renaming the file, the .htaccess configuration was likely responsible.
For a standard WordPress installation, go to Settings > Permalinks and click Save Changes to regenerate the WordPress rewrite rules.
Do not immediately restore custom rules. Add them back one at a time and test the site after each change.
WordPress permalinks return 404 errors
If your homepage loads but posts or pages return 404 Not Found errors, the WordPress rewrite rules may be missing or incorrect.
First, go to Settings > Permalinks and click Save Changes without changing the selected permalink structure. WordPress will attempt to refresh its rewrite rules.
Then test several posts and pages again.
If the problem continues:
- Confirm that
.htaccessexists in the correct WordPress directory. - Check that the WordPress-generated rewrite block is present.
- Confirm that your server supports WordPress rewrite rules.
- Check with your hosting provider if WordPress cannot update
.htaccess.
If your site runs on Nginx rather than Apache, changing .htaccess will not fix the issue because Nginx handles rewrite rules through its server configuration.
The .htaccess file is missing
If you cannot see .htaccess, first make sure your SFTP client or file manager is configured to display hidden files.
If the file genuinely does not exist and your site uses Apache, go to Settings > Permalinks and click Save Changes. WordPress will attempt to create or update the required rewrite configuration.
If WordPress cannot create the file automatically, your hosting environment may require you to create or configure it manually.
Do not assume that every WordPress site requires .htaccess. Nginx and some other server configurations manage equivalent behavior elsewhere.
Changes to .htaccess have no effect
If you edit .htaccess but nothing changes, check that:
- You edited the
.htaccessfile for the correct WordPress installation. - The rule applies to the directory where the file is located.
- The required Apache module is available.
- Your server allows the directive to be used in
.htaccess. - Another server, proxy, CDN, or edge configuration is not handling the behavior before the request reaches Apache.
Apache can also be configured to ignore .htaccess files entirely. If valid rules appear to have no effect, contact your hosting provider to confirm whether .htaccess overrides are enabled for your site.
WordPress cannot update .htaccess
When WordPress cannot write its permalink rules to .htaccess, it may require you to update the file manually.
Do not solve this by making .htaccess permanently writable by everyone. File permissions depend on the server environment, and overly permissive settings can create unnecessary security risk.
Use the permissions recommended by your hosting provider. If WordPress still cannot update the file, ask your provider to confirm the correct ownership and permissions for your WordPress installation.
Custom rules disappear
WordPress may regenerate the content between:
# BEGIN WordPress
...
# END WordPress
Custom rules placed inside this block can therefore be overwritten.
Keep your own rules outside the WordPress-managed section unless the tool or application creating the rule specifically requires otherwise.
When .htaccess isn’t the right tool
.htaccess is useful for Apache-level configuration, but not every performance, security, or traffic-management task is best handled at the origin server.
For example, .htaccess can be appropriate for:
- URL rewrites and redirects
- WordPress permalink rules
- Restricting direct access to specific files
- Adding or modifying selected HTTP headers
- Applying directory-specific Apache configuration
Other tasks are often better handled before traffic reaches your WordPress server. These include:
- Global content caching and delivery
- Web Application Firewall (WAF) protection
- DDoS mitigation
- Bot filtering
- Geographic or IP-based traffic controls
- Load balancing and traffic routing
Handling these functions at a CDN, WAF, or edge layer can reduce the amount of unwanted or cacheable traffic that reaches the origin server in the first place.
For example, Pressidium EDGE sits in front of the WordPress origin and processes traffic before it reaches the hosting infrastructure. It can cache content, filter malicious requests, and route traffic at the Edge, while the origin continues to handle WordPress execution and valid uncached requests.
This does not make .htaccess unnecessary. It means you should apply each rule at the layer best suited to handle it rather than using .htaccess as a solution for every WordPress performance or security requirement.
Conclusion
The WordPress .htaccess file is a powerful Apache configuration tool, but it should be used carefully. In WordPress, its most common role is managing permalink and rewrite behavior, although it can also handle redirects, access restrictions, headers, and other server-level rules.
Before editing .htaccess, always make a backup, keep custom rules outside the WordPress-managed block, and test changes one at a time. If a change causes problems, restore the previous file or regenerate WordPress rewrite rules through Settings > Permalinks.
It is also important to use .htaccess only for tasks that belong at the Apache or origin-server level. Caching, WAF protection, bot mitigation, DDoS protection, and global traffic management are often better handled by your hosting, CDN, or edge platform before requests reach WordPress.
Used in the right context, .htaccess remains a useful part of administering and troubleshooting WordPress sites without becoming a catch-all solution for every performance or security requirement.
Start Your 14 Day Free Trial
Try our award winning WordPress Hosting!