

Prototype Development is the activity of building an incomplete model of a system (usually a product) as a proof of concept, or as a means of acquiring more information (costs, dependencies, etc) about what is needed to be built. The developed prototype is then evaluated by test users, and their input is used for further refinement.
There are different types of prototyping, as this activity takes place in many fields besides software engineering and development. Mechanical engineering, design and electronics are some disciplines that use prototyping techniques. We will concern ourselves mostly with software-based prototypes.
The Process of Prototype Development
Prototyping is an iterative process. In each iteration, the prototype is refined more and more until it becomes mature enough for a wider release.
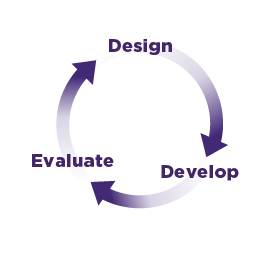
Design
In the Design stage, specifications and requirements are gathered for the prototype. This can be done in a variety of ways depending on whether you are part of a larger team or a single creative. It also depends on the type of prototype you will be developing.
Develop
After the prototype’s specifications are captured, development starts.
Evaluate
When development is finished, the prototype goes through an evaluation stage. The insights from the evaluation are fed back to the design, and the process begins again.
Prototyping in WordPress (Plugins and Themes Development)
For software prototypes such as WordPress plugins, use case scenarios aid in capturing the functional requirements of the prototype.
Try our Award-Winning WordPress Hosting today!


A scenario is a sequence of steps describing the interaction of a user with a system. For example, let’s say we want to develop an electronic payments WordPress plugin. The main scenario would be the following:
Main Scenario
- The user selects the payment type by clicking on the corresponding button (Paypal, VISA, etc)
- The user fills the needed information and then clicks the Pay button.
- The payment goes through and upon success, the user is notified by an e-mail of the order information.
Extensions
1a. The user selects Paypal.
– The user is redirected to the Paypal login screen.
1b. The user selects VISA.
– The user is prompted to enter the credit card number, security code, expiration date, etc.
2a. The credentials and/or information that the user entered are incorrect.
– If the user has selected VISA, the fields containing the errors will go red, and the user will be prompted again to enter them.
3a. The payment doesn’t go through for some reason (bank or Paypal rejects the transaction, etc).
– A red warning error message will appear on the screen announcing that the payment hasn’t gone through, plus whatever error code the bank or payment gateway returned.
The main scenario describes the main interaction between the user and the system, while the extensions to each step detail the alternative ways that the interaction will go, if something goes wrong. You can also add the following information in order to enrich the scenario:
- A pre-condition that needs to be true, in order for the system to start or continue to the next step.
- A guarantee that the system will ensure is true, after the end of each step.
- A trigger is an event that signals the start of a scenario or a step.
Although use case scenarios are versatile enough to describe user interactions, functionalities and system behaviours, they do not address any visual or aesthetic information. You need a different set of tools for that.
If, for example, you are developing a WordPress theme, the process can look like the following:
- Sketch on paper how the theme will roughly look. Its main elements and image placement, and so on. You will probably iterate a couple of times until you decide on the final design. Cutting out and shuffling around elements and experimenting with placement is very helpful at this stage and saves you time.
2. When you finalise the design, it’s time to start wireframing its mockup by using a tool like Sketchapp. This is the stage where you transfer your paper doodles and drawings into a preliminary digital format. The prototype is redesigned and enriched using colours, gradients, geometrical elements, bitmaps, etc. However, this is still in early form, with plenty of design information missing.
3. The final stage of the prototype needs actual material spec lists, like sizes, fonts, etc with pixel perfect accuracy. You can use a tool like Zeplin.io, or directly start developing the design using CSS.
Wrapping Up
Prototyping is large and complex as a discipline, and we’ve barely touched its surface. Whatever tool or technique you choose to use is up to you. The important thing is to iterate quickly and not lose time getting bogged down in details. We will be using prototyping in a hands-on manner in future posts so stay tuned.
Start Your 14 Day Free Trial
Try our award winning WordPress Hosting!


