

Contact Form 7 is a hugely popular WordPress plugin with an incredible 5+ Million active installations. In a crowded Contact Form marketplace, Contact Form 7 is clearly doing something right!
One of its many appeals is that Contact Form 7 is completely free. Whilst many contact form plugins offer a free version, they tend to follow a ‘freemium’ strategy where the basic plugin is free to use but you have to pay for additional features. The saying goes ‘you get what you pay for’ but in the case of Contact Form 7 it genuinely offers a fantastic contact form product for no money. Unusual indeed!
Although it is free, it can be a little complex to setup and, if this is the first time you’ve used it, you’ll likely find elements of the setup process a little confusing. That’s where we’re here to help with this Ultimate Beginners Guide to Contact Form 7.
Let’s get started with Contact Form 7!
First things first… we need to install the Contact Form 7 plugin. If you use WordPress regularly then this will take you 30 seconds and you can skip this part of the article. For those of you who are less familiar let’s take a look at how to do this.
Log into your WordPress Admin and then head to the Plugins tab on the left-hand side of the page. Click that and you’ll be taken to the WordPress plugin repository. From here you can search for and install thousands of different plugins (although please don’t add thousands of plugins to your WordPress website… a maximum of ten is generally recommended!).
This is one of the many amazing things about WordPress – it’s relatively easy using a plugin to add a range of functionality to your website, and as WordPress is so popular, new plugins are being added to the WordPress repository daily. Odds are, if you want a particular feature or function on your website, there is a plugin that’ll do it for you!
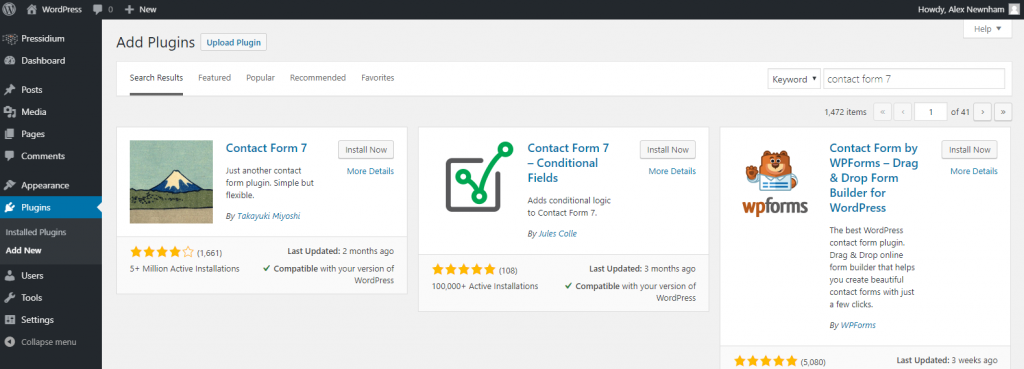
Use the ‘Search plugins’ search bar near the top right and type in ‘Contact Form 7’. It’ll pop right up on screen. Click on ‘Install Now’ and it will load up. Then click on ‘Activate’ and you’ll be ready to go.
Setting Up Contact Form 7
Now the Contact Form 7 plugin has been installed and is activated you’ll see a new ‘Contact’ tab on the left-hand side in your WordPress Admin. Click on that and you’ll load up the Contact Form 7 interface.
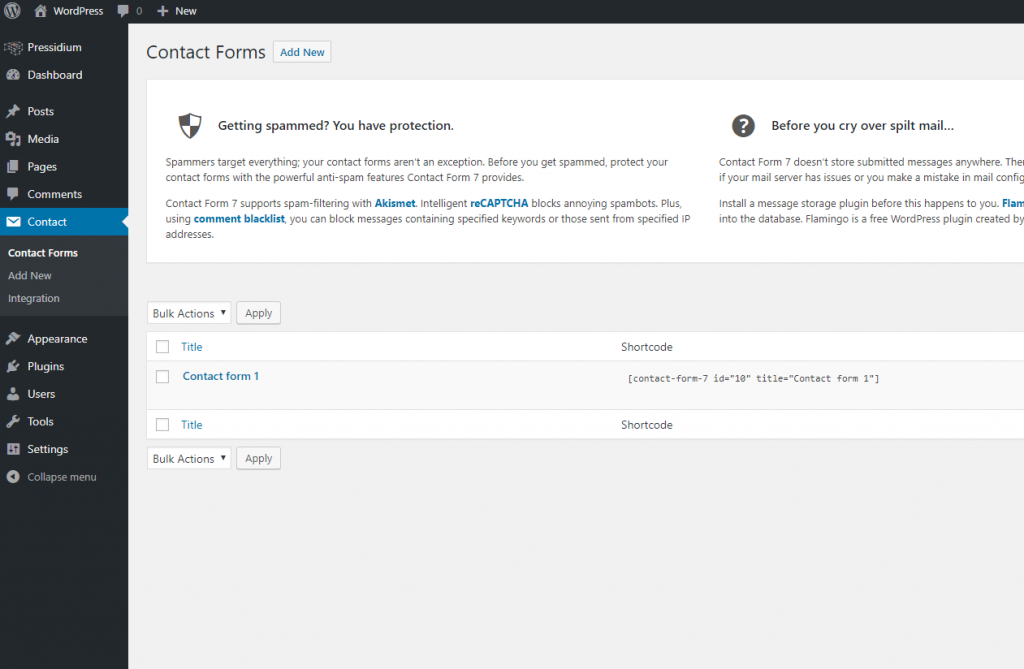
You will see that Contact Form 7 has a pre-built contact form called ‘Contact form 1’ for you to get started with. Click on that and you will now see the control panel for this contact form.
Within reason (we’re not aware of any hard limits) you can create as many contact forms as you need. These contact forms can be configured differently. So, for the main Contact page of your website you might need just a basic form. You may also want to run a survey and you could build a ‘contact form’ to do that which is loaded onto another page of your website. Each contact form can send responses received to a different email address as required.
Let’s get to work with the default contact form.
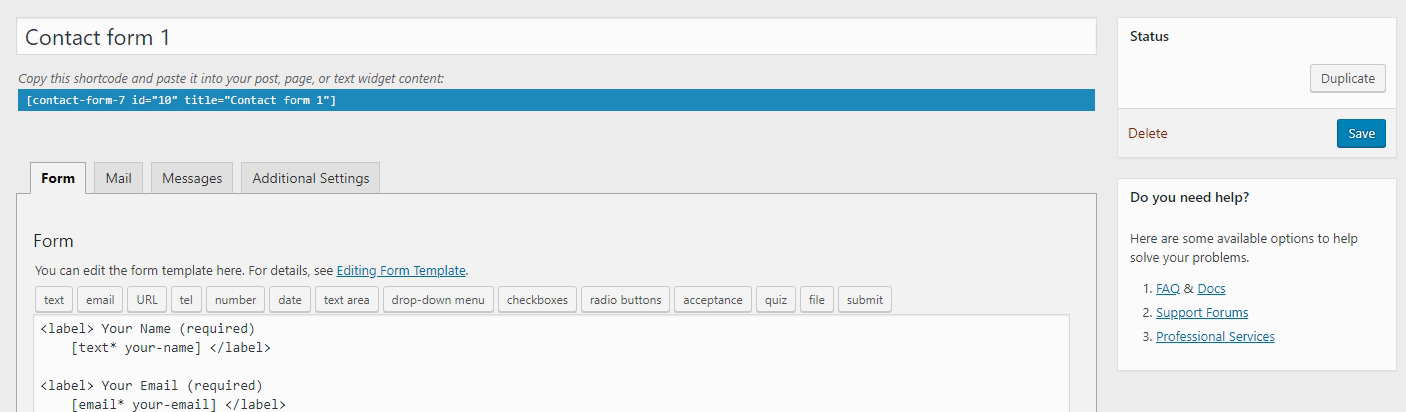
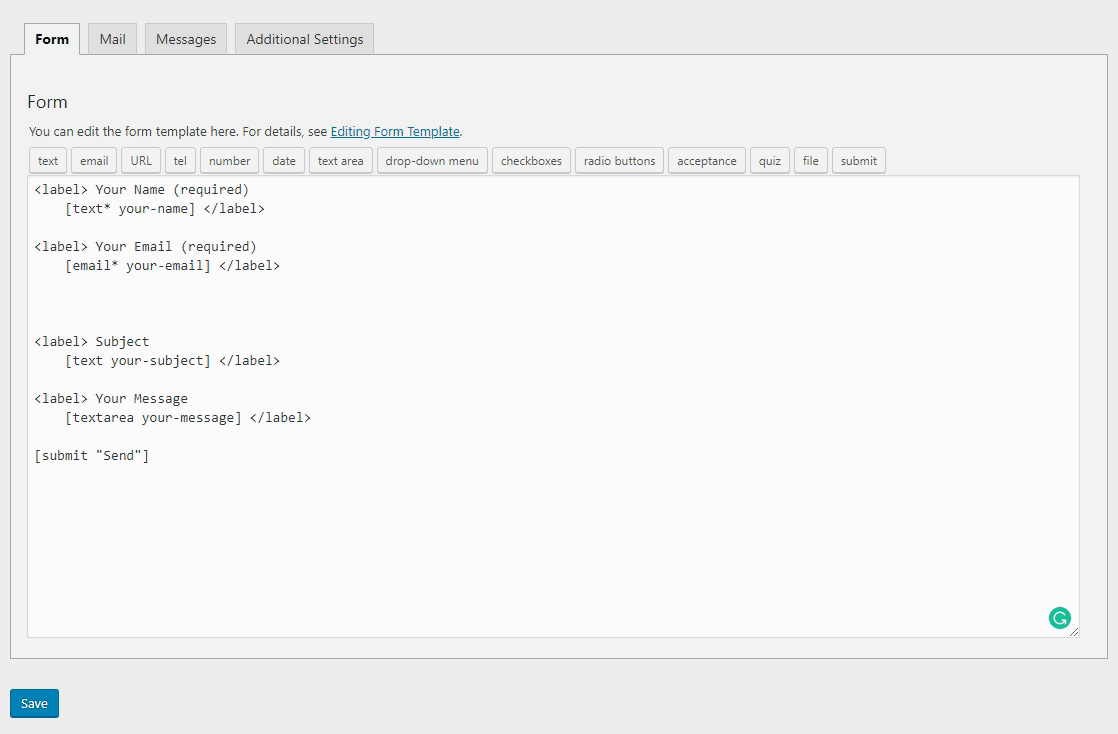
The Form Tab in Contact Form 7
The ‘Form’ tab is where you will do most of the setup for your form. You’ll see the form template with placeholders for Your Name, Your Email, a Subject and then Your Message.
It can definitely be confusing and is not a case of drag and drop to configure but once you get a handle on how this works, the full power of Contact Form 7 becomes available to you.
Try our Award-Winning WordPress Hosting today!


The default form is called ‘Contact form 1’. In the exact same way you can change the name of a page or post, you can easily change the name of your contact form. Let’s go for ‘Main Contact Form’ for our example.
Before we look at adding new fields to our form, let’s first understand the basics of how form fields are laid out in Contact Form 7.
Main Form Fields in Contact Form 7
The first field of the default form will look like this from within the Form tab:
<label> Your Name (required)
[text* your-name] </label>
Each field begins with <label> and is then ended with </label>. Those of you who have done some HTML coding will feel at home here but don’t panic if this looks complex. It’s super easy to add a new ‘test’ form at any point and you can then quickly copy this default layout to get you started if you need a hand in the future.
The initial element of the form field is the name of the field. In this example it is Your Name. So, the field will ask a contact for their name. Easy! You can write what you want here (e.g. First and Last Name).
You’ll notice that ‘(required)’ is added after this text. This means the words ‘required’ will be displayed and that the field has been programmed to be a required field. We’ll show you how in a second.
Underneath the field label you’ll see this:
[text* your-name]
We are now onto the element of the form which controls how information is sent via the form. The initial ‘text’ wording indicates that this is a text-based single-line field. The asterisk after this tells Contact Form 7 that the field is a required one (it won’t let you send the form without filling in this field).
After that, we have ‘your-name’. This is the form tag and is the unique identifier for the form field. This will make more sense shortly! This whole element is placed in square brackets and then the form field ends with </label>
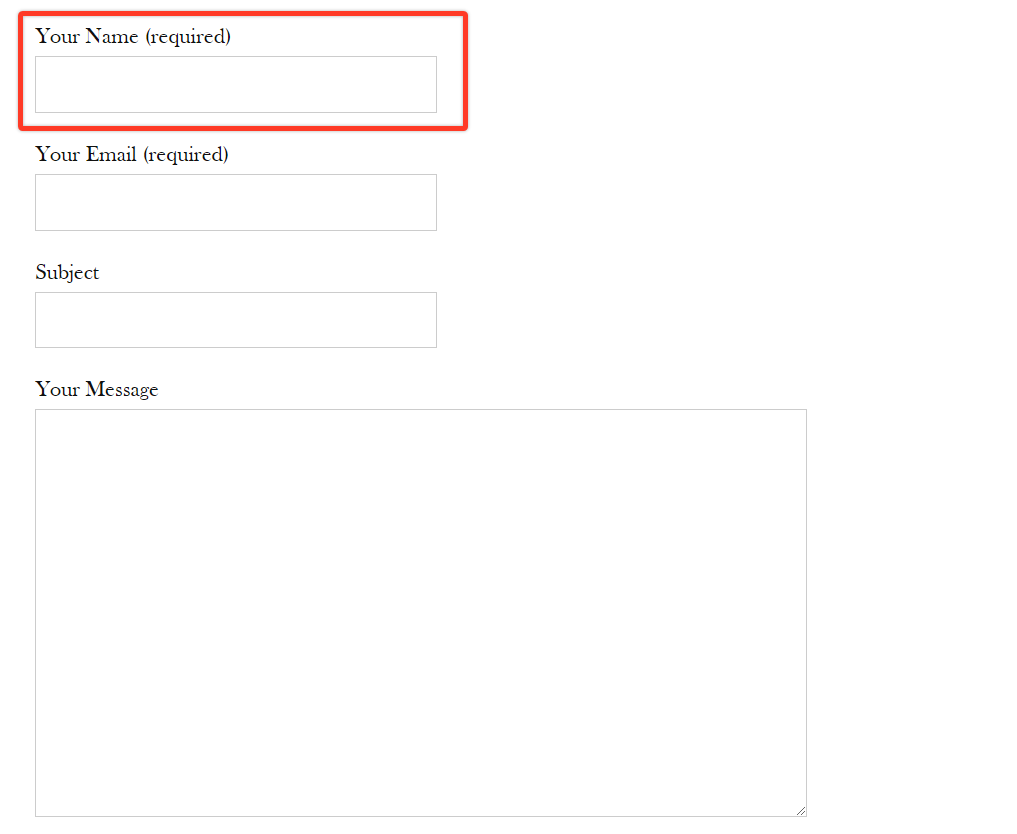
So in summary, when we publish the form, this first section will be displayed as the form field highlighted in red (below).
Each field in the form has its own row which begins with <label> and ends with </label>. The same method is applied to all of the form fields within Contact Form 7, but with different labels and Form Tags. Read on to find out more!
Adding New Fields in Contact Form 7
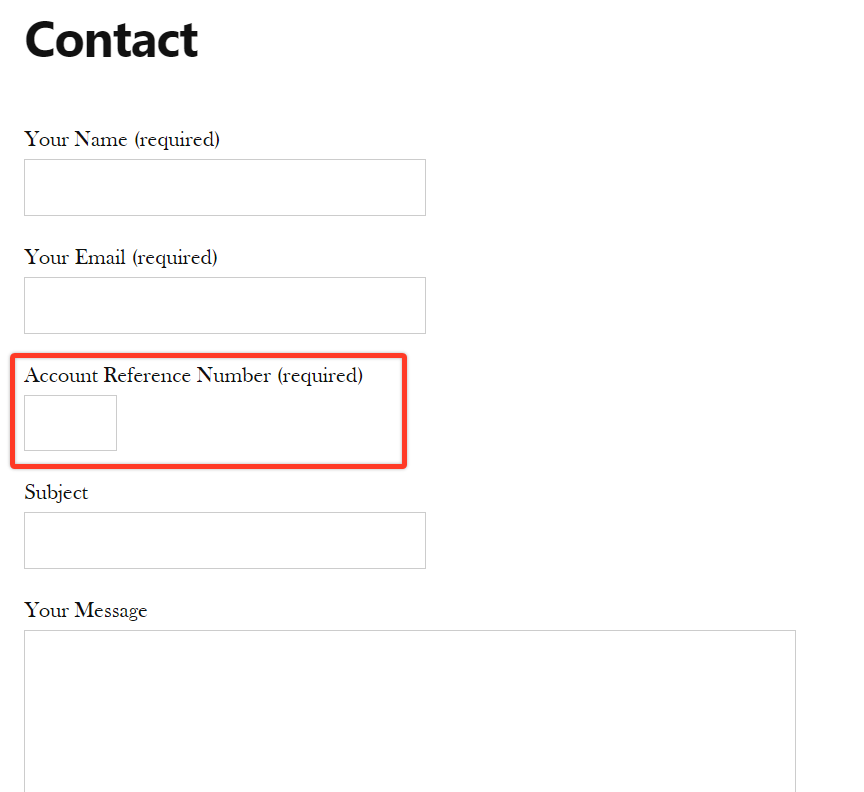
To add a new field to your Contact Form 7 form you will need to choose from one of the form placeholders which are laid out across the top of the form. There are several options and most are self-explanatory, for example, a ‘number’ placeholder will generate a form field that accepts numbers. This is perfect if you have a form field where you want people to only fill it out with numbers. Let’s set this up now as an ‘Account Reference Number’ and make it a mandatory field.
- We’ll start with <label></label>.
- The let’s add in the field name: <label> Account Reference Number </label>.
- Now we’ll add in the form tag. To do this, click on the number tag. A popup will open that gives you several new fields to fill in. You can run with the default values here. Choose ‘Spinbox’ and then, if you wish enter a default value and a min and max number that can be entered. So, if you have 4 digit account numbers then enter 1000 as the min number and 9999 as the max number. Click on the blue ‘Insert Tag’ button to insert this new form tag into your form.
- You will have noticed that there was a ‘Required field’ checkbox in the popup. Pretty self-explanatory… but if you forgot to tick it, you can easily make a field required by adding in an asterisk as shown in the screen recording below.
- Click ‘Save’ to save your form. You’ve now customized your Contact Form 7!
- Rinse and repeat for as many fields as you require. Watch the recording below for an example:
Now you’ve set this up, let’s take a look at what this would look like in practice:
Contact Form 7 has a wide variety of form tags and these can be customized in lots of ways. Because it’s a supremely well-maintained plugin, they also release new features on occasion as well. Odds are, if you want to achieve something in Contact Form 7 there is normally a way!
The Mail Tab
Now your form has been created we can get onto configuring where the responses get sent. Click on the ‘Mail’ tab and you’ll see what looks a bit like an email editor.
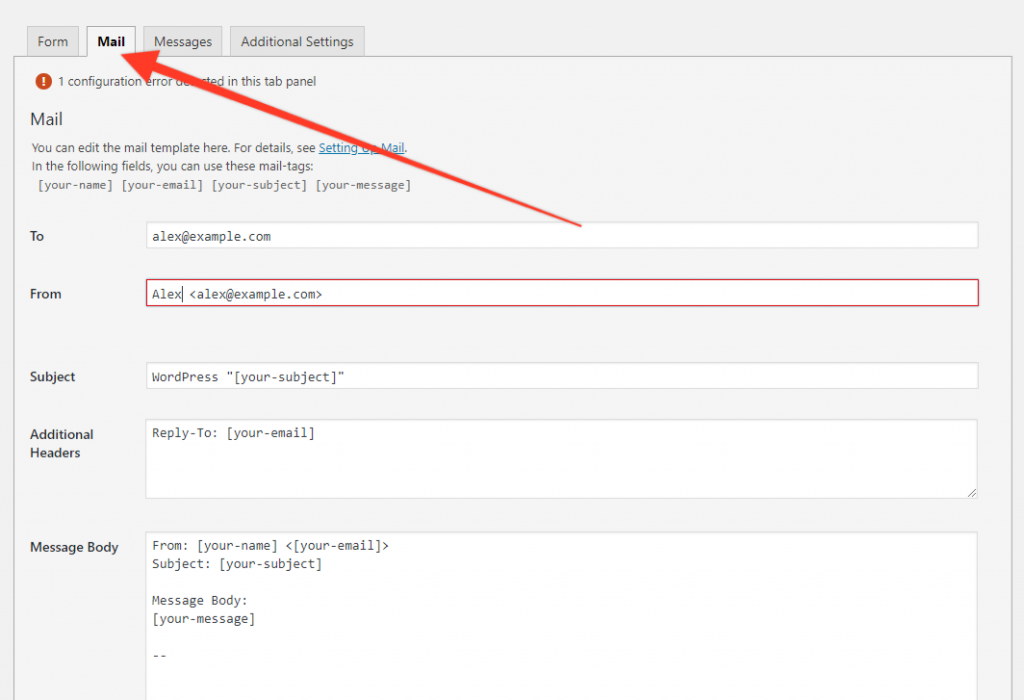
We need to carefully configure several fields here so you receive any contact form submissions successfully. Let’s run through the fields:
To:
Fairly self-explanatory; this is where you need to put the email address in for where you want the form to be sent to.
From:
There are two components to this. It’s nice if the email pitches up in your inbox and have the senders real name in it. To do this we’re going to put in the name tag. It’ll look like this:
[your-name]
Next, we ideally need to put in an email address that uses the same domain name that your website is hosted under. So, if your website domain is example.com, you’ll really need an email like ‘yourname@example.com’ to go here. You will end up with something like this (using your email address):
[your-name] <alex@example.com>
Subject:
You can either put your own subject line in here (for example ‘Customer Account Question’) or, if your contact form has a Subject line in it, you can again use the Form Tag like this:
[your-subject]
Additional Headers:
There are several email headers you can add here (which controls how your email behaves). The default (and most useful one) is:
Reply-To: [your-email]
Remember in the ‘From’ field we used our email address? This was primarily so your email account didn’t treat the email as spam. We would rather, however, be able to quickly reply to messages sent from our website so the additional header (above) tells our email program that the email ‘reply’ address should be the sender’s actual email address that they would have filled in on the contact form. Easy!
Message Body:
The default Message Body template looks like this:
__________
From: [your-name] <[your-email]>
Subject: [your-subject]
Message Body:
[your-message]
This e-mail was sent from a contact form on WordPress (http://example.com)
____________
I’ve highlighted the form tags in bold. You can configure the layout of this message template however you wish whilst ensuring you maintain the integrity of the form tags.
So, we added a new field in our form which was ‘Account Reference Number’. You’ll notice there is no mention of this field in the Message Template above. We need to add it in. To do this go back to the Form tab and copy the new field you created. Paste it into the Message Template so it looks like this:
____________
From: [your-name] <[your-email]>
Subject: [your-subject]
<label>Account Reference Number (required)
[number* number-660 min:1000 max:9999] </label>
Message Body:
[your-message]
____________
The ONLY bit you need to keep is the actual form tag which I have highlighted in italics. You can delete the rest. You need to put the form tag inside square brackets and then add in your own label so you can understand the information in your email when you receive it. So, it will end up looking like this:
____________
From: [your-name] <[your-email]>
Subject: [your-subject]
Account Reference Number: [number-660]
Message Body:
[your-message]
____________
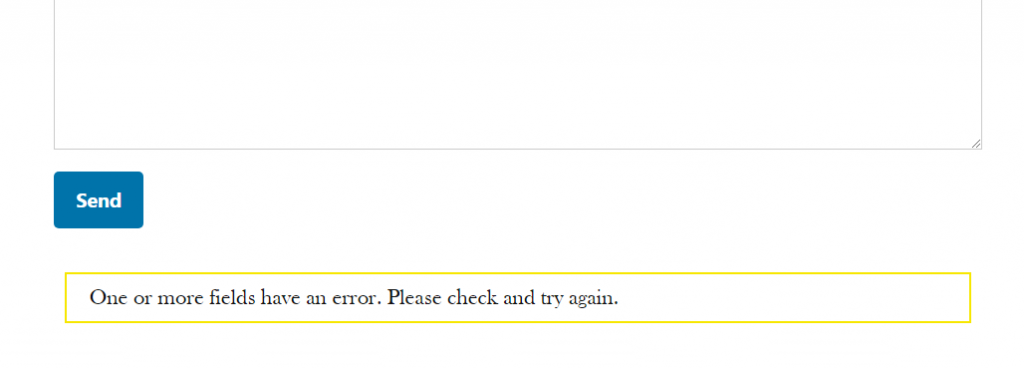
And that’s it! You can add in other text as required and copy over as many form tags as you wish. When you test the email, if you don’t see the form information then you have probably just forgotten to add the form tag to your message template. See below for how this will look:
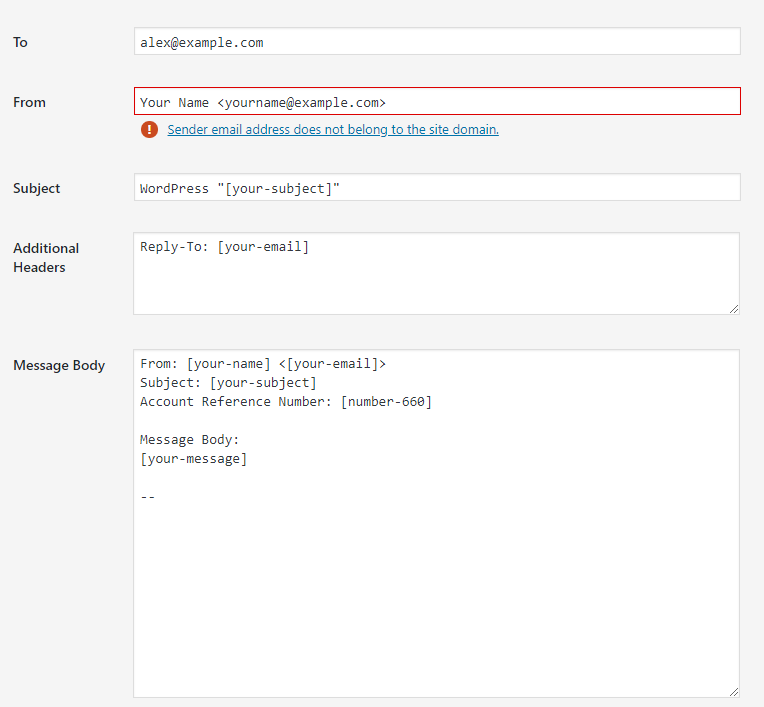
You might notice the red warning… you will see this is your email address does not belong to the same domain that the website is hosted on. This could happen if you are building your website on a staging server or (as in this instance) if it’s the wrong email address for the domain!
The Messages Tab
Ok, you can now breath a bit. We’ve done the bulk of the hard work. Your form has been designed and you have setup the email that your website will send you when someone fills in the form. We have a few more bits to do but it now gets fun!
The Messages Tab is a quick win. Open it and you’ll see lots of default messages. These are what are displayed to the end-user when they submit your form. You can customize these as you wish. These messages will get displayed under the form whenever someone sends it.
Duplicating Contact Form 7
A great way to learn how to use Contact Form 7 is by just having a go! But before you go messing around with your form, you might want to think about duplicating it. This is also a great trick if you have spent hours building a form and want a new copy that will retain many of the fields you have already set up and you don’t want to have to start from scratch with building it.
To duplicate the form you’ll need to install a new plugin. Head back to the plugin page from within your WordPress Admin and click on ‘Add New’. Search for ‘Duplicate Post’ and install this.
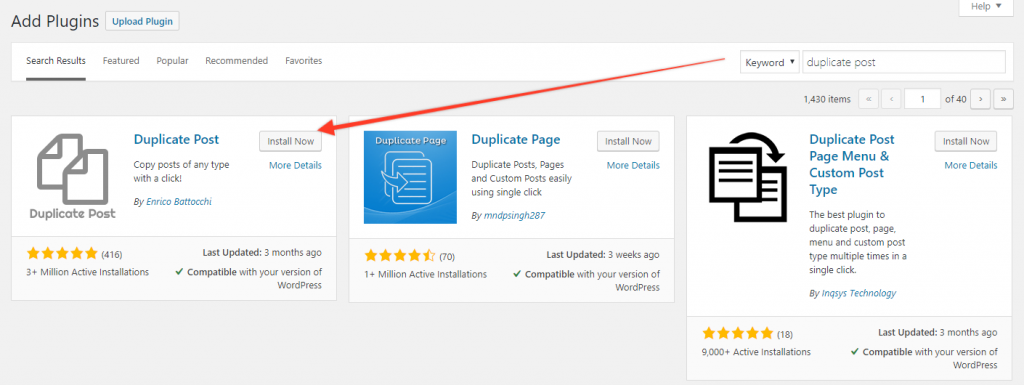
Activate and then head back to your Contact tab. Load the form you want to duplicate and in the top right of the form (above Save) you’ll see a button which says ‘Duplicate’. Hit that and you’ll get a perfect copy of your form. This is perfect for testing out features or can save you hours of work when you want a new form for your website but can’t find the energy to start from scratch!
Adding your Contact Form 7 form to a web page
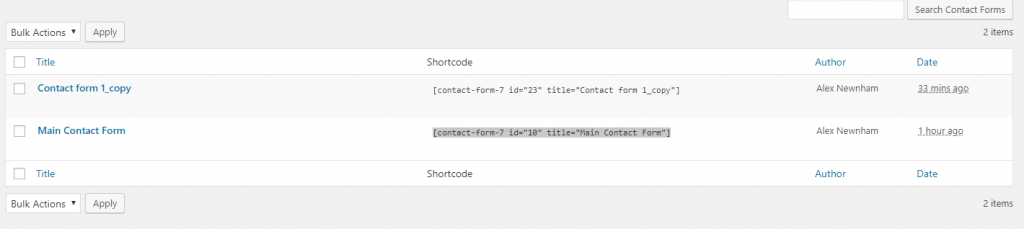
So, you’ve done it! You’ve built your Contact Form and now all that is left to do is to add it to a page on your website. Fortunately, this is super easy. To get started head to the main Contact Form 7 tab (click ‘Contact’ in the Admin bar). You’ll then see a list of your forms. This is where naming them comes in handy and if you’re unsure what form is what, now is the time to open them and give them an appropriate name.
Alongside the name you will see a Shortcode. Shortcodes are an easy way of inserting a function into a WordPress page or post. We need to copy this shortcode by clicking on it. It will go blue and then you can copy this (CTRL C on a PC).
Now, open up the page where you want to place your Contact Form. Go to the section on the page where you want the form and then add a Shortcode Widget using the Gutenberg Editor.
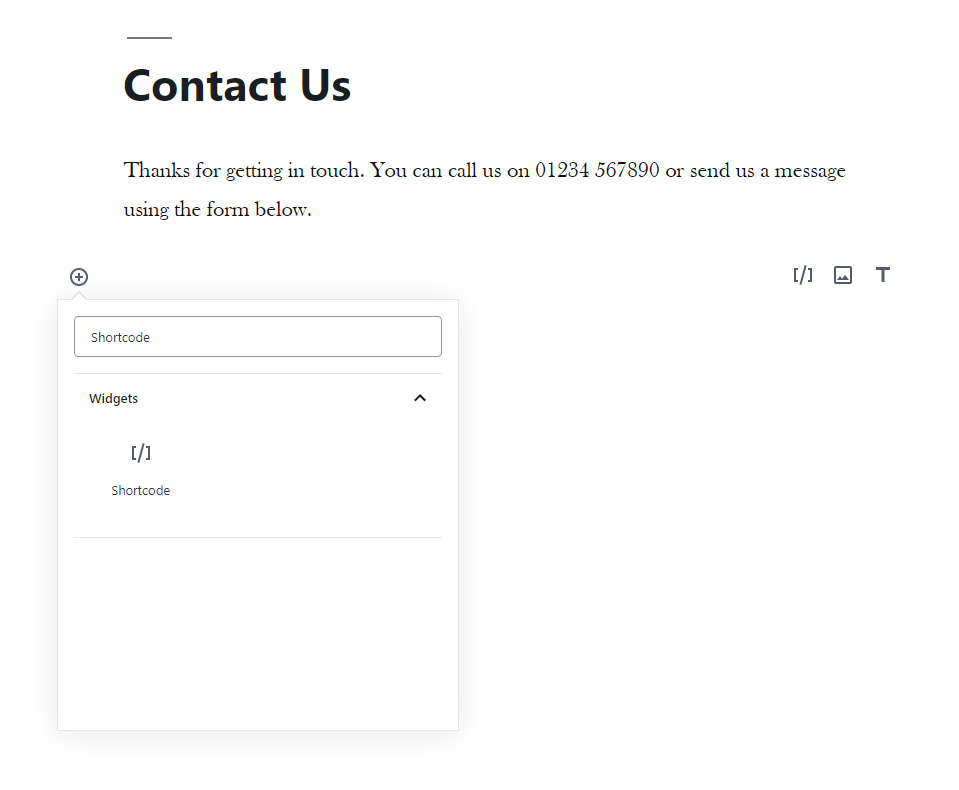
Paste your previously copied Contact Form 7 shortcode in the widget box and update the page.
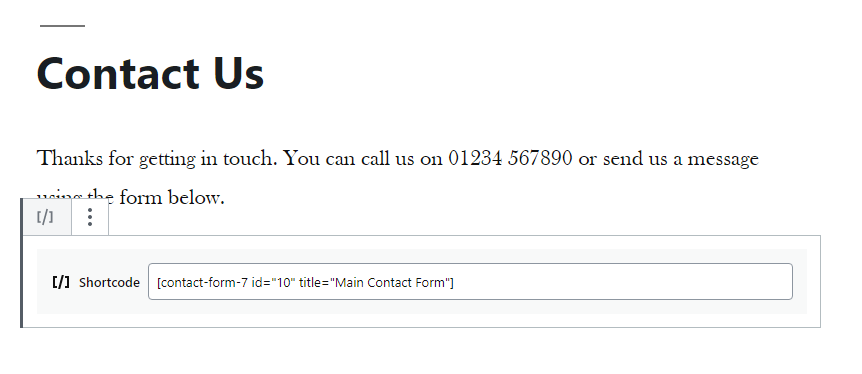
That’s it! Your Contact Form 7 form will now display. Load the page and take a look.
Now for the really exciting part… testing your form! Fill it out and press Send! Fingers crossed you should get an email into your account within a few seconds.
Configuring a Google reCAPTCHA
Spambots are everywhere and they’re looking for forms just like yours. Why they bother is anyone’s guess but you’re pretty much guaranteed to get a whole lot of email that you really don’t want without setting up a reCAPTCHA.
If you don’t believe me then feel free to skip this step… I give you a week before you’re back here checking out these instructions 😊
What’s a reCAPTCHA?
It’s a free service from Google that helps protect websites from spam. You’ve almost certainly seen the ‘Tick this box to confirm you’re not a robot’ tickbox on forms before? Well, that’s a reCAPTCHA.
Things have moved on a lot now, and Google has introduced V3 of their reCAPTCHA which doesn’t even need the user to tick a box making ot very user-friendly. All you need to do is set one up.
Fortunately, Contact Form 7 makes this very easy to do. To begin go to https://www.google.com/recaptcha/intro/v3.html

Click on the blue ‘Admin Console’ button in the top right and log into Google (you’ll need to setup a free Google account if you haven’t got one already).
When you’re logged in click on the + icon in the top right and then fill out the form.

Under ‘Label’ just use the name of your website and then importantly select v3 of the reCAPTCHA (v2 won’t work with Contact Form 7).
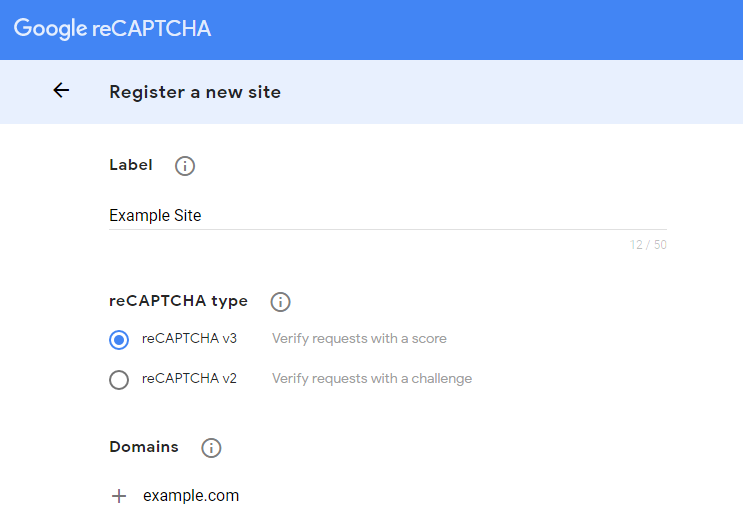
Add your website domain exactly (or again it won’t work) and then accept the terms and Submit. You’ll next be presented with a page that looks like this:
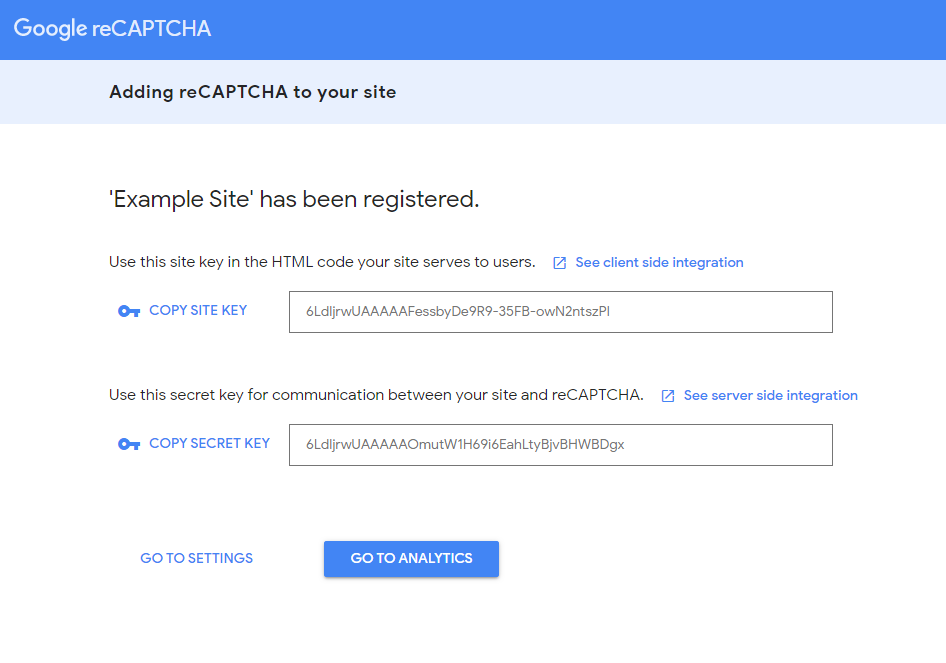
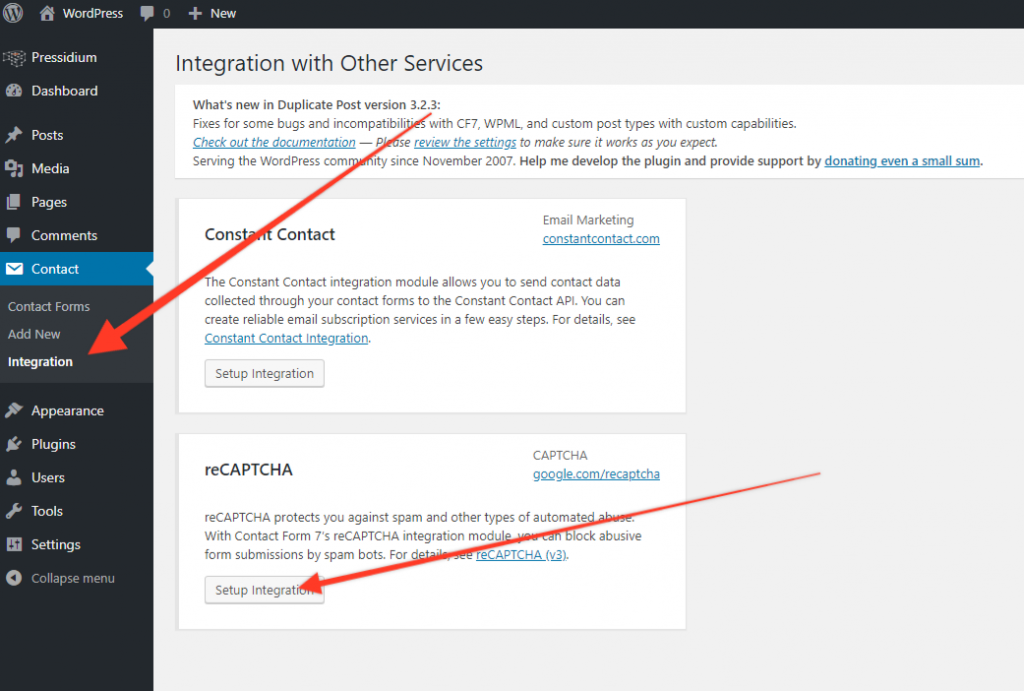
Head back to your website and under the Contact tab you’ll see a sub-menu which says ‘Integration’. Click this and then click ‘Setup Integration’. Copy the Site Key and Secret Key from Google and paste these in and then Save Changes.
That’s it! It’s a beautifully simple but incredibly effective system and pretty much guarantees you won’t find your email Inbox filled with all manner of spam email.
Using Contact Form 7 with an SMTP Server
When someone presses ‘Send’ a whole range of processes kick into action on your web server behind the scenes to process and actually send you an email with the sender’s message. How well this actually works heavily depends on your web host and how they have configured their mail server.
Generally, the cheaper the web hosting you’re using the great the probability of having issues with this. If you are getting error messages or not receiving emails from your contact form, odds are extremely high that there is a problem with your web hosts email server setup and NOT a problem with Contact Form 7.
So, what can you do if you’re not receiving your email message from your form? First, double-check you have configured the Messages tab correctly (see ‘The Mail Tab in Contact Form 7’ above). If that looks ok, then suspicion should fall on your host’s email setup.
In the first instance talk to them and see if they can help troubleshoot. For bargain-basement hosting though don’t hold your breath. You have two options now. One, migrate your website to a better host (have you taken a look at Pressidium’s incredible hosting plans? If not, then do it!) or alternatively you can try configuring your own SMTP server.
Configuring Mailjet to work with Contact Form 7
Mailjet is a fantastic, affordable and feature-rich email platform that is used by thousands of people around the world. They have a feature-rich setup that also includes a really fab WordPress plugin that allows you to quickly and easily bypass your web hosts email server and use theirs instead. Definitely recommended if you are using cheap hosting!
And the best bit? They have a fab free plan which allows you to send up to 6,000 emails each month for free. To get started go to https://www.mailjet.com/ and sign up for an account.
Then, open up the ’My Account’ page.
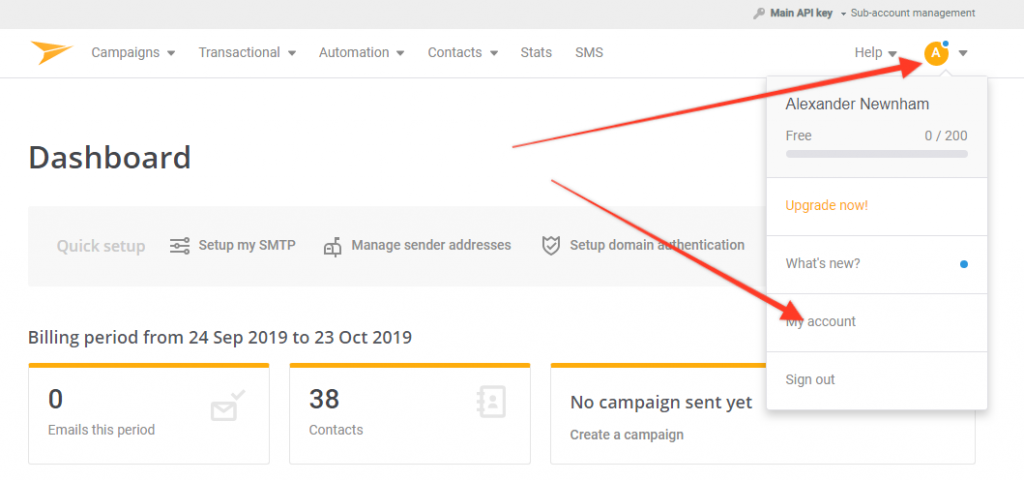
You’ll need to go to ‘Add a Sender Domain or Address’
Click on ‘Add a Sender address’ and follow the prompts. Put in your email address (the same one you are sending your Contact Form 7 email to).
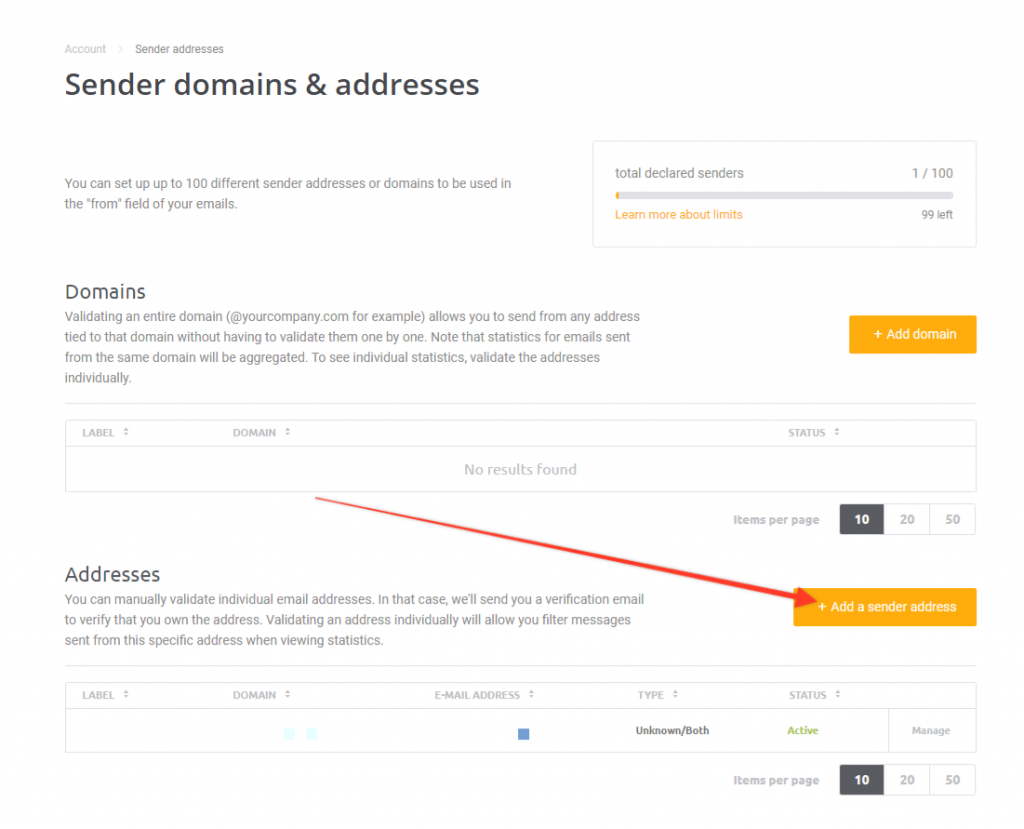
Mailjet will send you an email to verify you own this address. Click the link to confirm and then you can move onto the next step.
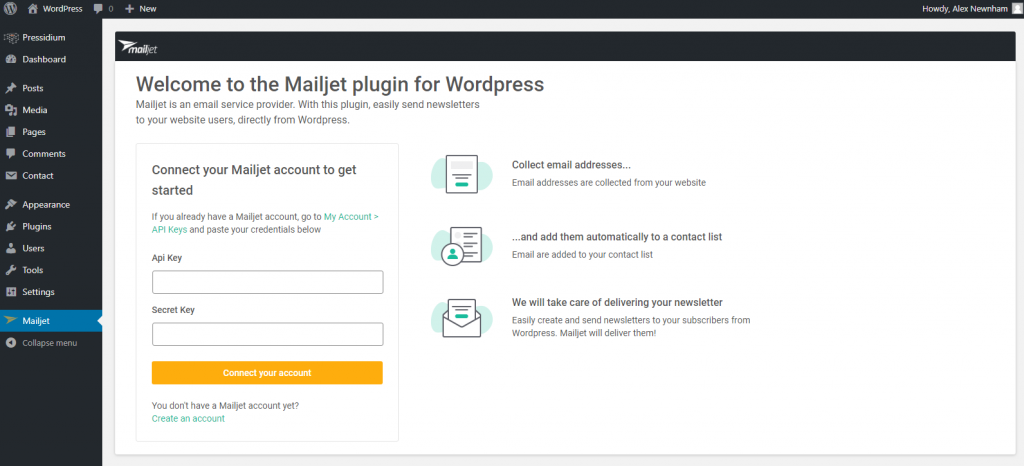
The Mailjet plugin
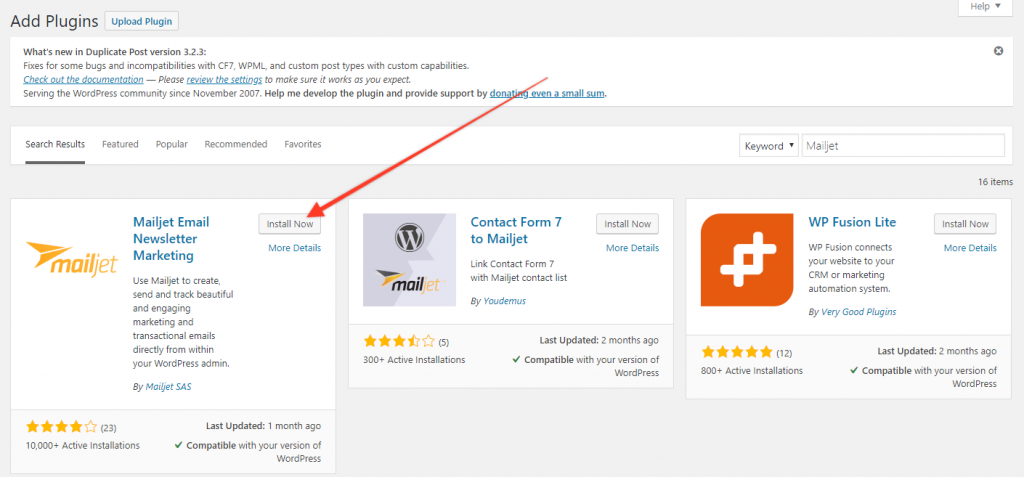
Now we’re setup in Mailjet you’ll need to head back to your WordPress website and log into the Admin area. Go to Plugins and search for Mailjet. Add this plugin and activate it.
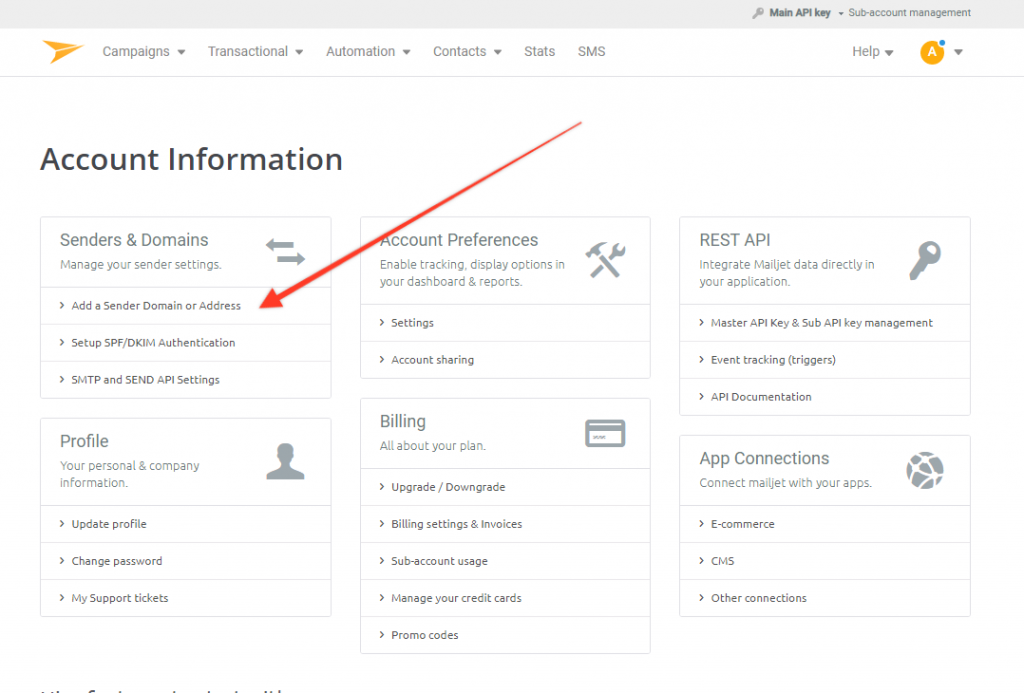
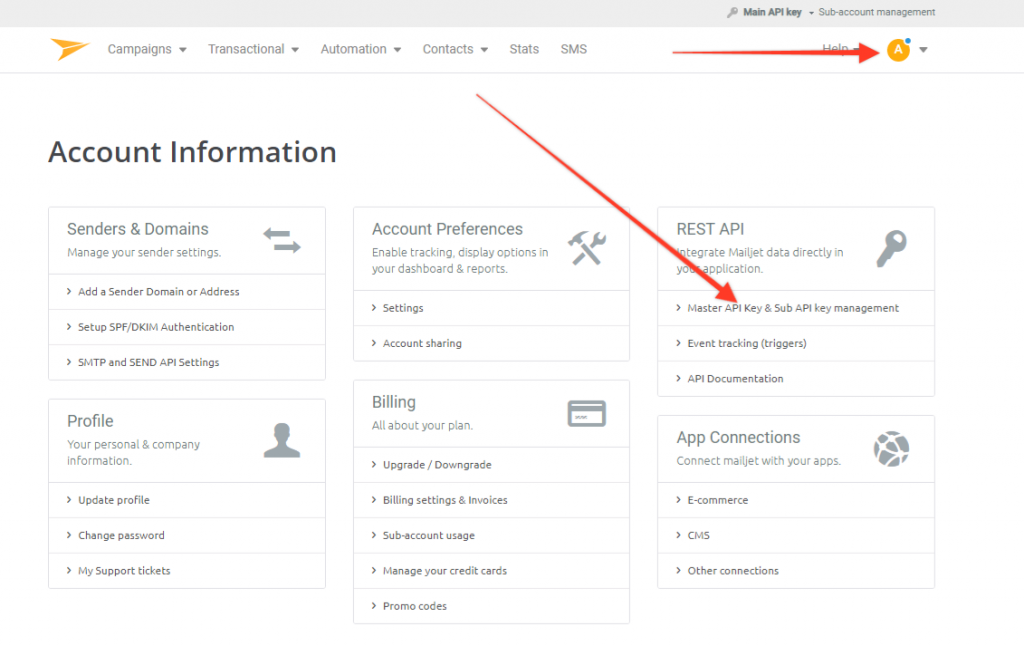
Go to the Mailjet tab and open up Mailjet. You’ll see you need to login by entering an API Key and a Secret Key. You can find these by going back to your Mailjet account, selecting ‘My Account’ from the dropdown menu (top right) and then clicking on ‘Master API Key & Sub API key management’.
Copy your API Key and Secret API key and enter these in the WordPress Mailjet admin panel and then login.
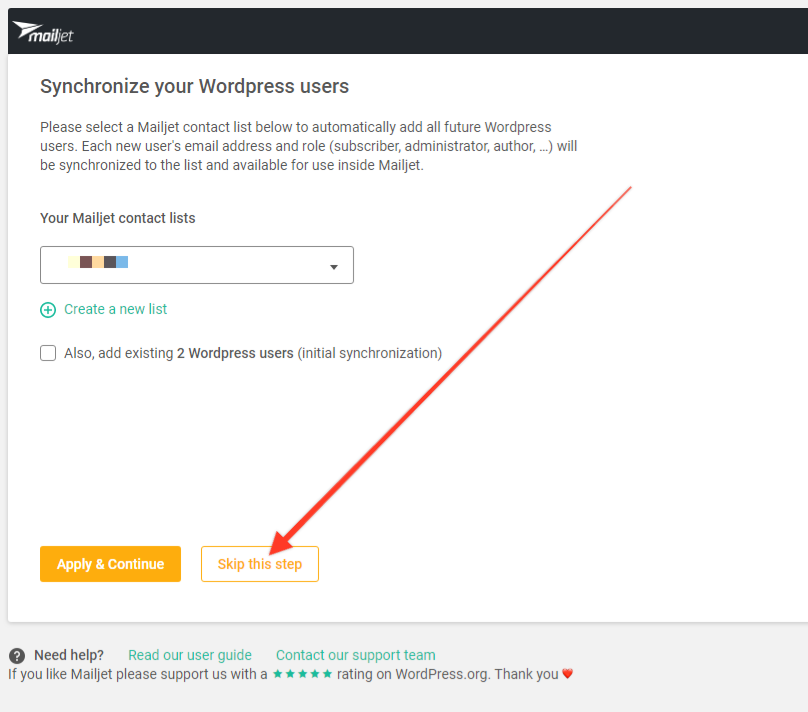
You may see a ‘Mailjet Contacts List’. Don’t worry about this at the moment and instead click ‘Skip this step’
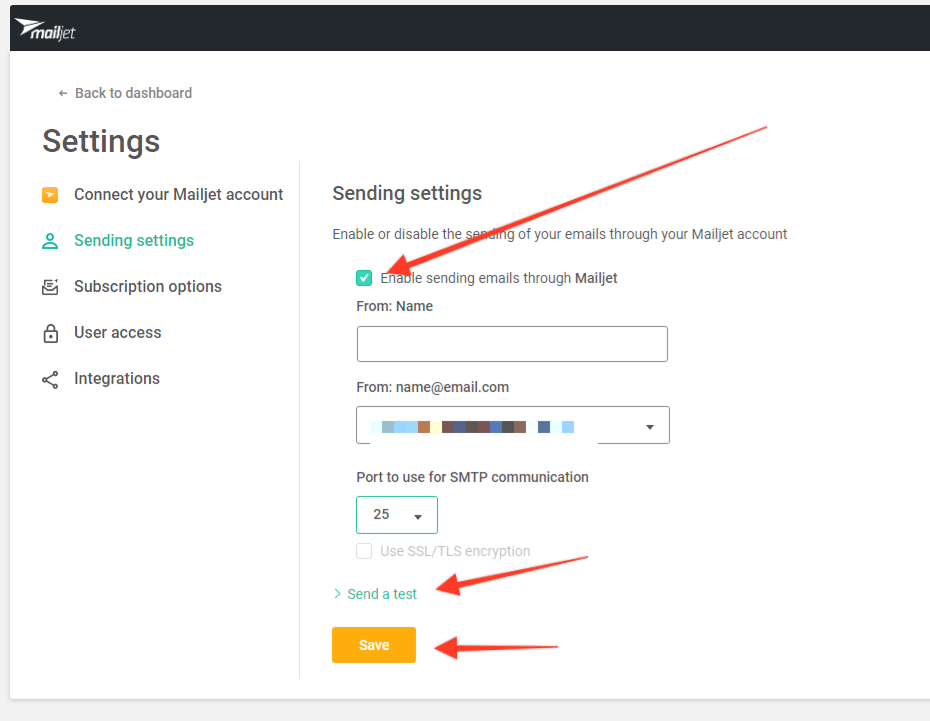
Next, click ‘Configure WordPress email sending’. Tick the box that says ‘Enable sending emails through your Mailjet account’ and then enter a from name. From the dropdown box below select the email account you would have configured in Mailjet earlier. Click ‘Send a test’ and then Save and that’s it. All your emails from Contact Form 7 will now get sent through Mailjet! This is likely to solve any sending issues you have been experiencing and offers a much more reliable way to send email from your website.
There are lots of other neat ways you can use Mailjet and Contact Form 7. For further details checkout a great article they wrote on their Mailjet Contact Form 7 integration.
So that’s it! Your Contact Form 7 Masterclass is complete
Whilst we’ve tried to be as detailed as we can in our explanation of how to use Contact Form 7, don’t forget to check out their website at www.contactform7.com for more information and resources.
We hope you find the information in this article useful. Contact forms are a core part of most websites and Contact Form 7 offers WordPress users a fantastic contact form system… once you understand how it works!
Pressidium Managed WordPress Hosting
If you’d like to enjoy hassle-free WordPress backups along with blazing load speeds, site cloning features, built-in security systems and awesome 24x7x365 support for DevOps engineers who know what they’re talking about then make sure you check out Pressidium Managed WordPress Hosting.
Start Your 14 Day Free Trial
Try our award winning WordPress Hosting!


