

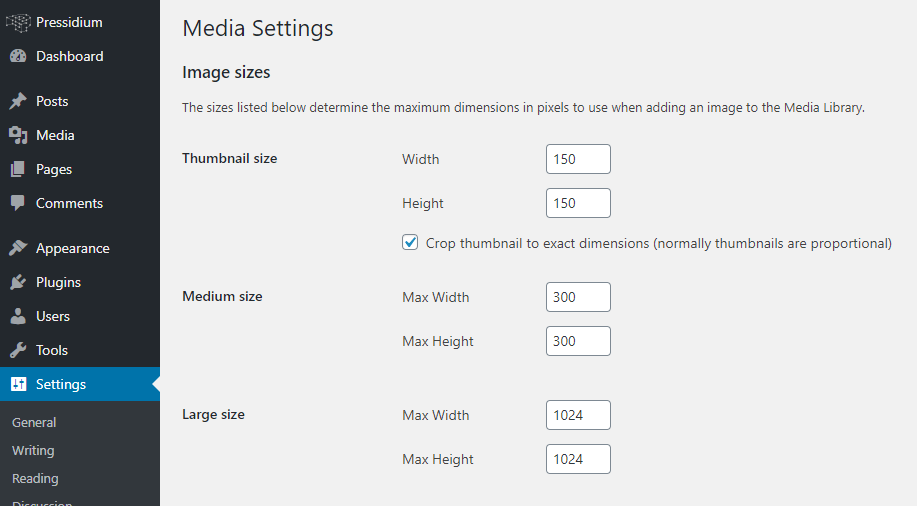
WordPress image sizes can sometimes be a bit of a mystery! Have you ever seen this Media Settings page in your admin area and wondered what it is?
In this article we’re going to run through WordPress image sizes, what they are all about and how this can affect things like upload times. In addition we’ll also look at how WordPress utilizes these different image sizes in website layouts. And finally we’ll take a look at how you can remove unnecessary image sizes or add your own custom size.
What is the Role of Image Sizes in WordPress?
It’s really important that images on your website look nice and crisp and of high quality. There are several elements that will dictate this including physical size of the image (both dimensions and file size) and the resolution of the image. If your image is too large (for example 10,000px wide) and the file size is too big (i.e. in excess of 1mb or so) you will begin to slow down the load speed your website. Conversely, if the image size is too small then you will likely see a degradation in quality of the image… in other words it could begin to look blurry or grainy.
Try our Award-Winning WordPress Hosting today!


WordPress tries to strike a balance by serving up the optimal image size depending on the location of the image. It does this by creating 3 different image sizes each time you upload an image to the WordPress Media Library. These are ‘Thumbnail size’, ‘Medium size’ and ‘Large size’ with dimensions of 150×150 pixels, 300×300 pixels (maximum) and 1024×1024 pixels (maximum) respectively. Finally it will also store a ‘Full size’ image which is the original size of the uploaded image.
These sizes along with additional sizes we will later look at are used by WordPress in various positions in the frontend layout. This is done so the image used both a) looks good and b) loads quickly.
Examining WordPress Image Sizes in More Detail
Let’s run through an example so you can see exactly what goes on ‘behind the scenes’ when you upload an image to WordPress. For the purposes of this example we are going to upload an image with the name ‘post1-feature-image’. It is 294KB in size and measures 2089×1175 pixels and we are going to do this with the default WordPress Twenty Twenty theme active (other themes may alter how images are handled by WordPress).
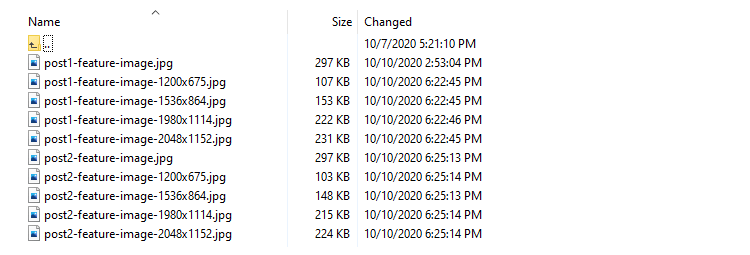
Having uploaded this image via the WordPress Media Library we can connect to our site using an FTP client and, if we head to the Upload folder, we’ll see that multiple versions of our images have been created.
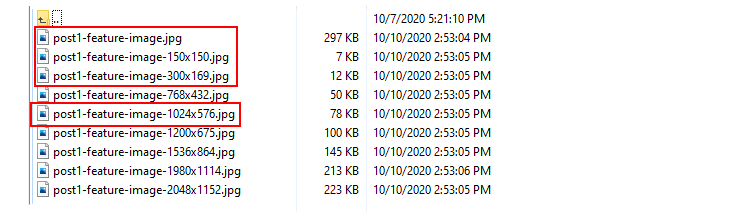
Highlighted in red you’ll see our default image sizes. The Thumbnail has been cropped as this is set as a default via the Media settings.

The ‘Medium size’ and ‘Large size’ have been resized in a manner that avoids changing the actual proportions of the image. So, that is why for example the ‘Medium size’ is 300×169 instead of 300×300. The rest of the images that were generated are a result of some WordPress core files and the Twenty Twenty theme’s code.
Getting Technical!
If you’re interested in the code behind what’s happening when the additional image sizes are created then this section of the article is for you. If not, feel free to skip to the next chapter!
WordPress is pulling instructions from a file called media.php which is located inside the wp-includes/ folder. Head to this, line 4861 and you’ll see the following:
/**
* Add additional default image sub-sizes.
*
* These sizes are meant to enhance the way WordPress displays images on the front-end on larger,
* high-density devices. They make it possible to generate more suitable `srcset` and `sizes` attributes
* when the users upload large images.
*
* The sizes can be changed or removed by themes and plugins but that is not recommended.
* The size "names" reflect the image dimensions, so changing the sizes would be quite misleading.
*
* @since 5.3.0
* @access private
*/
function _wp_add_additional_image_sizes() {
    // 2x medium_large size.
    add_image_size( '1536x1536', 1536, 1536 );
    // 2x large size.
    add_image_size( '2048x2048', 2048, 2048 );
}
post1-feature-image-768x432.jpg is being created as result of the ‘medium_large’ size which was added in WordPress version 4.4 for better responsive image support and can be seen on various portable devices. It is defined in the “wp-admin/includes” folder in file schema.php line 522
// 4.4.0
'medium_large_size_w'             => 768,
'medium_large_size_h'             => 0,
and requested in the image.php file in line 86:
} elseif ( 'medium_large' === $size ) {
$max_width  = intval( get_option( 'medium_large_size_w' ) );
$max_height = intval( get_option( 'medium_large_size_h' ) );
post1-feature-image-1200x675.jpg and post1-feature-image-1980x1114.jpg are generated from the ‘Twenty Twenty’ theme inside the functions.php file in line 53:
/*
* Enable support for Post Thumbnails on posts and pages.
*
* @link https://developer.wordpress.org/themes/functionality/featured-images-post-thumbnails/
*/
add_theme_support( 'post-thumbnails' );
// Set post thumbnail size.
set_post_thumbnail_size( 1200, 9999 );
// Add custom image size used in Cover Template.
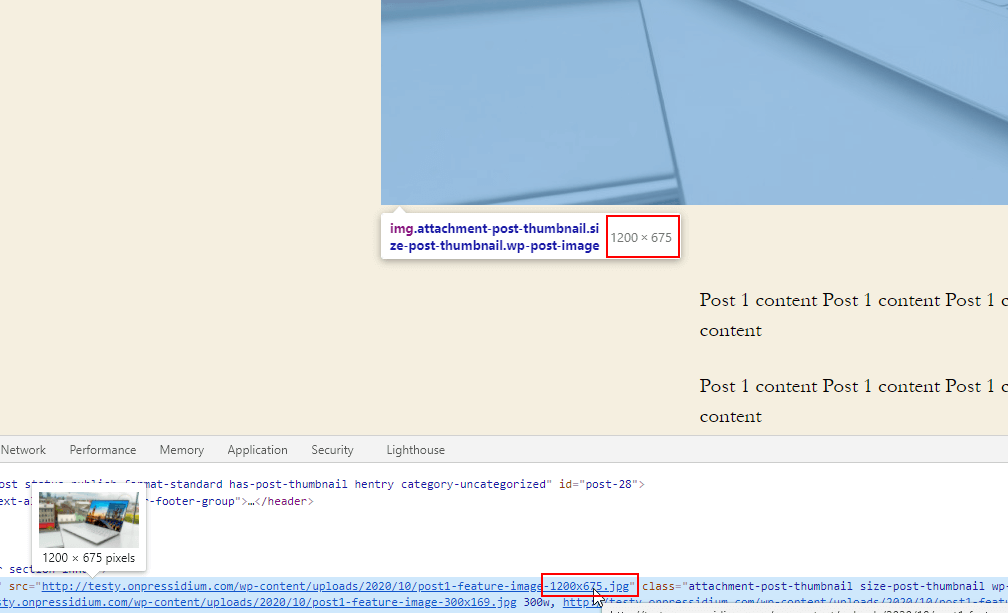
add_image_size( 'twentytwenty-fullscreen', 1980, 9999 );This is done because the Twenty Twenty theme uses 1200px as the image size for featured images. If we create a test post and add a featured image and then in the frontend single post page we can see how this size is used by right clicking the featured image and looking in the browser’s inspector.
Finally the 1980px image is the size used for the featured image of the other post templates. You can see this by changing the test post template to ‘Cover Template’. Then, in the inspector CSS of the cover image’s HTML element we can see how this size is used:

It is always worth making sure that any image you upload is wider than the Featured and Cover image widths in order that they look sharp. WordPress can reduce image sizes effectively but it can’t scale up a small image and make it look good.
Remove Unnecessary WordPress Image Sizes
As we’ve seen, WordPress is busy producing a range of image sizes whenever we upload an image to our Media Library. But do we really need all of these images? In reality, no we don’t. Not only does it slow the speed at which images are uploaded as WordPress is having to work away in the background creating these various images sizes, but it also takes up storage that we don’t need to use on our server. So, how do we stop WordPress creating image sizes that we don’t need? Read on to find out!
Note: Unless you’re following these instructions on a demo website, we’d recommend that you implement the changes outlined below in the functions.php file of a child theme. Changes to made to the functions.php file in a parent theme will be wiped the next time the theme is updated.
Remove the WordPress Default Image Sizes
This can be easily accomplished by editing the theme’s functions.php and adding the following code:
add_filter( 'intermediate_image_sizes_advanced', 'prefix_remove_default_images' );
// Remove default image sizes here.
function prefix_remove_default_images( $sizes ) {
    unset( $sizes['thumbnail']); // 150x150 pixels
    unset( $sizes['medium']); // 300x300 pixels(maximum)
    unset( $sizes['large']); // 1024x1024 pixels(maximum)
    unset( $sizes['medium_large']); // 768px width
    return $sizes;
}
To test, let’s upload a new image (in our example this is called post2-featured-image) to the media library and refresh our FTP view of the upload folder.
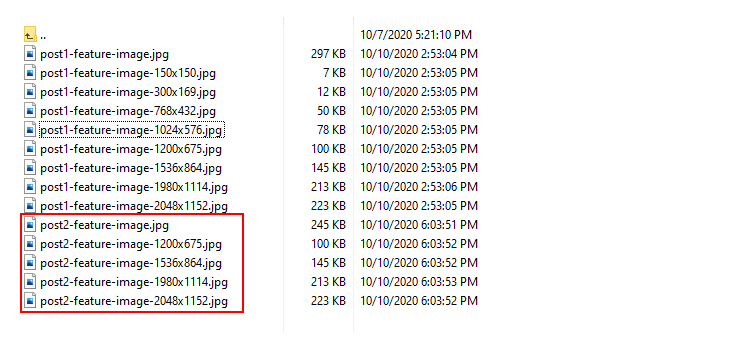
As you can see, by telling WordPress to remove the 4 default image sizes via our functions.php file we have stopped WordPress for creating these in our media folder. Moving forward, this simple update to our theme code means we won’t clog up our server with unwanted image sizes. This will save space and speed up the image upload process.
Removing Old Image Sizes from the Media Library
You might have noticed that whilst the 4 default images sizes weren’t created for our new image that we uploaded, the previously uploaded image still has all 8 variants saved in the media library. In all likelihood, unless this is a brand new website, you will have uploaded tens, if not hundreds of images and in all cases these ‘extra’ sizes will have been created. So, what to do?
The first thing to ascertain is do you need these images? Before proceeding with removing images generated by WordPress you will have to confirm that these sizes are no longer used. Check your blog posts, featured images and any other part of your website to make sure none of the old sizes are still in use.
A great way to deal with these unwanted files of the old images is to use the Force Regenerate Thumbnail plugin which will go through and automatically delete them. Install and activate the plugin and then hit the ‘Regenerate All Thumbnails’ button from within the plugin menu (Tools->Force Regenerate Thumbnails).

Refresh your FTP media folder view and you’ll see that the default WordPress images have gone. Nice!
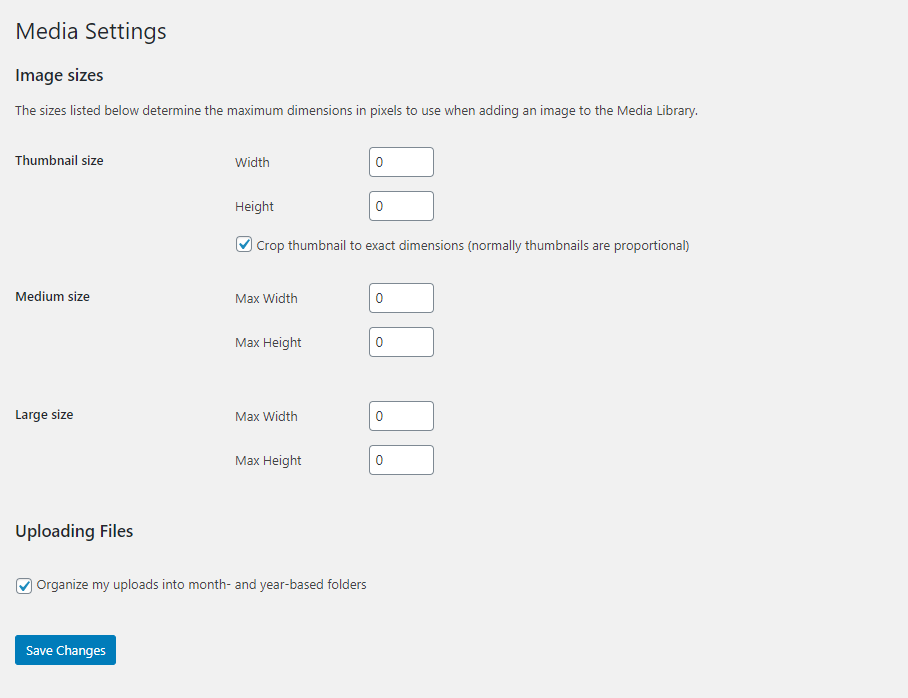
Another easy way to achieve the same result for the default sizes is to change their dimensions value to “0” from inside Settings > Media in the wp-admin. You’ll then see something like this:
An alternate method is to change the update_option( ‘SIZE_w/h’, 0 ); inside functions.php. Remember to do this to a child theme functions.php file so your changes aren’t lost when you update the theme at a later point.
update_option( 'thumbnail_size_h', 0 );
update_option( 'thumbnail_size_w', 0 );
update_option( 'medium_size_h', 0 );
update_option( 'medium_size_w', 0 );
update_option( 'large_size_h', 0 );
update_option( 'large_size_w', 0 );
When this update is made you’ll see that Which will reflect the dimensions value in the Media settings (from within WP Admin) have now been updated to 0.
Remove Additional Theme Image Sizes
We’ve now successfully dealt with the default images produced by the WordPress core. We can now move on and tackle the images created by the theme (in this case Twenty Twenty). If, like our default image sizes, you have concluded that these are not necessary, then you can make some changes to your theme code to stop WordPress producing these sizes in the future.
To do this we’re going to use the init hook and the remove_image_size core function. Copy the code below and paste it into your functions.php file. If you’re not using the Twenty Twenty theme as we are here then replace the ‘post-thumbnail’ and ‘twentytwenty-fullscreen’ names with the name of your active theme.
function remove_extra_image_sizes() {
    foreach ( get_intermediate_image_sizes() as $size ) {
        if ( in_array( $size, array( 'post-thumbnail', 'twentytwenty-fullscreen' ) ) ) {
            remove_image_size( $size );
        }
    }
}
add_action('init', 'remove_extra_image_sizes');
If we upload a new image now and check our upload folder via our FTP client we will see that all the sizes are generated except ‘post-thumbnail’ and ‘twentytwenty-fullscreen’.
Add Your Own Custom Image Size
Now that we learned how to remove redundant image sizes in WordPress, let’s see how we can add our own custom image sizes according to our template’s needs.
How do we decide what image sizes we need?
Supposing that you have a website with a main column with width 960px where the feature image is on top and the post content below. You desired image size will be 960px then. Do not forget to also calculate the CSS padding if any. If the parent elements have a sum of 20px padding for example, then the right width for the image will be 920px. It is 960px minus 20px for the left padding minus 20px for the right padding.
Register New Images Sizes
One simple way to register new size(s) is to use the built-in add_image_size() function that is provided by WordPress. The function structure is:
add_image_size( name, width, height, crop )Most of these options are self-explanatory. The last option (crop) dictates whether WordPress respects the proportions of our image when resizing or whether it crops our image. If the crop option is set to ‘true’, then the image will be cropped and proportions will not be respected. If the crop option is skipped or set to false then our image proportions will be respected.
Let’s try this in action and monitor the outcome using a test image that is 2089×1175 pixels.
First let’s add this code:
add_image_size( 'new-post-thumb', 220, 180 );This will generate a post2-feature-image-220x124.jpg instead of 220×180 in our uploads folder because crop is not set (false). The same would happen if you insert the following:
add_image_size( 'new-post-thumb', 220, 180, false );If however you you set crop to true like this then an image post2-feature-image-220x180.jpg will be saved.
add_image_size( 'new-post-thumb', 220, 180, true );Lastly, you can dictate the way the crop will be positioned. Instead of ‘true’ just use options like ‘left’ or ‘top’ or both:
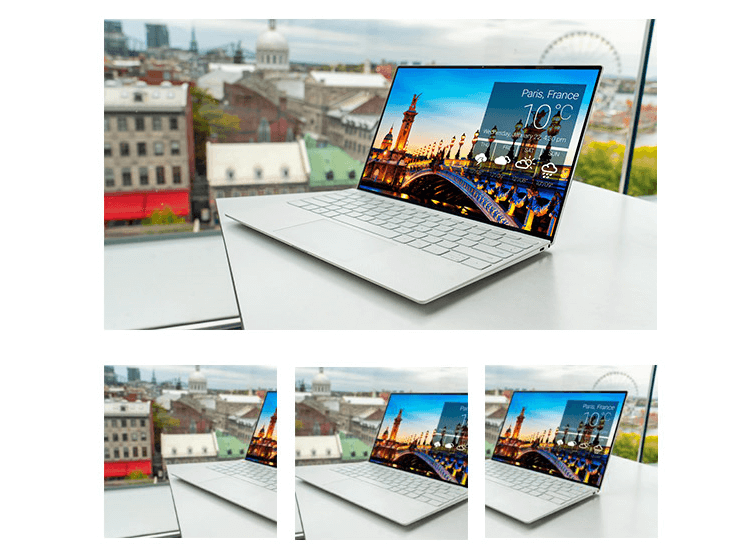
add_image_size( 'custom-size', 220, 220, array( 'left', 'top' ) );The array specifies the crop location. The values that can be used are:
For x_crop_position: ‘left’, ‘center’, or ‘right’.
For y_crop_position: ‘top’, ‘center’, or ‘bottom’.
The output in each case will be a different part of the original image. Here are some examples:
An alternate to doing this manually via adding code to our theme is to use a plugin such as Simple Image Sizes. None-the-less it’s helpful to understand what’s going on behind the scenes even if you do use a plugin like this.
Conclusion
Using the correct image sizes in WordPress is important – not only does it ensure a high quality user experience by presenting sharp, high res images to the website viewer but also significantly impacts load times and server usage. Hopefully this article helped you understand the importance of the image sizes in WordPress and the ways you can override, remove or expand the image sizes to meet the needs of your website as well as how you can potentially save a ton of server space by stopping WordPress generating unnecessary sizes of each image you upload.
Start Your 14 Day Free Trial
Try our award winning WordPress Hosting!


