

If you’ve got a large website or blog then you might be looking at ways of helping your users filter certain content or articles. Tags might be the perfect solution.
Tags have in many cases fallen out of fashion in WordPress with many websites now just focussing on sorting content by category. Categories are great but don’t allow the level of refinement in filtering content that tags do.
In this article we’re going to take a closer look at tags and how they can be deployed on your WordPress website. So, if you’ve been desperate to provide a new sense of order to your website content then this article is for you. Read on!
Default WordPress Tags
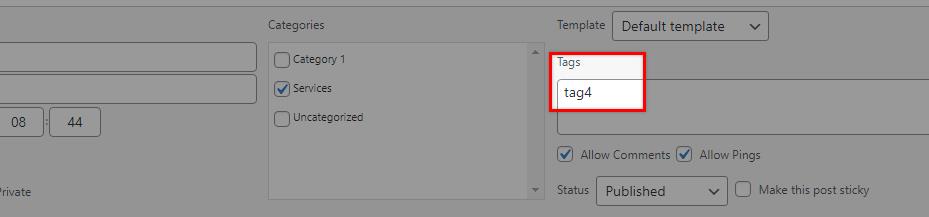
If you’ve used WordPress for any length of time then you’ll probably be familiar with WordPress tags even if you don’t regularly use them. They most commonly appear on post pages. Because they’re a core WordPress feature, they’re super quick and easy to add. You can do this on each individual post or even via the ‘Quick Edit’ screen show below.
Once tags have been created they appear as selectable items for future posts meaning you don’t have to constantly remember which tags you’ve used in the past.
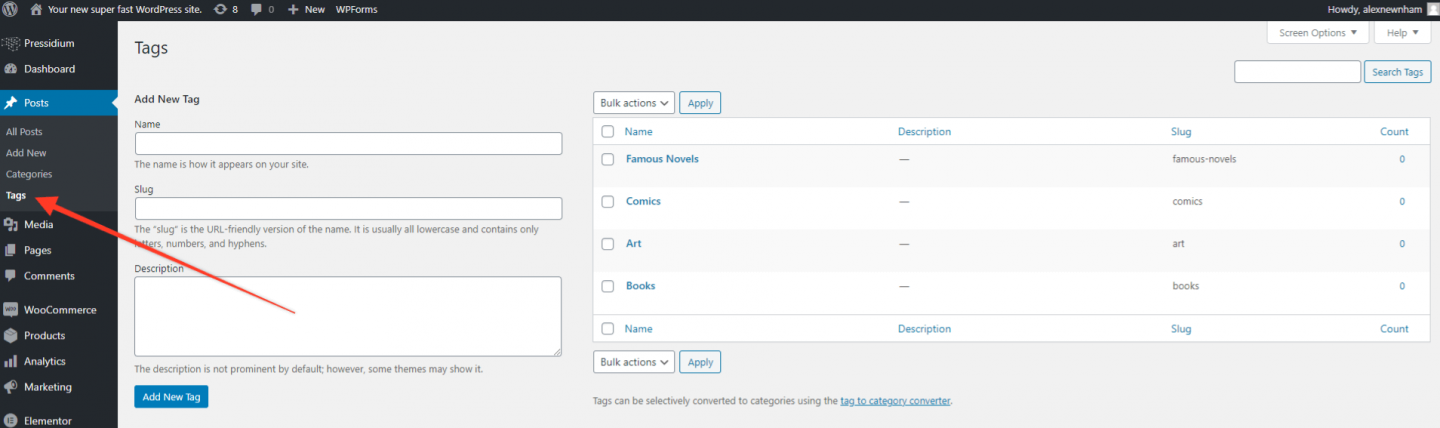
WordPress also makes it easy for you to get an overview of all the tags you’re using on your website by visiting the ‘tags’ section under the Posts menu. Here you can also add new tags and delete old, unused ones.
Displaying Tags
The most usual way to add tags to a WordPress website is by using a Tag Cloud widget that allows you to add tags to things like blog post sidebars. To do this, head to the Widgets Menu (Appearance > Widgets) and then drag the Tag Cloud widget into a section of your choice. Theme dependent there may be ways of customizing this.
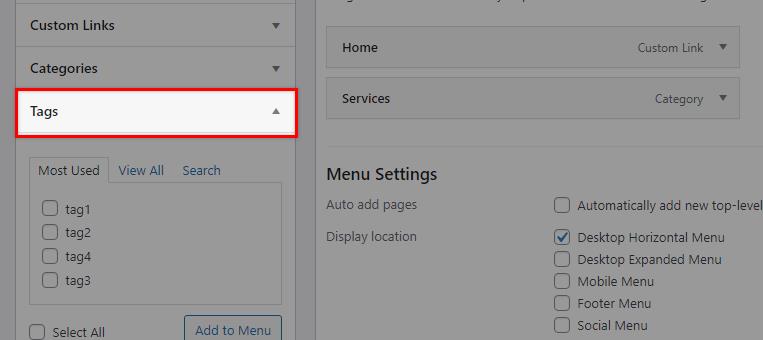
What is less well known is that it’s possible to add tags to your WordPress menu. By default, tags are hidden in the Menu settings area. To show them as an option, first head to your Menu and click on the Options selector which drops down from the top of the page. Tick the box marked ‘Tags’.

You’ll now see a Tags menu appear in the Menu builder sidebar which will display all your current tags. Simply add these to your menu as you would any other item.
If your users click on these tag Menu items then they’ll of course be directed to a page displaying all posts and pages that have that tag added to them. This is a really quick way of allowing your users to filter content on your website.
All of the above is a great starting point when it comes to tags. But what if we need to undertake more complex filtering using tags? For example, you might want users to be able to filter posts by tag within a particular category. This would only display posts or pages that both a) belonged to a defined category and b) were assigned a particular tag. There are two primary ways of doing something like this – with a plugin or by writing some custom code. Let’s take a look at both options. Let’s see how you can achieve this by giving you two routes to follow, by using a plugin or by using your own custom code.
Create the Tag Filter with a Plugin
A great solution for adding more control over your tag filtering is by using the plugin Search & Filter by Designs & Code.

Install and activate the plugin then launch it’s ‘Getting Started’ page by clicking on the ‘Search & Filter’ menu item that appears after activation. There are no settings for you to worry about with this plugin. Instead, take a look at the documentation which will explain how you can create tag filters using shortcodes.
Try our Award-Winning WordPress Hosting today!


To filter by tags within a certain category, you’d need to use some code that would look like this: <?php echo do_shortcode( '[searchandfilter fields="category,post_tag"]' ); ?>
This code would best be placed within your category view template page right before the articles begin to display. Although the plugin does a lot of the work for us, we still need to do a little bit of coding to get it to work. Using the Twenty Twenty theme as our example, open up the index.php file using a code editor. Inside this file around line 57 there is this if condition that checks if a page on your site is an archive page (i.e. one that displays categories). It looks like this:
if ( $archive_title || $archive_subtitle ) {
?>
    <header class="archive-header has-text-align-center header-footer-group">
        <div class="archive-header-inner section-inner medium">
            <?php if ( $archive_title ) { ?>
                <h1 class="archive-title"><?php echo wp_kses_post( $archive_title ); ?></h1>
            <?php } ?>
            <?php if ( $archive_subtitle ) { ?>
                <div class="archive-subtitle section-inner thin max-percentage intro-text"><?php echo wp_kses_post( wpautop( $archive_subtitle ) ); ?></div>
            <?php } ?>
        </div><!-- .archive-header-inner -->
    </header><!-- .archive-header -->
    <?php
}
In this case, all we need to do is insert the shortcode right under the $archive_title.
if ( $archive_title || $archive_subtitle ) {
    ?>

    <header class="archive-header has-text-align-center header-footer-group">
        <div class="archive-header-inner section-inner medium">
            <?php if ( $archive_title ) { ?>
                <h1 class="archive-title"><?php echo wp_kses_post( $archive_title ); ?></h1>
            <?php } ?>

            //OUR TAG FILTER SHORCODE
            <?php echo do_shortcode( '[searchandfilter fields="category,post_tag"]' ); ?>

            <?php if ( $archive_subtitle ) { ?>
            <div class="archive-subtitle section-inner thin max-percentage intro-text"><?php echo wp_kses_post( wpautop( $archive_subtitle ) ); ?></div>
            <?php } ?>

        </div><!-- .archive-header-inner -->
    </header><!-- .archive-header -->
    <?php
}
And voila!

Note: Remember that depending on your theme’s template hierarchy, the right place to put your code in the category is most times the archive.php file under the theme’s main folder which is used for category and tag archives. You can always consult the WordPress Template Hierarchy to find out which file you should edit.
If you wish to apply the filter to specific categories only you can wrap the previous code in an ‘if’ statement like this:
<?php
    $categories = get_the_category();
    $category_id = $categories[0]->cat_ID;
    if ( $category_id=='17' ){
        echo do_shortcode( '[searchandfilter fields="category,post_tag"]' );
    }
?>
To check out what ID corresponds to which category, open that category page from within the Admin (so you’re editing it) and you’ll see the ID listed in the url in your browser bar as shown below.
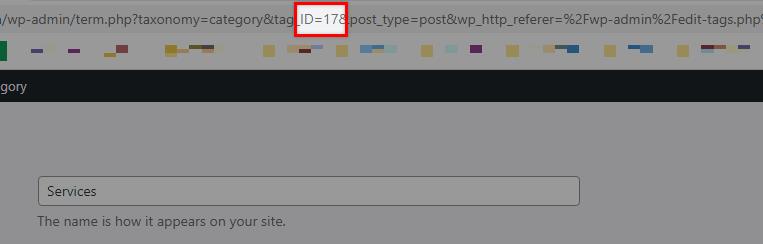
In this example, the category ID is 17, hence the if ( $category_id=='17' ) statement in our example.
Create the Tag Filter with Custom Code
If you don’t want to use a plugin to create a tag filter you can always write your own code. Plugins, whilst great, don’t always offer the full functionality or control you need. Coding your own solution means you can achieve exactly what you want.
To get started, we need to create a PHP form with a submit button and then add some code that will check the POST value to redirect the page on submission.
Inside the same category view PHP file you used before, delete the plugin shortcode and replace it with the code below:
<?php

	if( isset( $_POST['my_tag_filter'] ) ) {
		$tag = get_tag( $_POST['my_tag_filter'] );
		if ( $_POST['my_tag_filter'] == "0" ) {
			$link = site_url() . "/?cat=31" . $tag->slug;
		}else{
			$link = site_url() . "/?tag=" . $tag->slug;
		}
		header("location: $link");
		exit;
	}
	?>
	<form action="" method="post" class="searchandfilter">
		<div>
			<ul>
				<li>
				<select name="my_tag_filter" id="my_tag_filter" class="postform">
					<option value="0">Όλες οι εκδηλώσεις</option>
	<?php
	$the_query = new WP_Query( 'cat='.$category_id );
	$tag_ids = array();

	if ( $the_query->have_posts() ) {
		while ( $the_query->have_posts() ) {
			$the_query->the_post();
			$posttags = get_the_tags();
			if ($posttags) {
				foreach($posttags as $tag) {
					$tag_ids[] = $tag->term_id;
				}
			}
		}
		$tag_ids = array_unique($tag_ids);
		print_r($tag_options);
		foreach($tag_ids as $tag_id) {
				$tag = get_tag( $tag_id );
				if ( $tag->slug==$_GET['tag'] ) { $selected="selected";}else {$selected = "";}
				echo '<option class="level-0" value="' . $tag->term_id . '" ' . $selected . '>' . $tag->name . '</option>';
		}
	} else {
		// no posts found
	}
	wp_reset_postdata();
	?>
				</select>
				</li>
				<li>
					<input type="submit" value="Φίλτραρε">
				</li>
			</ul>
		</div>
	</form>
Head to the category page and you should see a form with the filter function that allows categories to be filtered by tag. As previously, you can apply the filter to specific categories if you wrap the code above in an ‘if’ statement like this:
<?php
$categories = get_the_category();
$category_id = $categories[0]->cat_ID;

if ( $category_id=='17' ){

    // THE CODE

}
?>
Now if you visit a different category page, the filter won’t show.
Summary
Tags are a sometimes neglected feature of WordPress websites. As we’ve shown, they can be used to powerful effect to allow you to filter content on your website in a variety of ways. This is ideal for larger websites where just allowing users to filter by category doesn’t offer the level of fine-grained control of results as always necessary.
As with all websites, it’s best to try and plan how you will use categories and tags in advance of deploying them in order to avoid ending up with a confusing organizational system at at later date. Carefully planned however, and tags could be an excellent addition to your website.
Start Your 14 Day Free Trial
Try our award winning WordPress Hosting!


