

It’s an exciting day as after a lot of hard work we are now ready to apply some finishing touches to our brand new business website and then take it live!
In Part 7 we completed the last remaining design steps needed to get our website looking good. These included updating the menu and also the footer, plus we looked at how to build a blog. Now those jobs are done we need to turn our attention to some everyday ‘housekeeping’ tasks that everyone who runs a website should undertake. There are four things we’ll look at.
- Installing and configuring an SEO plugin called Yoast.
- Setting up a Google Analytics account and registering our website.
- Adding our site to a Google Webmasters account.
- Taking our website live!
Let’s get going!
Installing the Yoast plugin for SEO
SEO, or Search Engine Optimization, is a huge topic and certainly beyond the scope of this series to fully cover. Very briefly, it’s important to optimize your website in a way that helps boost the chances of Google choosing to rank you in their search index for certain search terms. There are a ton of factors that will dictate how well your website will rank including how it is built (the technical element of SEO) and the content it has on it (content SEO).
Broadly speaking, the more competitive your industry and the more mainstream your product or service, the harder it will be for you to rank high up the SERPs (Search Engine Results Pages). In the case of our fictional business, Press Plumbing, ranking for the search term ‘Plumber London’ might be tricky. This is what’s known as a ‘short tail’ keyword. In other words it’s not hugely specific and that means it can be hard to knock your competitors from the top spots and to take their place. Typically it’s easier to rank for very specific keywords where there is less competition. For example ‘plumbers who operate in Westminster, London with 24hr call out service’.
Try our Award-Winning WordPress Hosting today!


Your websites content (what’s written on the page) will have a big impact on how successful your website is at ranking. It’s also very important that your website is correctly optimized from a technical perspective. This means that the code ‘behind the scenes’ needs to be written in such a way that Google ‘understands’ what your website is about. It also encompasses things like site load speed (the faster the better) and whether or not it is mobile responsive (i.e. resizes according to the screen size it’s being viewed on).
All of these elements will be factored in when Google decides where in the SERPs to place your website.
Our website for Press Plumbing is technically spot on. It is mobile responsive and loads super quickly thanks to being hosted with Pressidium. Because it’s built using a reputable theme (Astra) using WordPress it ticks a lot of other technical boxes from an SEO perspective as well.
So, what has this got to do with Yoast? Yoast is a plugin that helps with some on-page SEO analysis as well as allowing you to easily edit your website meta description. It’s no SEO cure-all, but does provide some insight into how your website might perform from an SEO perspective. For Press Plumbing we are primarily concerned about updating our website’s meta description as this affects how our website will appear in the SERPs.
To install Yoast, head to your plugin page and search for Yoast.
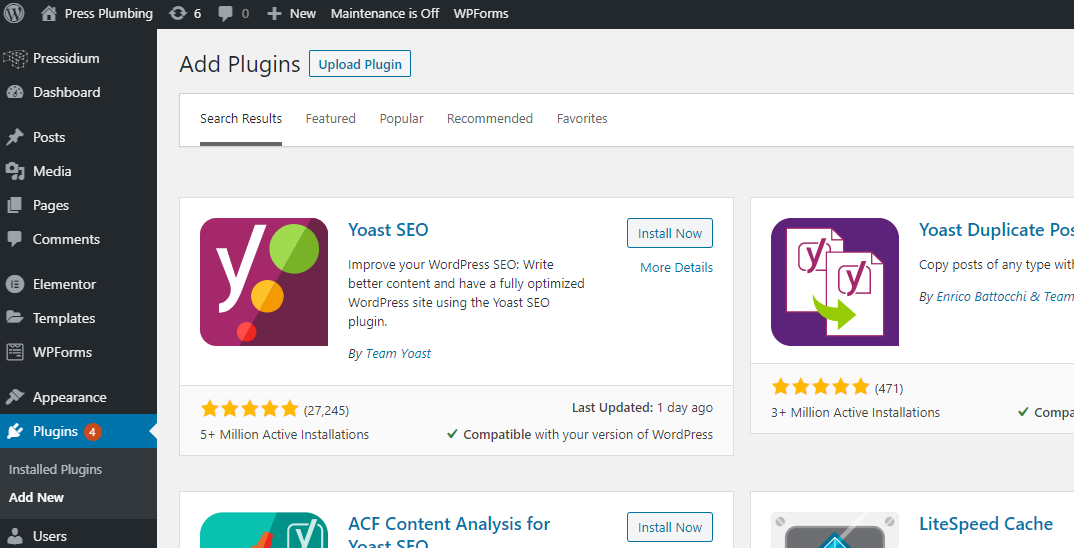
Install and activate the plugin and then head to your website’s homepage from within the WordPress Admin. Scroll down the page and you’ll see a new box called Yoast SEO. You can add in a ‘focus’ keyphrase. This might be ‘plumbers’. Yoast will then score your page using a traffic light system and provides a number of hints and tips as to ways you can improve your page from an SEO standpoint. Please note though that just because you get a ‘green’ light from Yoast this does not automatically mean your site will rank well.
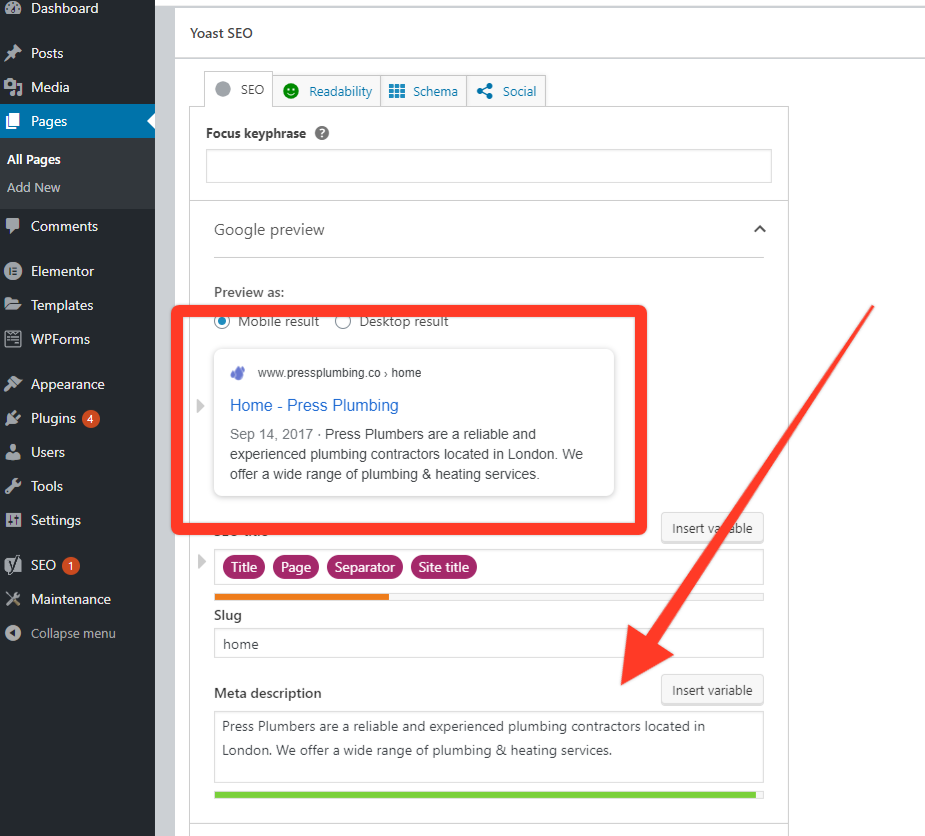
Editing the Meta Description in Yoast
Take a look and you’ll see a ‘Google’ preview of how your website will appear when displayed in Google search results. Google displays the page title and then a small description under this. You can control both of these using Yoast.
Under the section that is marked ‘Meta description’ type in a brief overview of what this page is about. Bear in mind that this is what your potential customers will see when searching for your business. You’ll see a bar change from orange to green showing that you have hit the optimal length for this text. Too long and it won’t be shown by Google.
Once you’ve added in a description you are happy with and made any changes to the page as suggested by Yoast (just remember these are only a guide!), save the page and now Google will be able to display the correct page title and description for your website. You will need to do this for each page on your website.
Google Webmasters
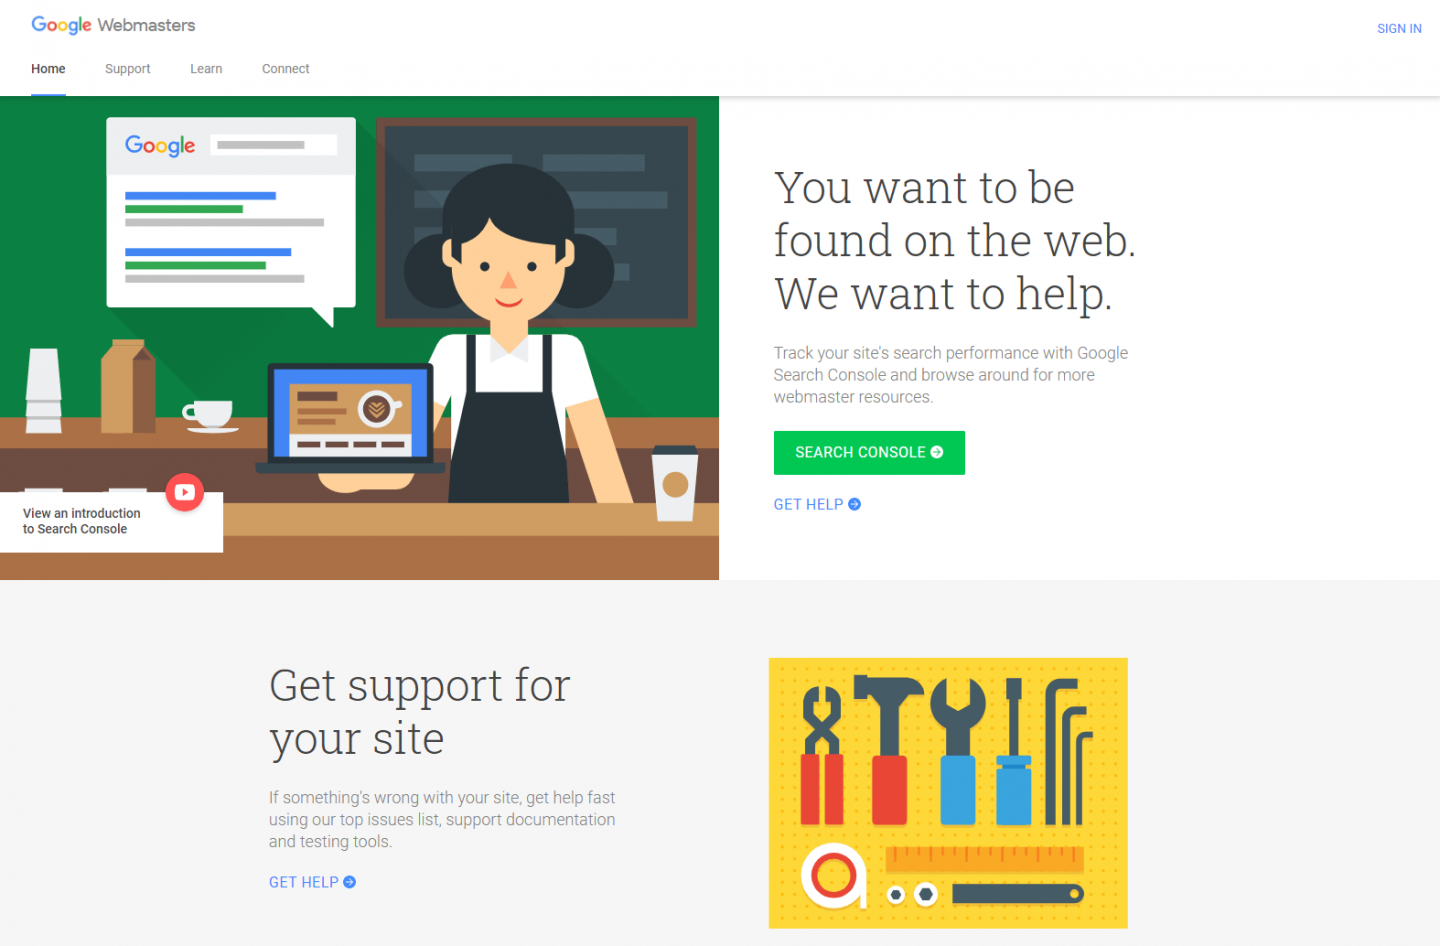
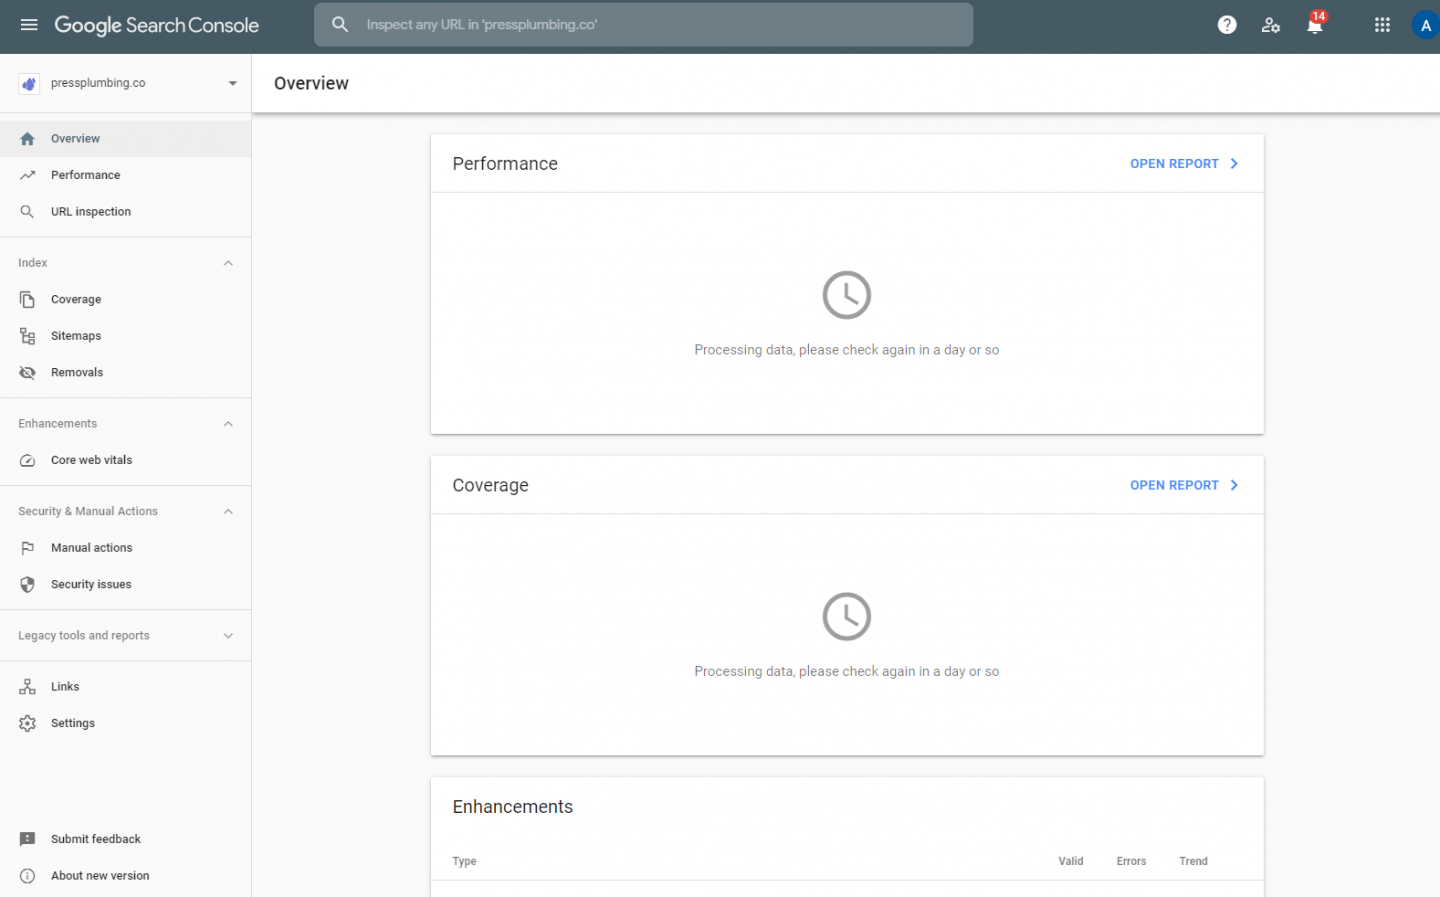
Whilst it’s not recommended that you ignore other search engines (like Bing), there is no doubt that Google is currently the king of search. Fortunately they provide some tools that can help you monitor how your website is performing. It’s called Google Webmasters and is free to use (you’ll just need a Google account). To get started head to Google Webmasters and log in.
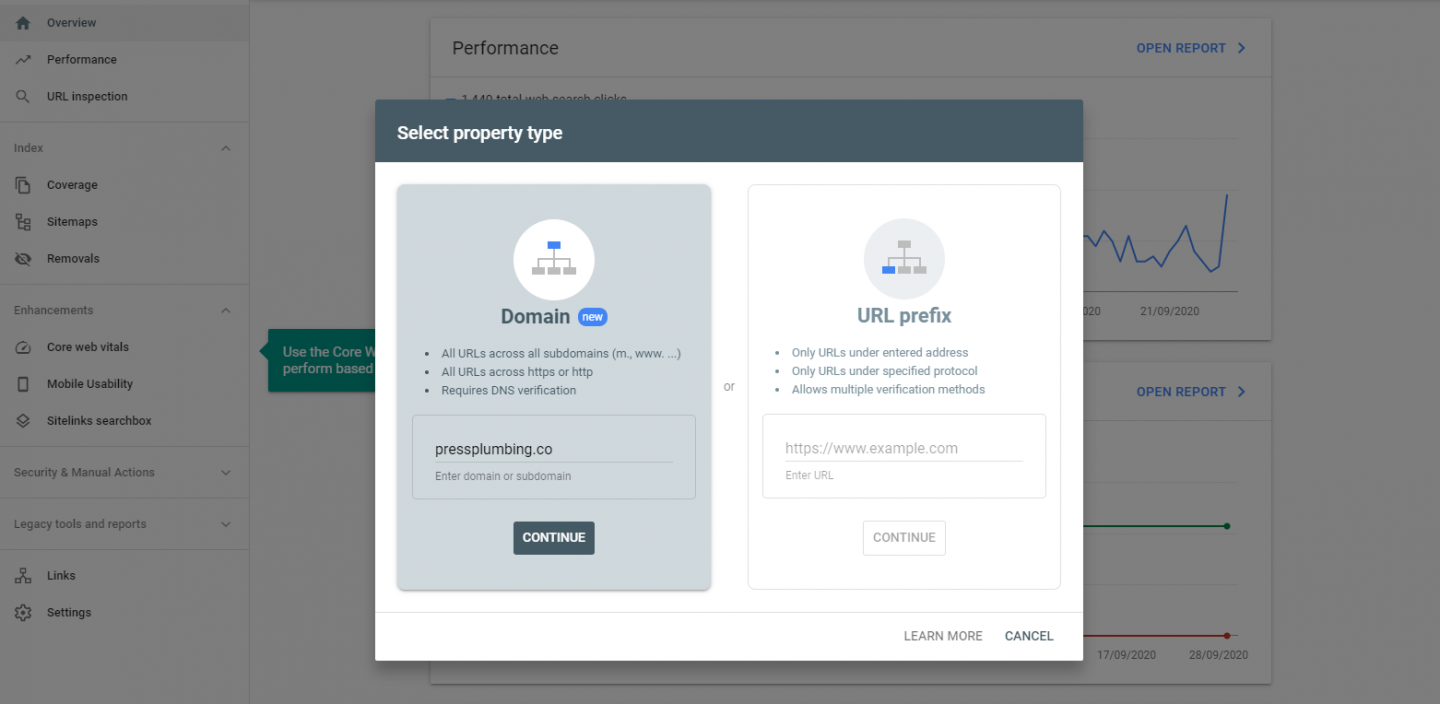
You will be prompted to ‘Add a property’ … this means your website. Choose the Domain option and enter your full website url (e.g. pressplumbing.co) and click continue.
After pressing continue you’ll be prompted to add a text record to your DNS records. Using Cloudflare this is easy. If you’re unsure how to do this with your registrar/DNS provider then ask them and they’ll definitely be able to help.
Once you’re done and Google confirms they have verified your website you will see a data console. This will take a day or two to begin to show data. It will include informative stats such as website performance and keywords people used to find your website.
Google will also alert you to any critical issues that your site might be facing such as security problems. It’s all useful information that allows you to keep your website in A1 condition.
Now we have a system in place for monitoring a range of stats about our website let’s move onto the next useful tool, also provided by Google. Google Analytics.
Google Analytics
Google Analytics is a brilliant tool that is free to use (again, all you’ll need is a Google account). When correctly configured, Google Analytics tracks your website usage allowing you to see the number of visitors your site is receiving, the pages the browse, the length of time the stay on the site and a whole raft of other information,. You can even see in realtime the number of people who are currently on your website and what pages they’re looking at!
There are a ton of settings within Google Analytics and it can potentially be quite overwhelming to use. Initially however, it’s worth just focusing on basic metrics such as the number of visitors on your site.
Installing Google Analytics
Log into your Analytics account where you will be prompted to create a new ‘account’. This is the container that your analytics will be held in for your website. Google do this as it allows you to have multiple websites registered via the one Analytics login.
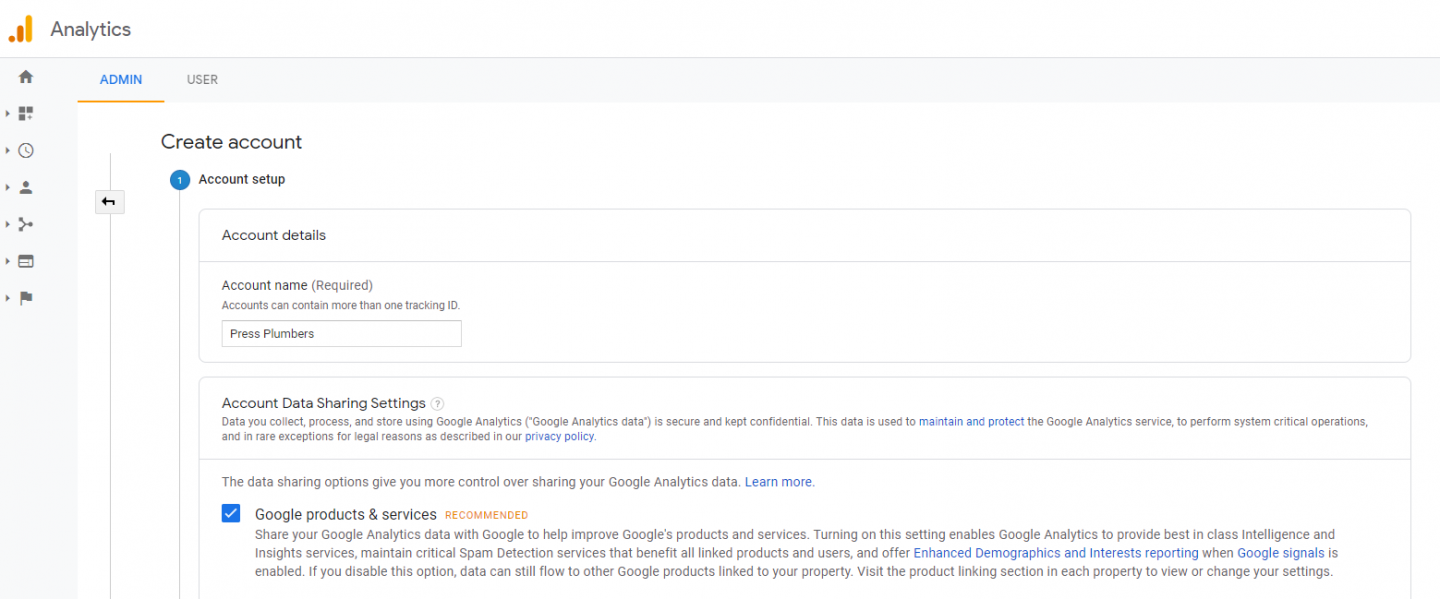
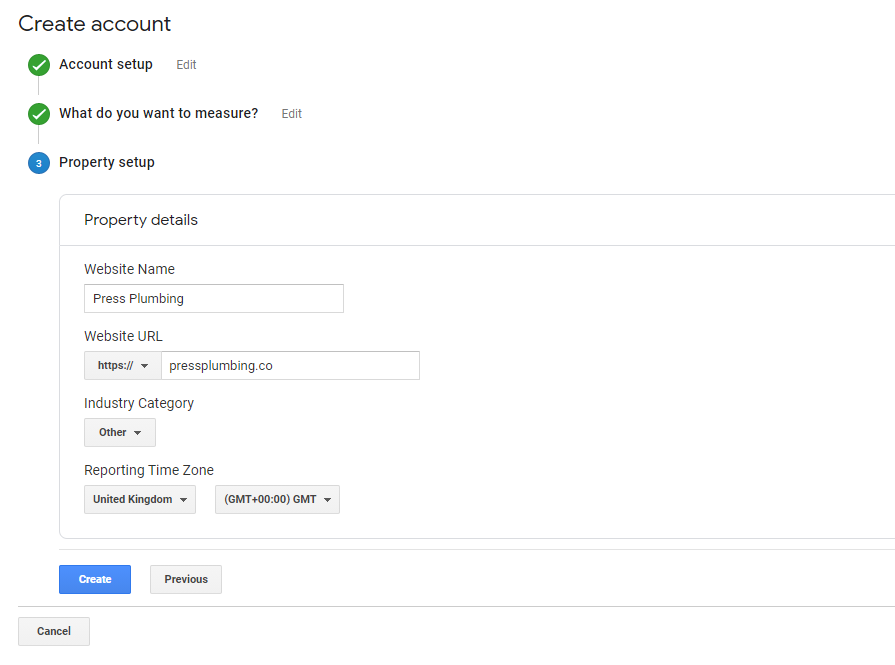
Click on ‘Next’ when you’ve filled in the name of your website. Then select ‘Web’ from the list and click Next again. Add in your website name again along with the url of your website. Select the correct time zone for your website so the analytics are accurately reported and click ‘Create’
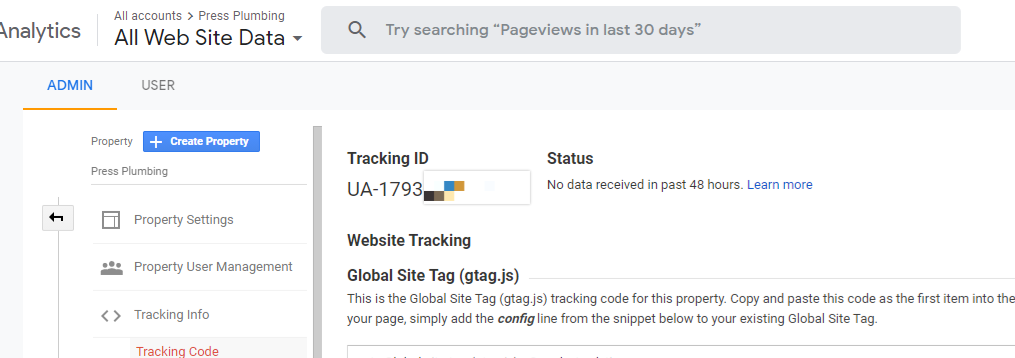
Agree to the T&C’s (warning… they go on for pages!) and then Google will give you a tracking code and a Tracking ID. It’s this ID that we’ll use so go ahead and copy this down.
Next, head back to your website, log into the Admin and head to the plugins page. Search for a plugin called ‘GA Google Analytics‘ . Install and activate this.
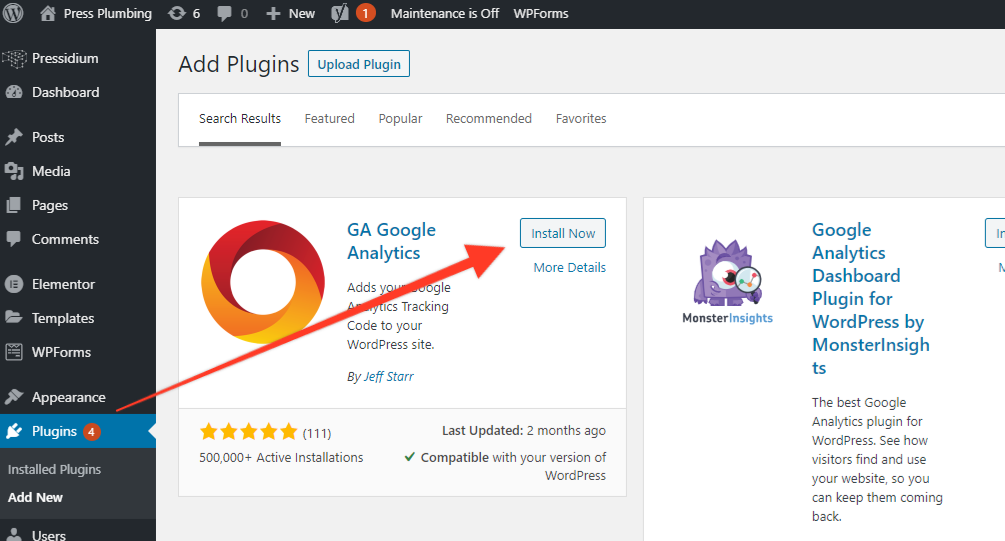
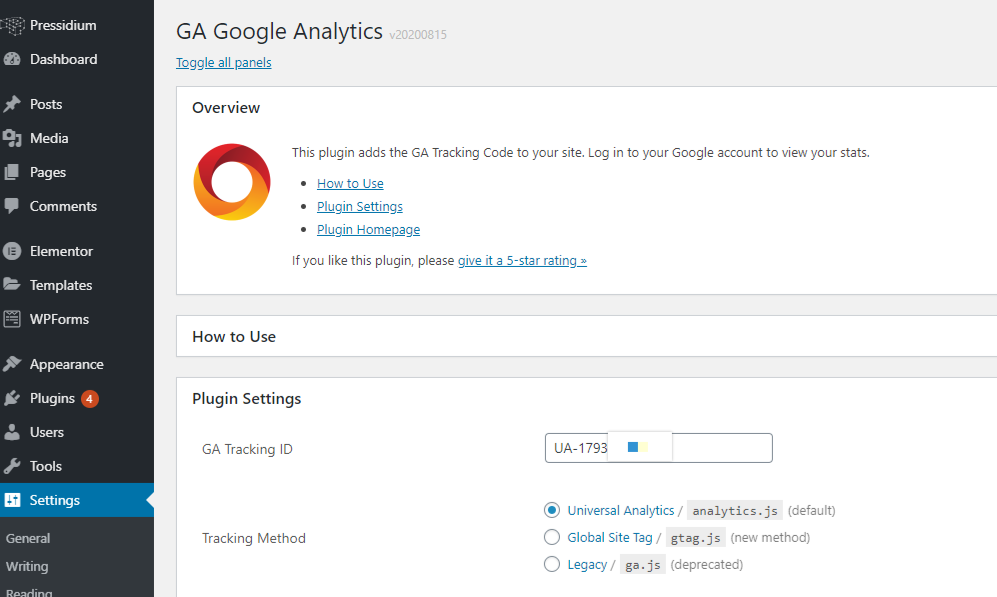
Scroll down the plugins list and find the newly installed GA Analytics and click on ‘Settings’. Then click on ‘Plugin Settings’. In the box marked ‘GA Tracking ID’ enter the tracking ID number that Google provided, scroll down and click ‘Save changes’.
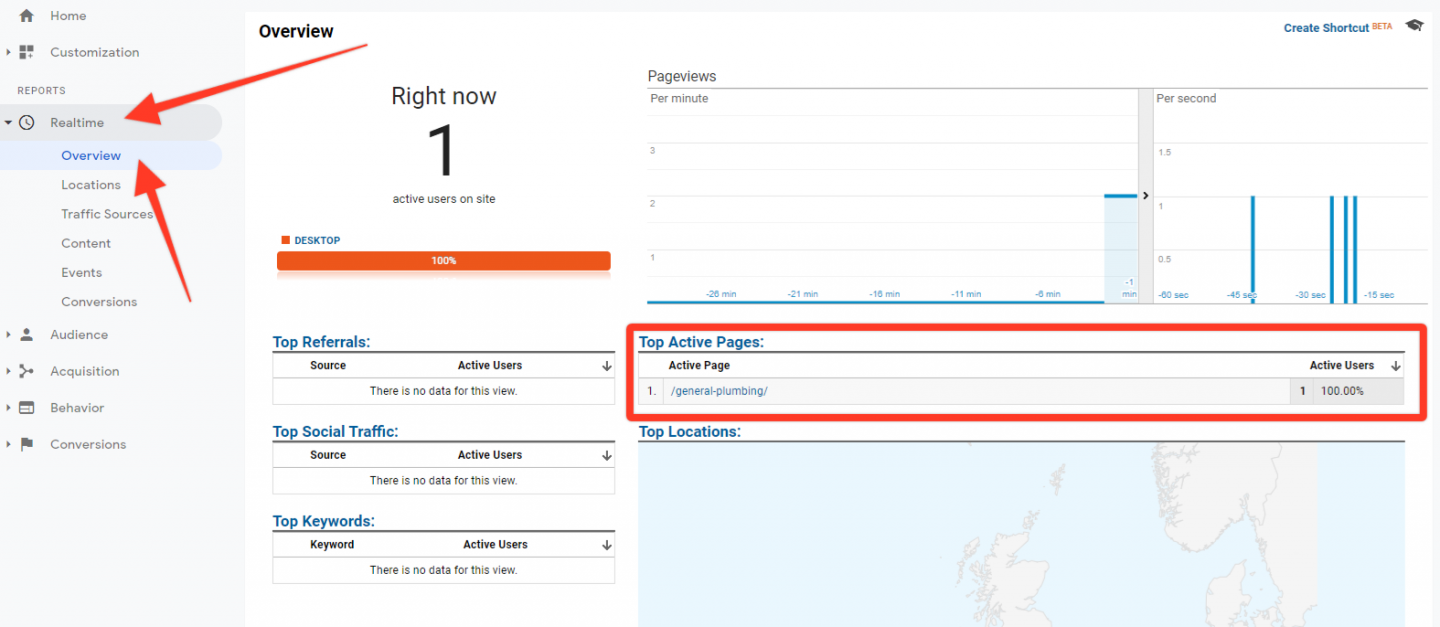
Now head back to your Google Analytics account and click on the ‘Realtime’ report which you’ll see in the left hand menu. Visit your website using an Incognito browser and you should see that you appear as an active user on your own website. Pretty neat! If you don’t see this after a few minutes try accessing the site via another device (like a mobile), making sure you are NOT logged into your website. If this still doesn’t work you many need to clear your WordPress cache if this is being used on your hosting. Ask your host for help if you’re unsure.
Don’t worry if Google Analytics seems overwhelming. The key data you’ll initially be interested in is things like the ‘Audience’ which shows the number of visitors to your website over a certain date range (you can change the date range in the date selector located to the top right on most Analytics reports). Acquisition reports that give you an idea of where you website visitors have come from are very helpful (for example via search, from a social media link etc.) and Behaviour is also a great report as this shows the pages that each visitor viewed and how long they spend on them.
All of this data will help you as your website and business grows and will give you the insights you need to improve your website, direct advertising spend appropriately and much more.
Going LIVE!
This is it! After a lot of work we now have a fully functioning website that has been SEO optimised where possible and is ready to go. Perhaps double check your contact form is working, view the website on a mobile to check it looks good on smaller screens, have a final read through and then click on the ‘Maintenance is On’ button that you’ll see at the top of each page (when you’re logged into WP Admin).
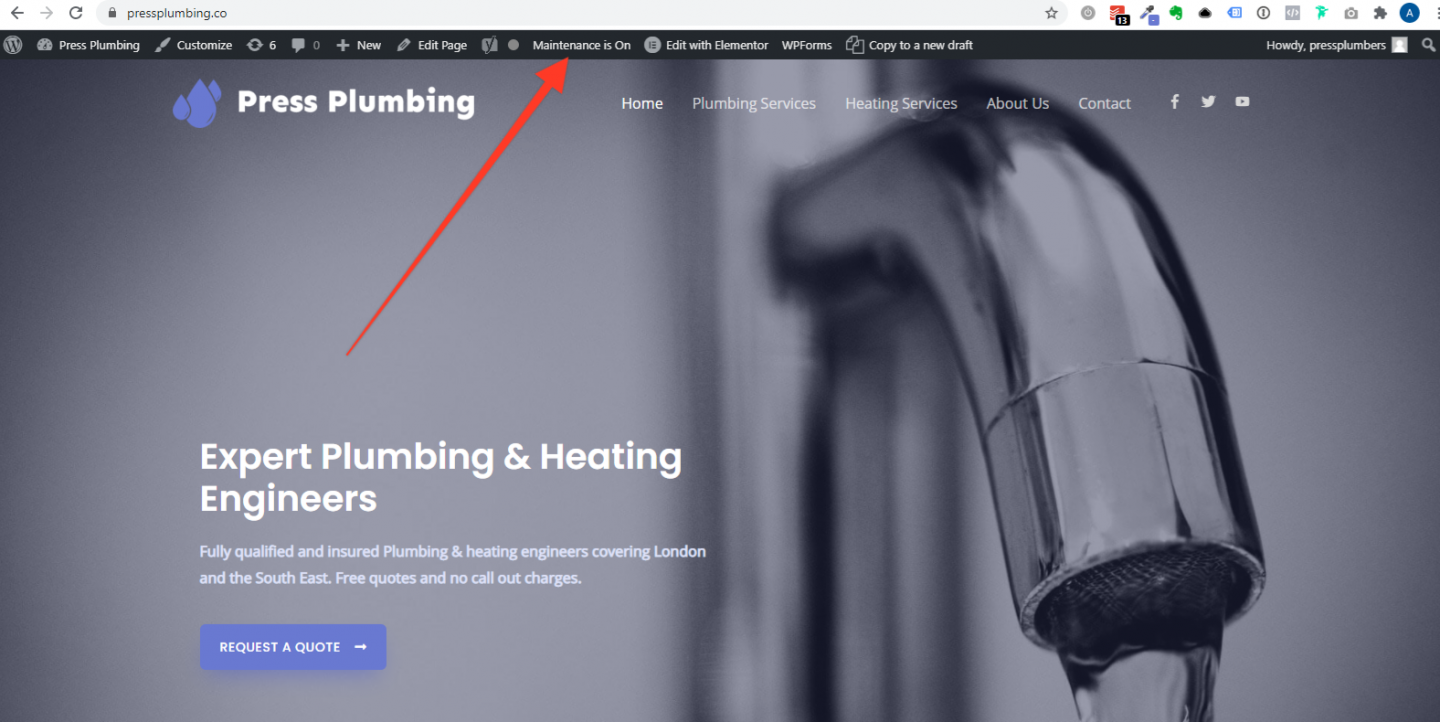
Click this button to be taken to the Maintenance plugin where you’ll see a green toggle switch. Click this to turn the Maintenance screen off and then hit save changes to push your site live! Then, visit the website from another browser or Incognito window to check that the maintenance screen has been replaced by your live website.
If in the future you wanted to make changes to the website but didn’t want to the site to be live during this work you can of course re-enable the maintenance screen. Just remember to turn it off after you’ve finished!
And that’s it for this 8 part series. If you want to take a look at the finished website just go to https://pressplumbing.co
We hope you’ve found this tutorial series helpful. If you need hosting for your new WordPress business website then head to Pressidium for full details and pricing. All standard plans come with a 60 day money back guarantee so you can try hosting with Pressidium risk-free.
Happy website building!
Start Your 14 Day Free Trial
Try our award winning WordPress Hosting!


