

The benefits of using a staging server when working with a WordPress website are significant yet many developers, designers and website owners still neglect to include a staging server in their workflow. That’s a big mistake but one that is incredibly easy to correct. If you’re not sure why you should use a staging server or don’t know what one is then read on!
What is a Staging Server and how does it work?
A staging server is a server that is used to test a website or application. This server isn’t typically made available to the public. A staging server would typically run alongside your live website or app mirroring its setup. The staging server is normally accessed via a private sub domain which means you can view both your live site and staging site alongside each other.
A well-built staging system will allow you to copy your live (production) website to a server that is configured identically to your live server. This staging site then becomes accessible via a separate subdomain and can be updated and viewed in the same way as your live site. Changes made on a staging server can then be pushed to your live site as and when required. It’s that simple!
What are the benefits of using a Staging Server?
Now we hopefully understand what a staging server it let’s look at some of the benefits of using one.
Updating your WordPress website core, themes & plugins
Anyone who has used WordPress knows that, on occasion, things can go wrong. Typically this is most likely to occur when you update your WordPress core, your theme files or your plugins. There are a lot of moving parts on a WordPress website, and, in order for things to function as they should, all these parts need to ‘play nicely’ with each other. With new WordPress core updates being released every few weeks (major and minor updates), frequent plugin updates and occasional theme updates, the potential for things to go wrong when updating your site are significant.
This could be due to either a) an incompatibility between an updated plugin/theme/core file or b) as a result of an error that occurs during the update itself. Whatever the reason, what may have been a simple update could break your site or part of it. This might result in a minor inconvenience thanks to an element of your site not rendering properly right through to a complete meltdown where your site suddenly becomes inaccessible.
Try our Award-Winning WordPress Hosting today!


In both cases issues like this can range from annoying to a major problem depending on how important your website is. If your website is important to your business then any sort of downtime or malfunction could cost you a significant amount of money (and stress!).
Given the frequency of updates required in WordPress it’s probably more likely to be an ‘if rather than when’ something goes wrong during an update. A staging server completely eliminates this risk by allowing you to test any updates without risk of your live site going down. Assuming all is well, you know you can update your live site without fear. However if the update causes a problem you can at least troubleshoot in your own time without any impact on your live site.
Test new features for your website
New features can help keep a website fresh as well as introducing improved functionality for a better visitor experience. Anyone who wants to keep their site relevant and up-to-date will likely see a range of improvements they want to make over the lifetime of the website. Introducing new features onto a live website however can be risky.
The first risk is technical… complex (or sometimes even simple) features may not function as expected and ultimately break your site. Clearly bad news, especially if you have a lot of traffic hitting your site on a daily basis. Secondly, new features may not be as aesthetically pleasing as you hoped or might be designed in a way that confuses your end user. As such on both counts it makes sense to test new features on a staging server first.
Technically, features can be run to ensure they operate as expected. From a usability perspective, a link to your staging server can be provided to your team or perhaps even a focus group so you can get valuable feedback before the update makes its way into the wild. Either way, when it comes to pushing this new feature live, having firs tested it on a staging server, you can be much more confident it will work as expected.
Make wholesale design changes to your site
Sometimes you want to embark on a complete site redesign. Instead of starting completely from scratch you might want to salvage a significant chunk of your existing website (such as the page copy, blogs and so on) and just make design changes. Perhaps your business is rebranding with a fresh logo and color scheme.
A staging server allows you to copy the existing site and then make wholesale updates to your site design without impacting your live site. When you’re ready to launch your new site, a couple of clicks will see it go live. It’s a seamless way to make the transition from old site to new site.
How do I setup a Staging Server?
There are two main ways of seting up a WordPress staging server.
The Manual Way
It’s perfectly possible to setup a staging server by creating a new website install on your hosting account (making sure that it’s running the same PHP version, the same WordPress core and so on as the live website install). You then can use a plugin of your choice to migrate a copy of your live site to this install.
However, as easy as that sound sin practice, anyone who migrates sites regularly will know that it’s not always a simple process and can be quite time consuming. The other thing than needs to be considered is that if you’re making a range of changes to your site on your staging server that you want to copy to your live site at some point, you’ll need to undertake the migration in reverse (i.e. staging site to live site). If the migration process is slow or hit and miss you run the risk of your live site going down… precisely the thing a staging server was meant to avoid in the first place.
The Automated Way
Without doubt, we’re a little biased, but, setting up and managing your own staging site as outlined above really is much too much like hard work as well as being risky. A much better bet is to take advantage of a pre-configured staging system that is offered by several managed WordPress host’s such as Pressidium.
Let’s see just how easy it is to create a staging site using the build in staging we offer.
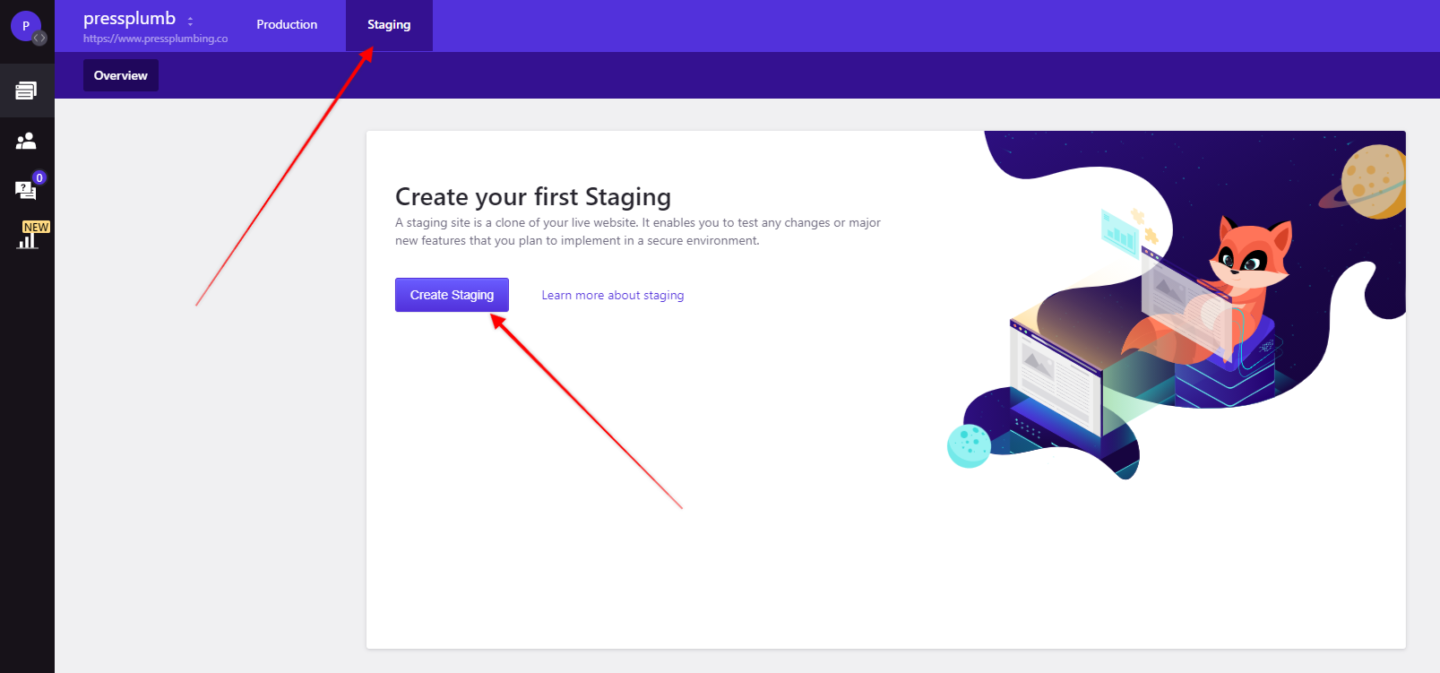
Step One:
Log into your Dashboard and open up the site you want to push to a staging server. Click on the ‘Staging’ tab at the top of the page followed by ‘Create Staging’ as shown below. Now, go grab a coffee… your new staging site will be ready in about 5 minutes or less. You’ll get an email notifying you when it’s ready.
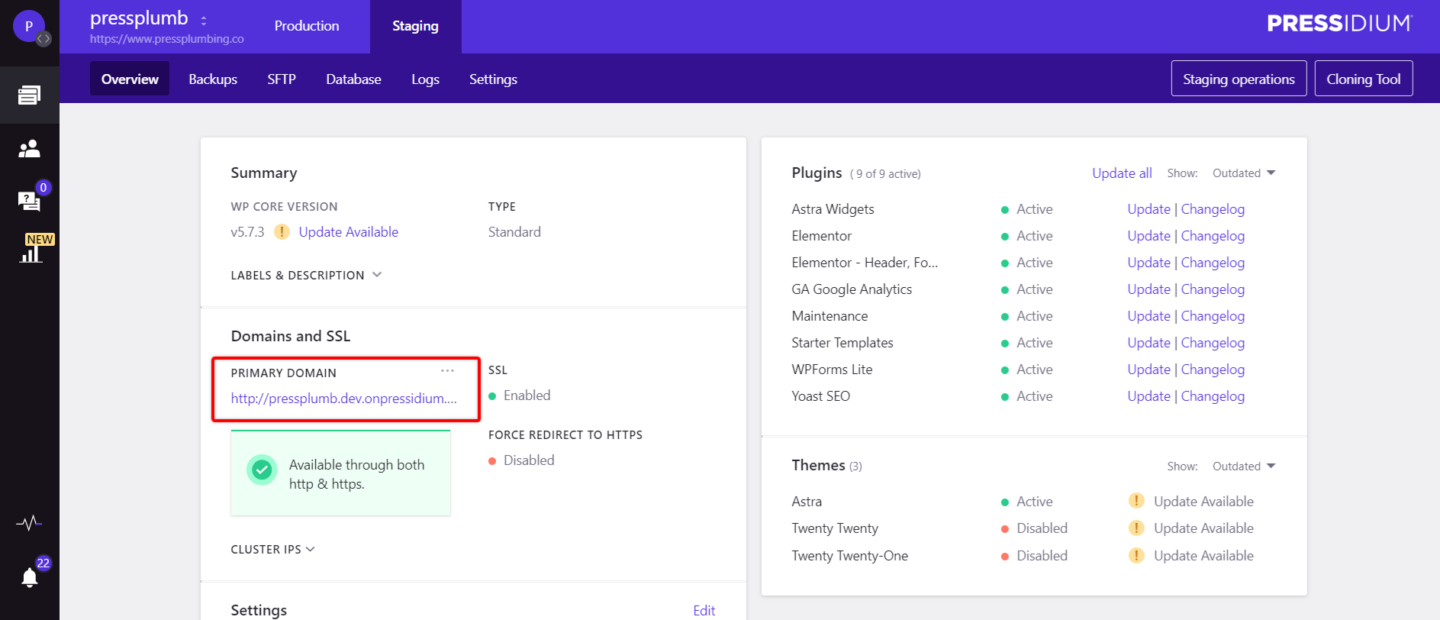
Step Two:
On the staging page you’ll now see something that looks practically identical to your live website Dashboard. The overview page will show the WordPress core version, you’ll spot the site plugins (and be able to update these), have access to daily backups of your staging server and much more.
The main thing to look for is the automatically generated url that directs you to your staging server (see below). Click that and you’ll be taken to an identical copy of your website. Login via WP Admin as you would normally (same username and password).
Step Three:
Make the changes / updates to your site as you see fit. When you’re happy with these changes, head to your Dashboard, and click on ‘Staging Operations’. Click ‘Push Staging to Production (i.e. your live site). A popup will appear that confirms the direction that your site will be pushed (in this case your staging site will overwrite your live site). Select if you want to include the database and/or files and then hit ‘Yes, Push to Production’. Go get another coffee if you want!

These updates will be pushed to your live site seamlessly in a matter of minutes. All urls will automatically update from your staging domain to live domain, your site cache will be cleared and visitors will now see your refreshed/updated site. It is THAT easy. We even take a backup of your live site prior to pushing the staging site live just in case anything goes awry.
The whole process of copying your live site to staging and then pushing your staging site to live takes a few clicks and a matter of minutes. No plugins, no technical expertise, no manual migrations, no stress.
We’re confident that once you experience using a staging site with Pressidium it will revolutionize how you manage your WordPress website. To try it for your self sign up now or log into your Dashboard.
Start Your 14 Day Free Trial
Try our award winning WordPress Hosting!


