

Welcome back to our build a website series. In Part 3 we got started with choosing a WordPress host, installing WordPress and pointing our domain name to our new WordPress install. With this done we set up a maintenance page which included our new business logo and some contact details so any customers who took a look at the website whilst we finished building it were able to see how to get in touch with us.
Our next steps where to install the Elementor plugin which is the page builder we will be using to construct our site, and then finally we installed a starter theme provided by the WordPress theme developers Astra.
This left us with a solid foundation from which we could continue to build our website for our new plumbing business.
In Part 4 of this series we are going to make some significant inroads into building our new website. To begin we will make a number of design changes to the theme for example a colour palette that is used across the site and also the fonts. We will update the site with our logo and create a homepage that will set the tone for the overall layout and style of the site moving forward. With that done, we’ll then be in an excellent position to create pages that promote the different services offered by the business (in Part 5). There’s lots to do so let’s get stuck in!
Updating the name of our website in WordPress
You will probably notice if you look at the tab in your browser this is displaying your new website that it says, ‘Your new super fast WordPress site’. This is the generic name given to all new WordPress websites and is something that will want to change. To do this login to your admin panel, head to the settings menu and click on ‘General’. In this panel you will see a site title and tagline. Update these to something appropriate for your business.
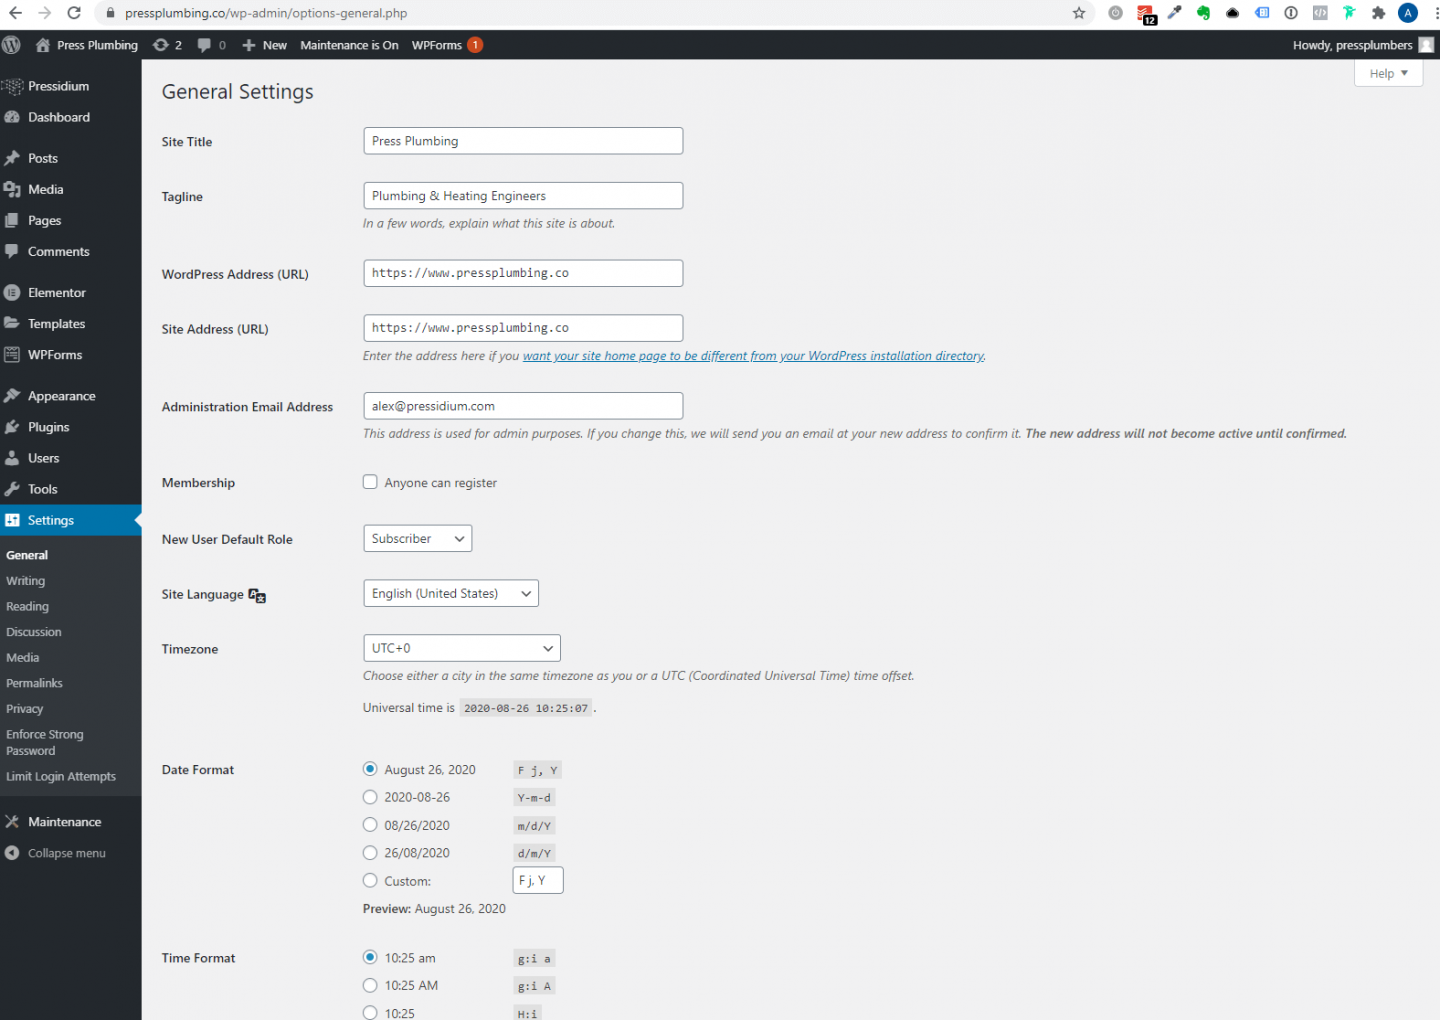
When you have made the updates scroll down and click on ‘Save changes’.
Making changes to the Astra starter theme defaults
Most WordPress themes have a built in control panel or options panel that allow you to make changes to a number of settings that affect both the design of the website and also how it functions. our Astra starter theme is no different. The location of this control panel can vary from theme to theme. In this instance it is accessible via the ‘Appearance’ menu and then the sub menu ‘Astra Options’.
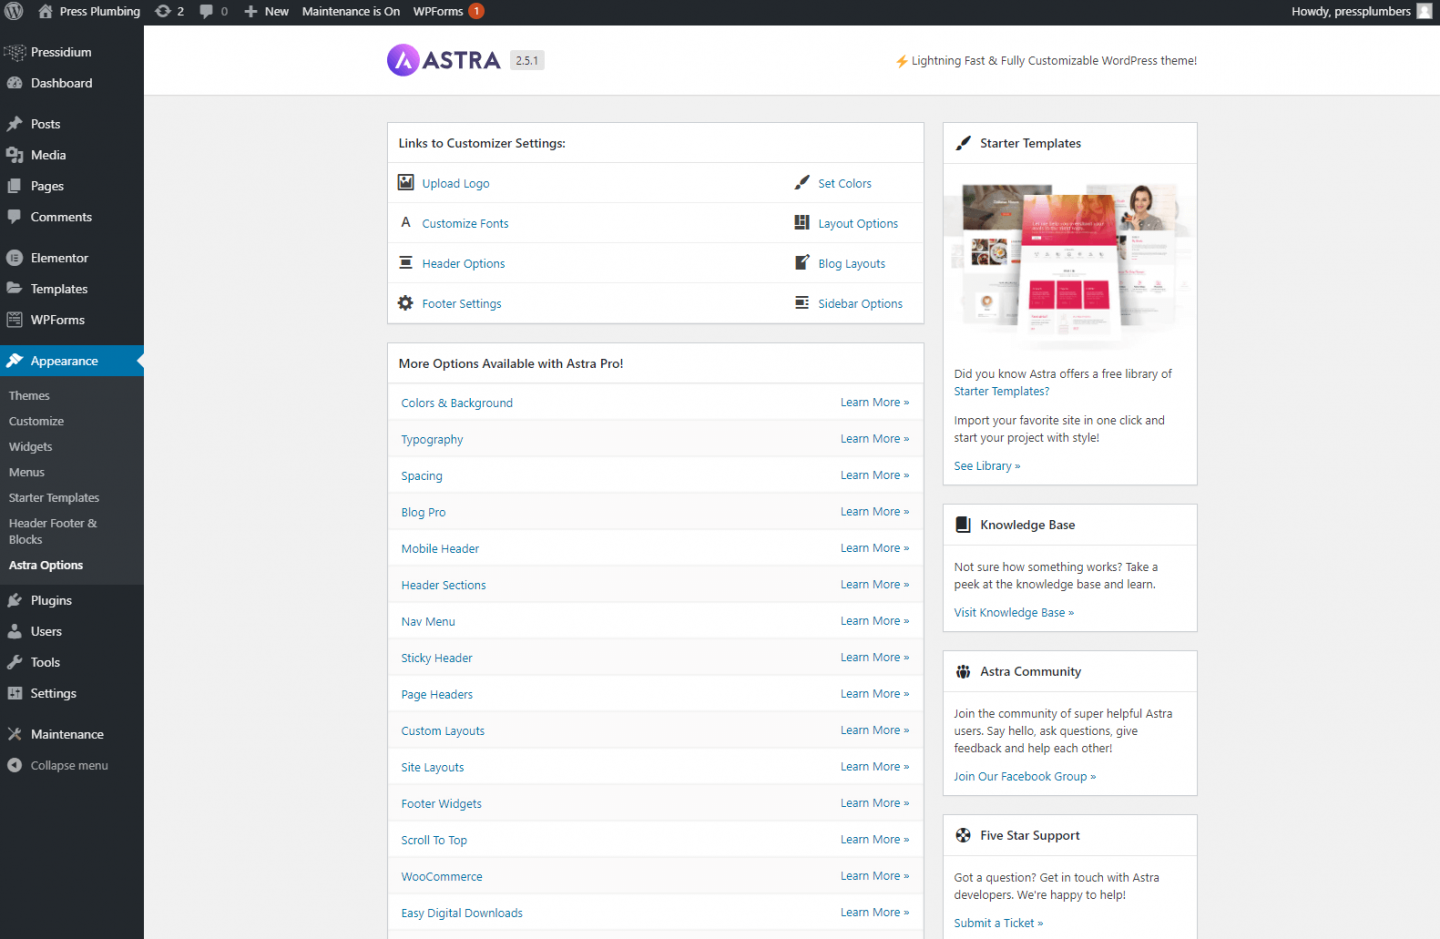
Click on this and you’ll be presented with a raft of options that can be updated to alter the style and function of your website.
Website logo
Our chosen theme makes use of full width header images over which the navigation menu and logo are laid in a transparent manner. Because of this will need to use a logo that is saved as a PNG file and has a transparent background. Hopefully when you created your logo, or had a designer do this for you there would have been the option to either download a suitable PNG file like this or the designer would have given you a copy. As mentioned it’s very important that any logo that is designed is saved as a vector file as this gives you a lot more flexibility to generate the image format that is required. in this instance it’s relatively easy to convert a vector to a PNG if needed.
Try our Award-Winning WordPress Hosting today!


Once you have your logo (we’d suggests sizing this to around 400 pixels wide), click on the upload logo link within the customizer settings. You will be taken to the WordPress customizer where you will be able to upload your logo and adjust the size. When you’ve done this, make sure you click on the ‘Publish’ button which will then save your changes.
Because we currently have a maintenance screen set up on the website these changes won’t be visible to the public. In the future however when this maintenance screen has been turned off, when you click the publish button, any changes you’ve made will be instantly live on your website for everyone to see.
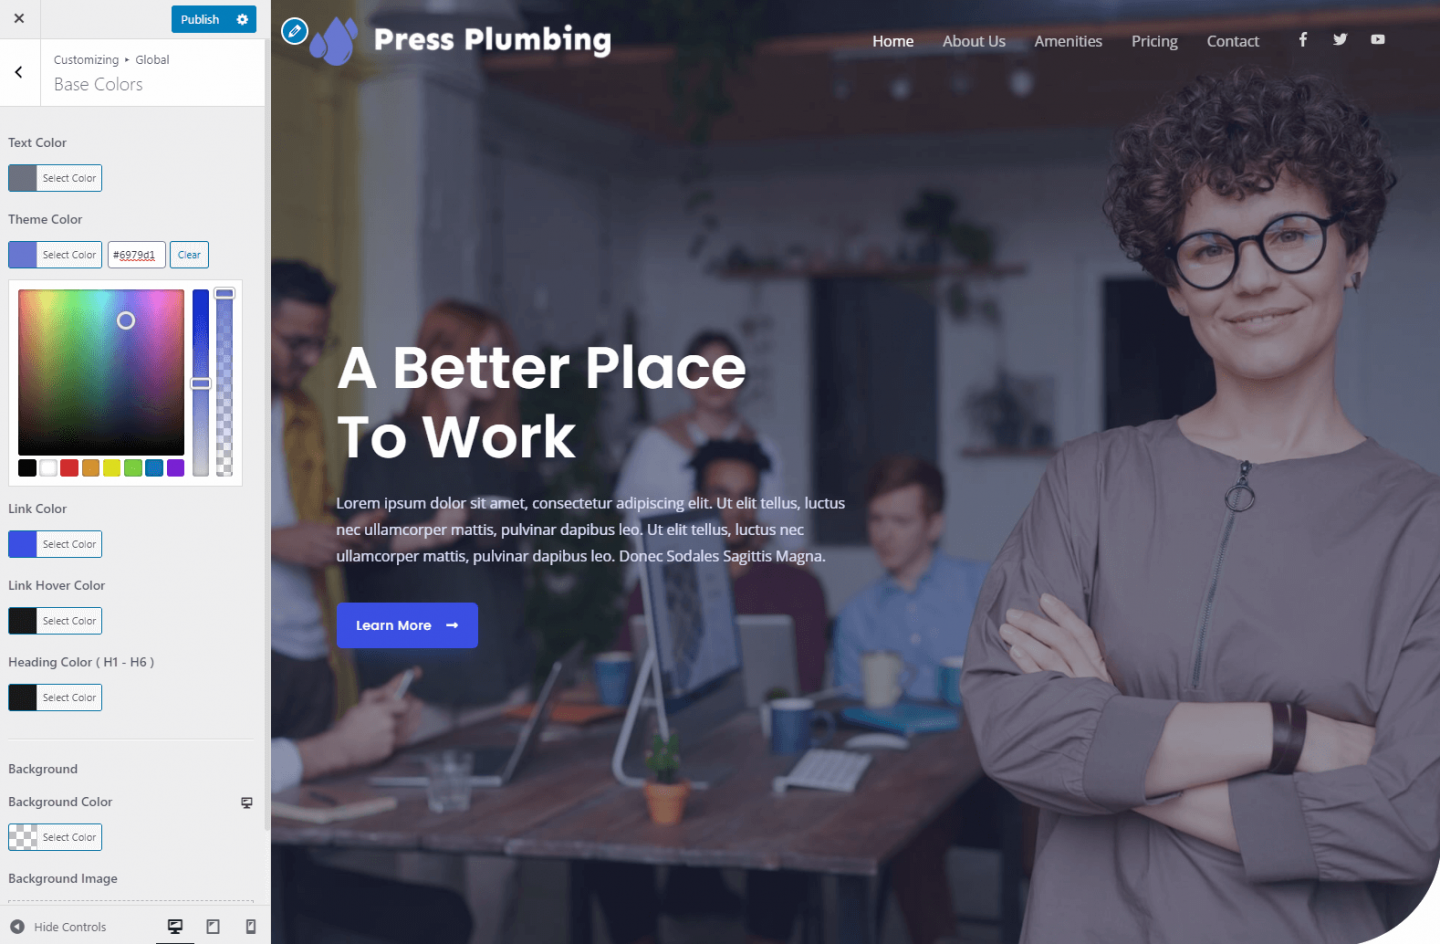
Color scheme
Now we have our logo set up we can make some changes to our colour scheme. As it happens the default colour scheme for this particular theme is a shade of blue that is close to the one that we have chosen for our business. It’s not absolutely spot on though so will need to update this. Websites use a color system called ‘Hex’. Colours are represented by a six digit code. For example, white would be #ffffff. The shade of blue we have chosen for our business is #6979D1.
To update our set colours on the website head back to the Astra options panel and click on ‘Set colors’. You will be taken back into a WordPress customizer where you’ll see a tab that says base colors. Click on this, and you’ll see five different color swatches. we’re going to keep the text colour link hover colour and heading colour but update the theme colour and link colour two are shade of blue.
This will update colours in certain areas of the website but others, like buttons, are controlled by the Elementor plugin.
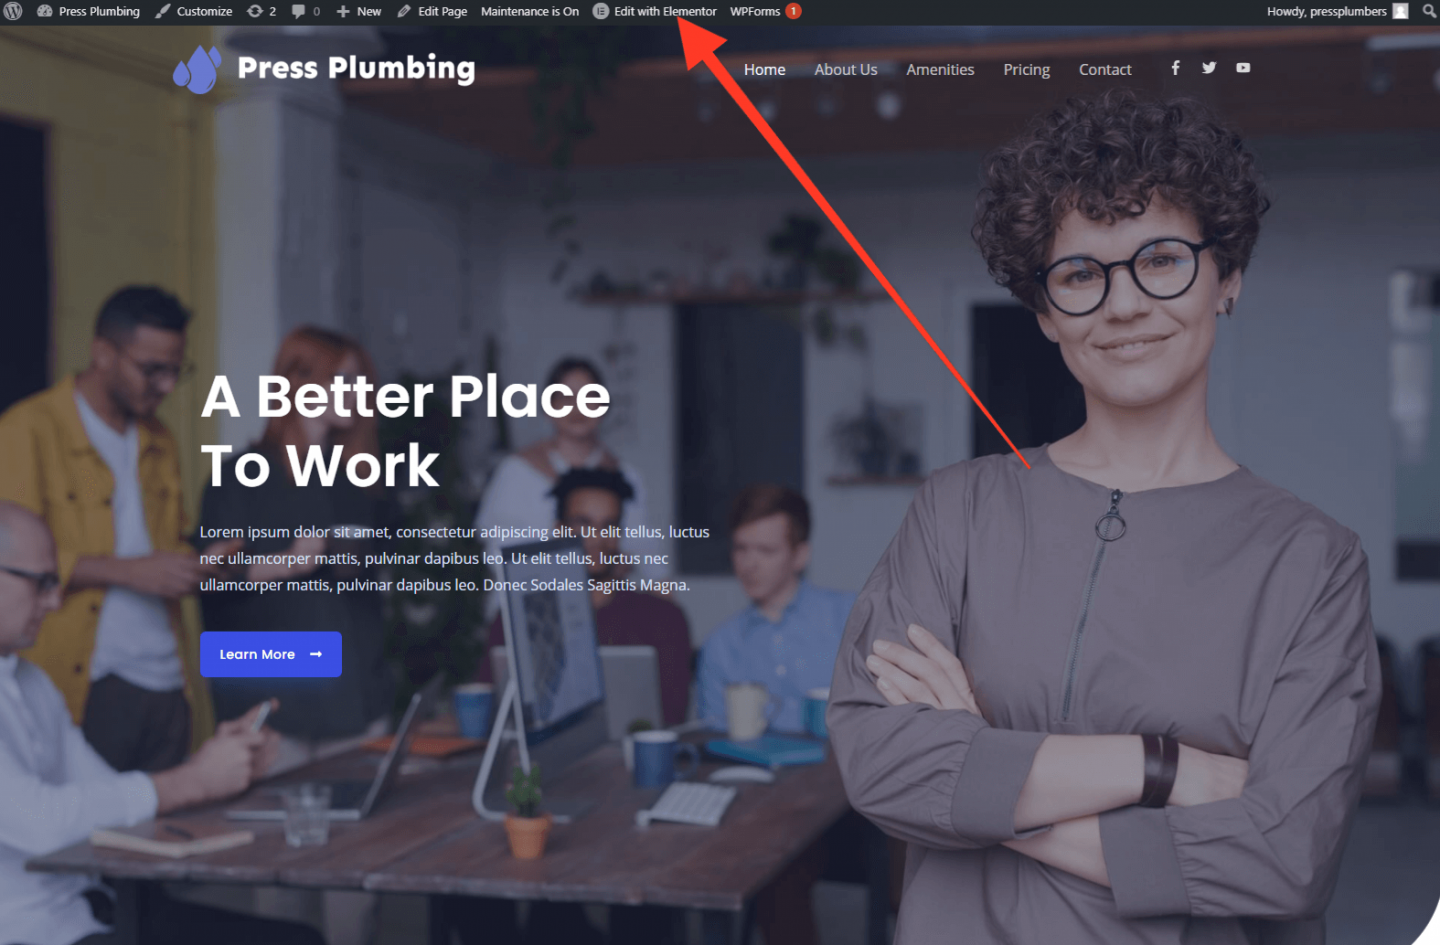
To make changes to these colors, exit the customizer and head to the home page of your website. You can do this by clicking on the ‘Home’ icon that appears in the WordPress Admin panel. See below:
When you’ve done this click ‘Edit with Elementor’:
Having done this you’ll be taken to the main Elementor editor. We’ll be spending a lot of time in this panel so it’s worth having a play and getting used to how this is laid out. Although we’ll be doing our best to walk you through how to use Elementor, it’s beyond the scope of these articles to cover off every little element and feature included in this page builder. if you’re serious about using Elementor to build your website it might be worth your time to checkout some of the tutorials that are provided by Elementor themselves.
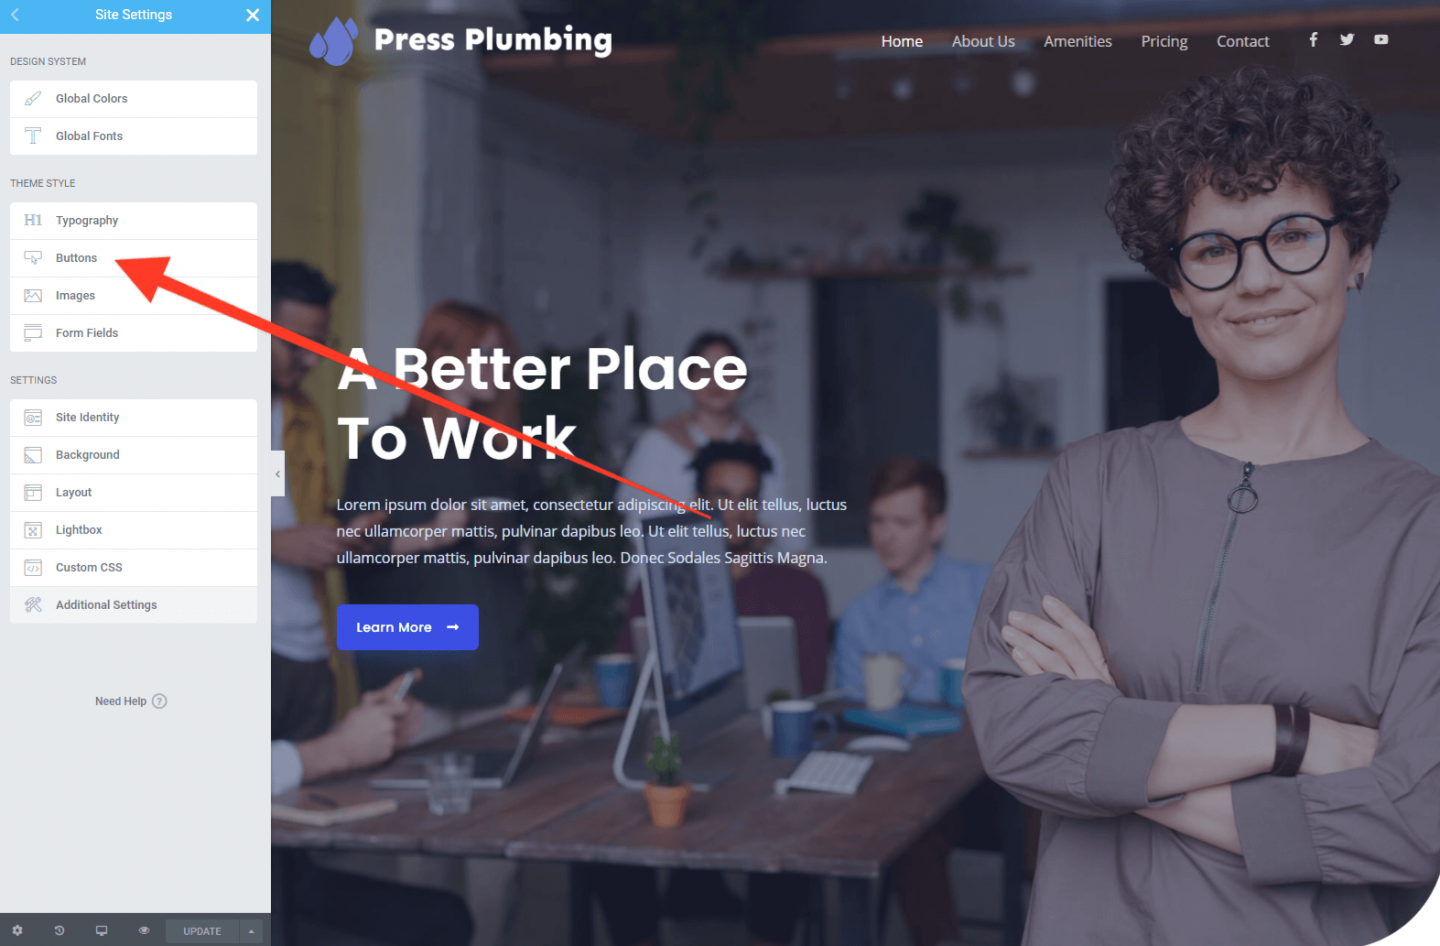
To update the button and background colors in Elementor, click on the 3 line ‘Hamburger’ menu located on the top left of the Elementor panel. This opens up a menu that includes a link to ‘Site Settings. Click on this. From within this panel you’ll see a ton of options for configuring site settings. For visual updates, one of the cool things about Elementor is that changes made in the Elementor panel appear immediately in the website preview so you can quickly see if that changes you’re making are having the desired effect.
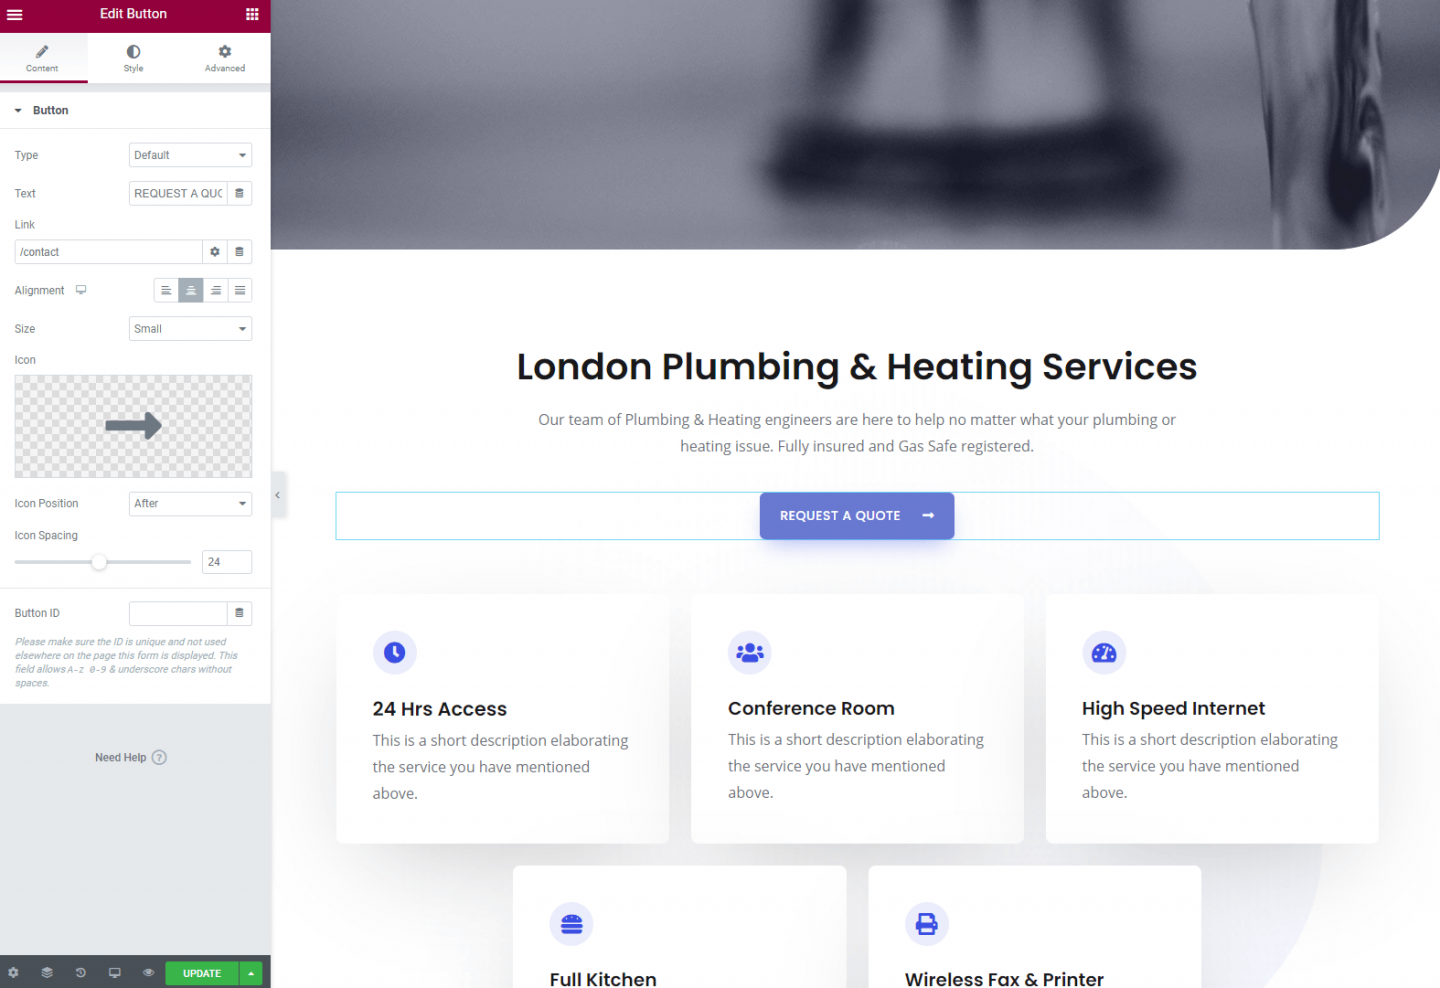
In this instance, we’ll update the Button color by clicking on ‘Buttons’.
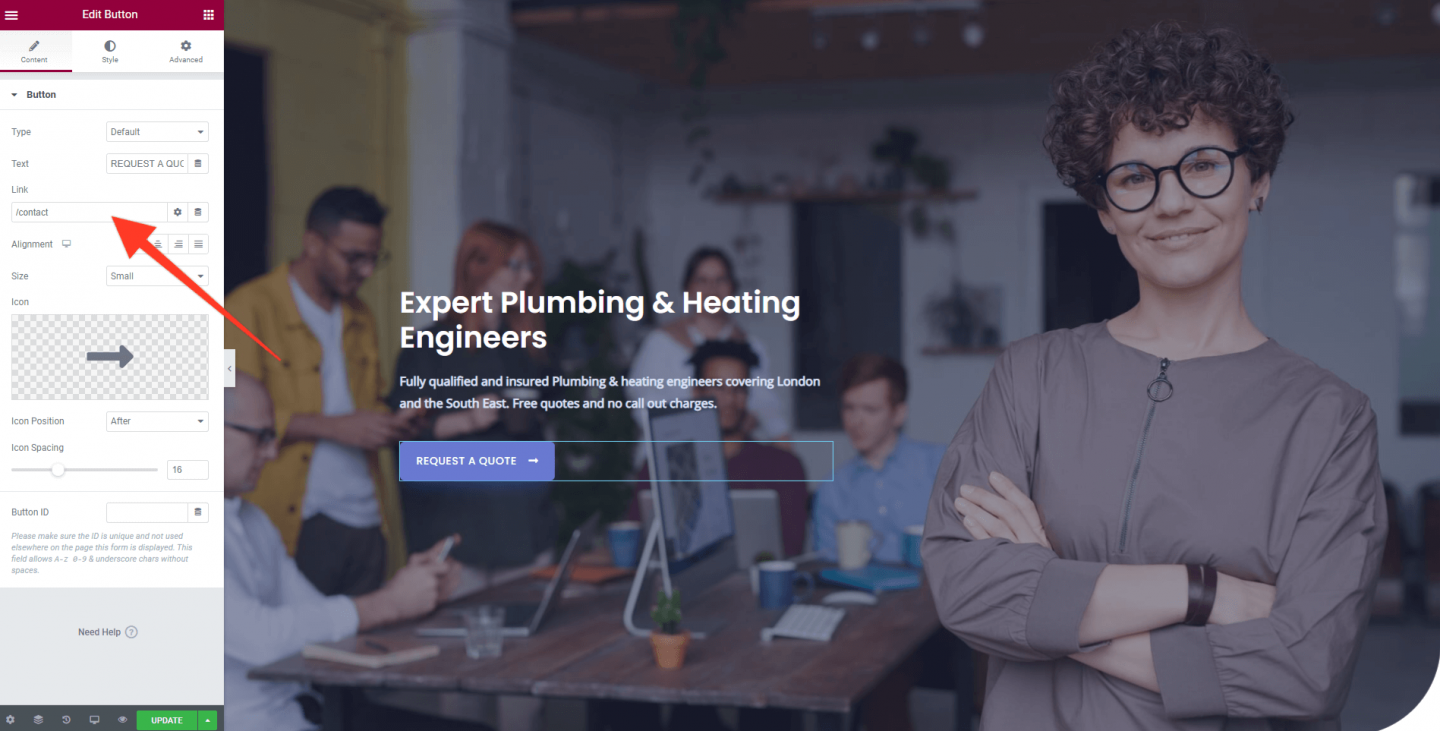
When this sub menu opens, click on the ‘Background Color’ tab to update to your chosen color. In our case, we’ll use the same blue as our logo (#6979D1). Click on ‘Update’ to save your changes (you’ll ALWAYS need to click on Update to save changes so don’t forget!).
Updating our Website Homepage
Now we’ve got our business logo and the correct color scheme setup we can crack on with changing the layout and design of our homepage to reflect our business. The homepage design will ‘set the tone’ for the rest of the site so it’s worth spending some time to get this right. Other pages on your site will flow easily from this design in that way.
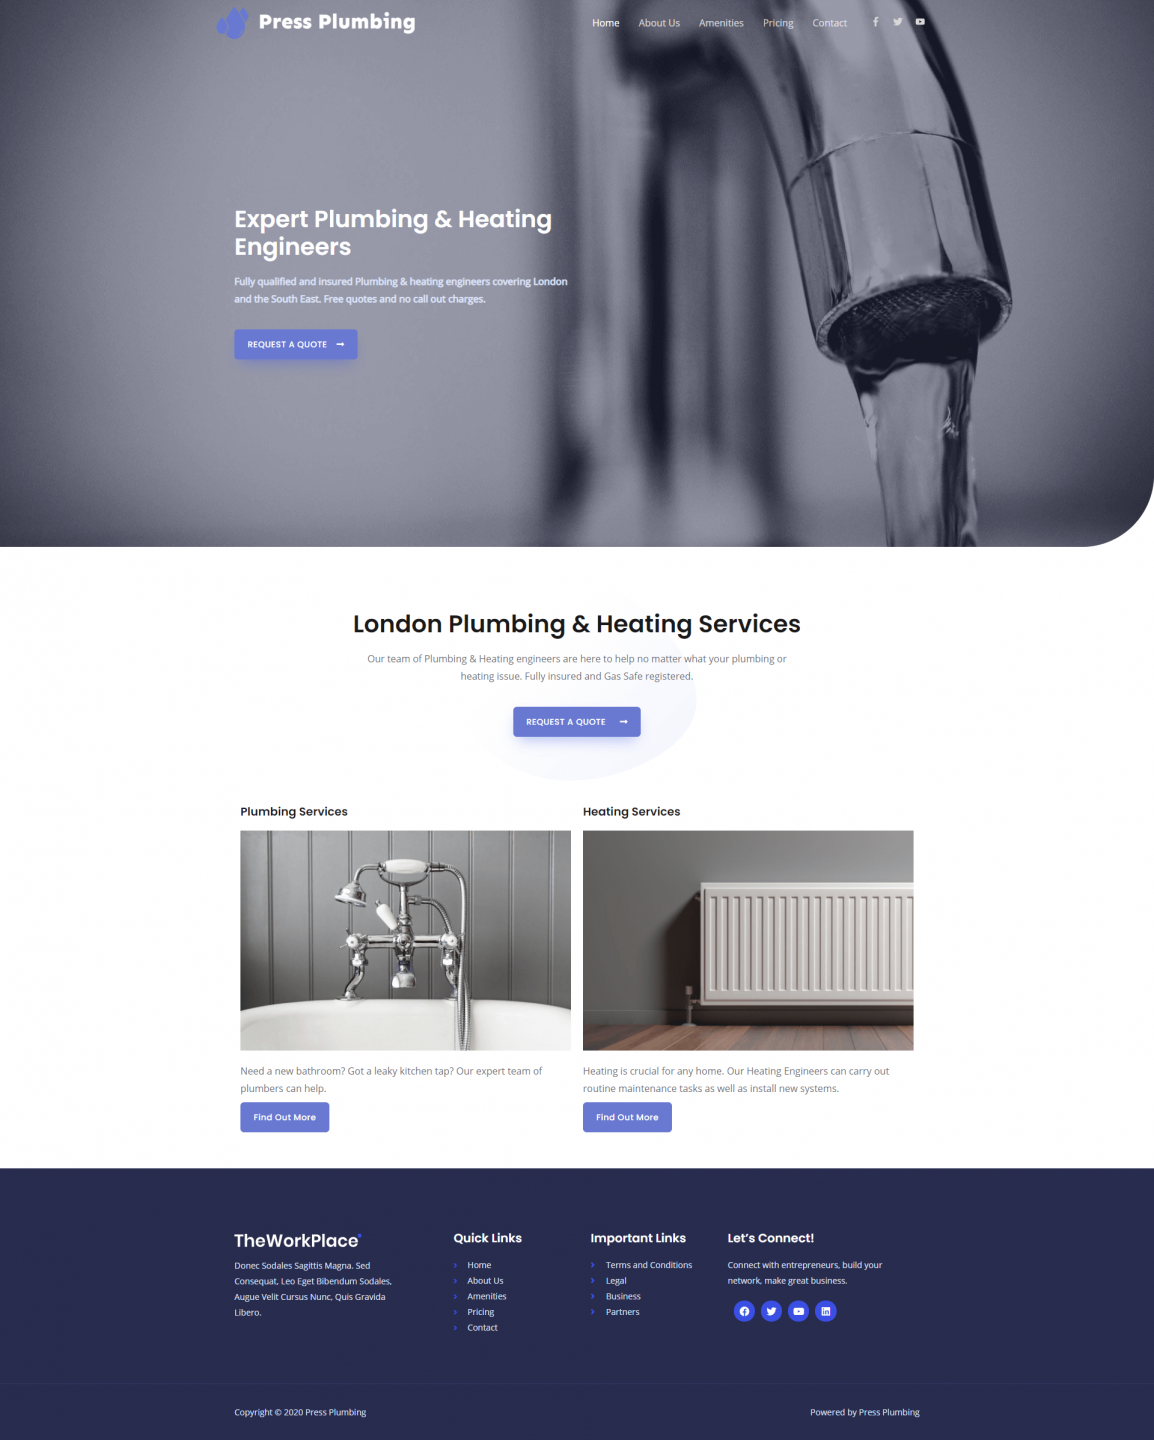
Let’s begin by updating the ‘Hero’ section that appears at the top of the page. This currently comprises a background photo and some introductory text, plus a button. To begin, head to the homepage and click on the ‘Edit with Elementor’ button (if you haven’t already). The Elementor dashboard will open up and elements on the page will become ‘clickable’.
Click on the Hero text and you’ll see that a cursor appears whilst at the same time the Elementor panel on the left changes to show a Title box. You can type a new title directly onto the page and tweak the size of this via the Elementor panel.
Now click on the text below and enter something suitable. Next click on the button and change this. Buttons in hero sections like this are a fantastic way to promote a ‘Call to Action’. In other words, use them to try and encourage a potential customer to ‘do something’. In our instance we’re going to change the text on the button to ‘REQUEST A QUOTE’. This will then lead them to a contact page on our website. We need to update the link on the button. When you click on the button you’ll see the button panel open in Elementor. In our case we’ll be taking people to the Contact page. Although this hasn’t been built yet, we know we’ll use the url https://pressplumbing.co/contact for this so we’ll add in /contact to the link field.
Click on ‘Update’ to save your changes. Moving forward, we won’t tell you to do this… just remember, when you make changes you want to save, click on ‘Update’.
Update the Homepage Image
Now we need to change the Homepage image. When it comes to images, using high quality ones is important. Low resolution snaps taken on a phone are unlikely to do your business justice. Depending on your business and your budget, you have a couple of options.
- Hire a photographer and get some ‘real’ photos of your business done. Where possible this is likely to be your best bet. Your photos will be unique, high quality and fully portray your business. It can be expensive to do this though so if you feel able you could of course try and take some yourself. Just bear in mind that if the photos look amateurish then so will your business.
- Use stock photos. There are numerous stock photo libraries online which provide high quality, ‘royalty free’ images that can normally be used for commercial purposes. Some, like Shutterstock, charge for accessing these whilst others like Unsplash, allow you to download and use them for free. Whatever you choose, its important that you check the licencing restrictions on a photo. What is NOT allowed (in general terms) is for you to go and copy any image you find on the internet and use this!
In our instance as we’re on a budget we are going to try and find some suitable images on free photo libraries. As well as Unsplash, you could check out Pexels and Pixabay.
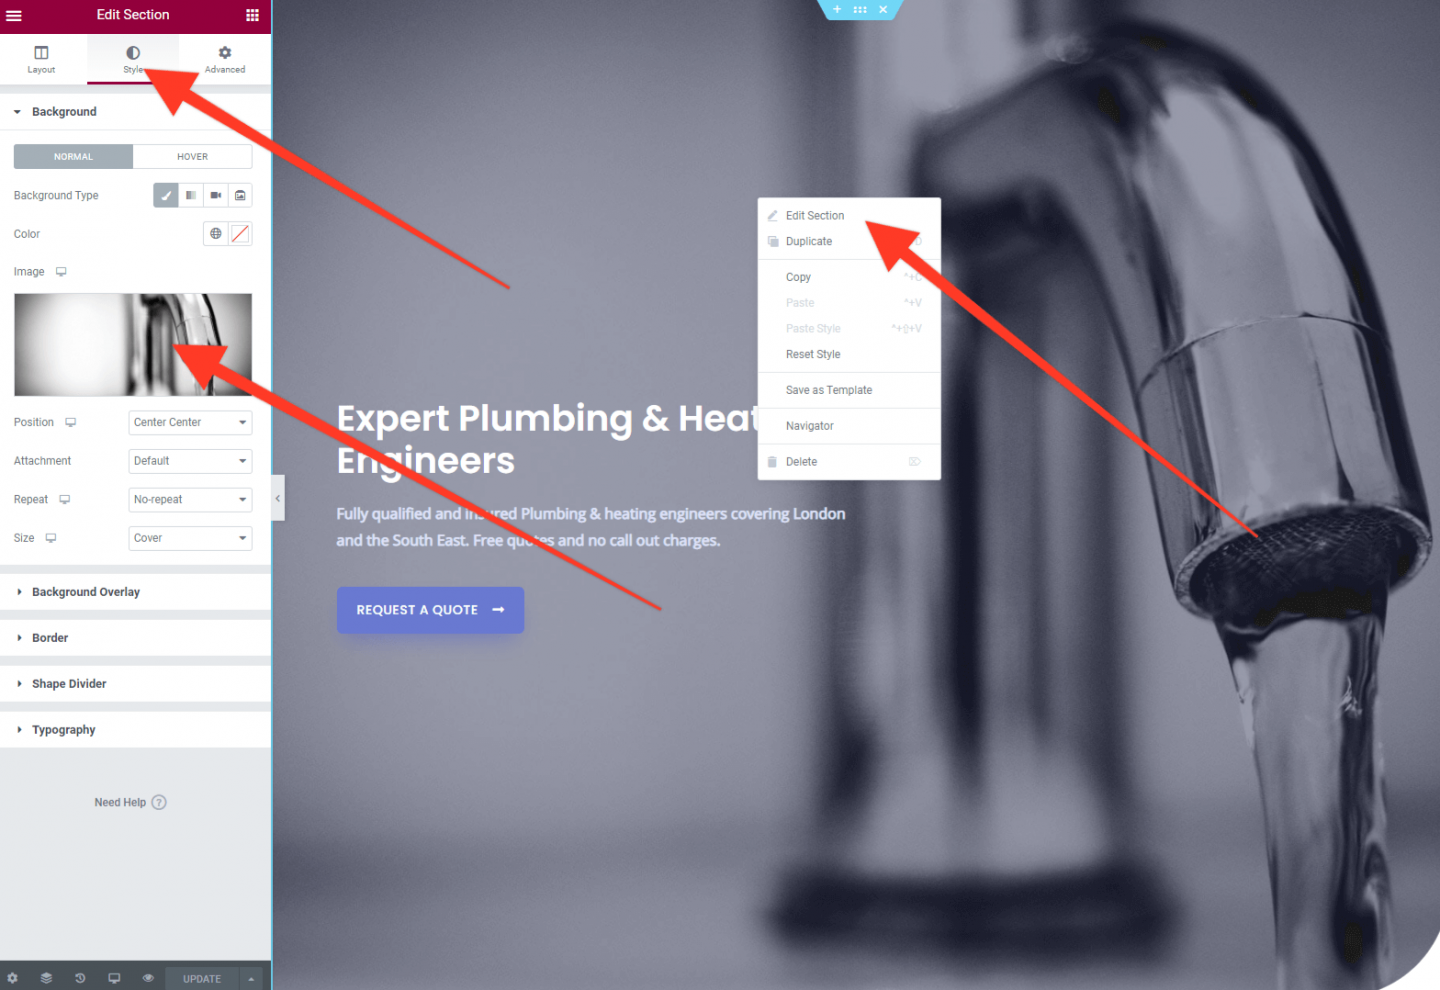
For our Hero image we found a great photo of a modern tap with water running out of it on Pixabay. We downloaded this and can now proceed to add it to our website.
Note – when adding photos (or images of any kind) to your website you want to be conscious of the size of the photo. This means both the width and height (measured in Pixels) and the size in MB’s. For things like hero images you will want to use an image that is around 2,000px wide. This ensures it will look crisp and clear on most screens. In addition though, you’ll want to make sure it isn’t too big in terms of Megabytes (MB’s). Why is this? Well, all content on your website has to be downloaded to the end viewer of your website. If you have a photo on your website that is 30mb in size this will take some considerable time to download, especially on a mobile phone. Ideally you want to try and keep images no bigger than about a 3rd of a MB in size (333kb). An easy way to remove some excess size is by using an image compressor. One of the best is called TinyPNG. As a bonus, it’s also free to use. Head to their site and run your image through their compressor and you’ll be amazed how many KB’s it shaves off without harming the quality of the image.
When you’ve done this head back to your website and right click on the current image. A menu will pop up – select ‘Edit Section’ from this menu. Next, in the Elementor panel, click on ‘Style’. You’ll see the current image there. Click this and you’ll then be able to upload your chosen image.
And that’s it! With relatively little work we now have a Homepage hero section that represents our business.
Editing the Homepage Layout below the fold
Now we’ve updated our Hero section we can get to work on the section under this (commonly referred to as ‘below the fold’ as it’s the bit that appears after you begin to scroll down). We’re going to keep this nice and simple. When thinking about the layout of your site you want to imagine guiding your customers on a journey. You need to make it easy for them to find the information they want and the homepage is the jump off point for this.
For our fictional business, Press Plumbers, they offer general plumbing services and also Heating services. These are two distinct categories of services so we’ll split them this way by creating a page dedicated to General Plumbing and a page that focusses on Heating.
The Homepage is the point where you can guide your customer to the service that is relevant to them and we’ll do this by having a two-column layout that links to each service.
We like the introductory text section that is provided by the starter theme so we’ll keep that. As with the hero section, click on the text to update it to something appropriate.
One of the great things about using a starter theme like the one we chose from Astra is that many of the elements on the page may look very close to how you want them to look – this means you can re-use them rather than having to build something from scratch. Although we love what’s been done with the homepage of this starter theme, it’s a little complex for our needs so we’re actually going to delete much of what’s here and do our own thing. Of course, you may wish to use a number of these components and, if that’s the case, go for it.
To begin we’re going to delete the components we don’t need. To do this hover over the element you want to get rid of and you’ll see an ‘x’ in a blue box. Click this.
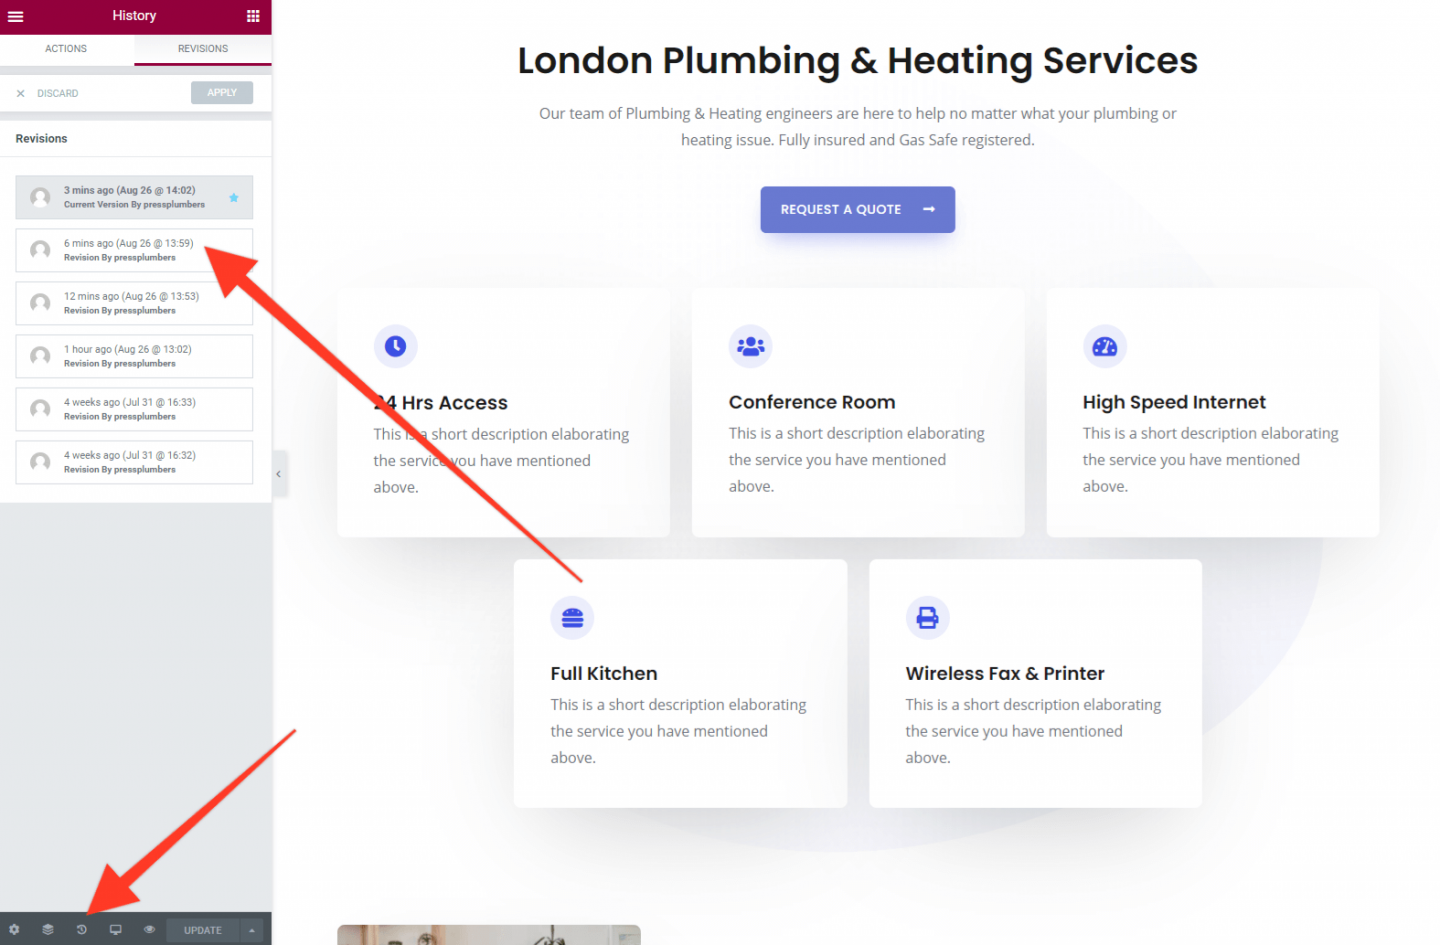
Note: If you go wrong and delete something you shouldn’t, you can step backwards and recover the deleted components by clicking on the ‘History’ icon from within the Elementor admin panel. In addition, before making any sizeable changes to your site you might wish to make a backup. If you’re hosting with Pressidium, this is quick and easy to do via the Pressidium Menu from within your Admin area of your website.
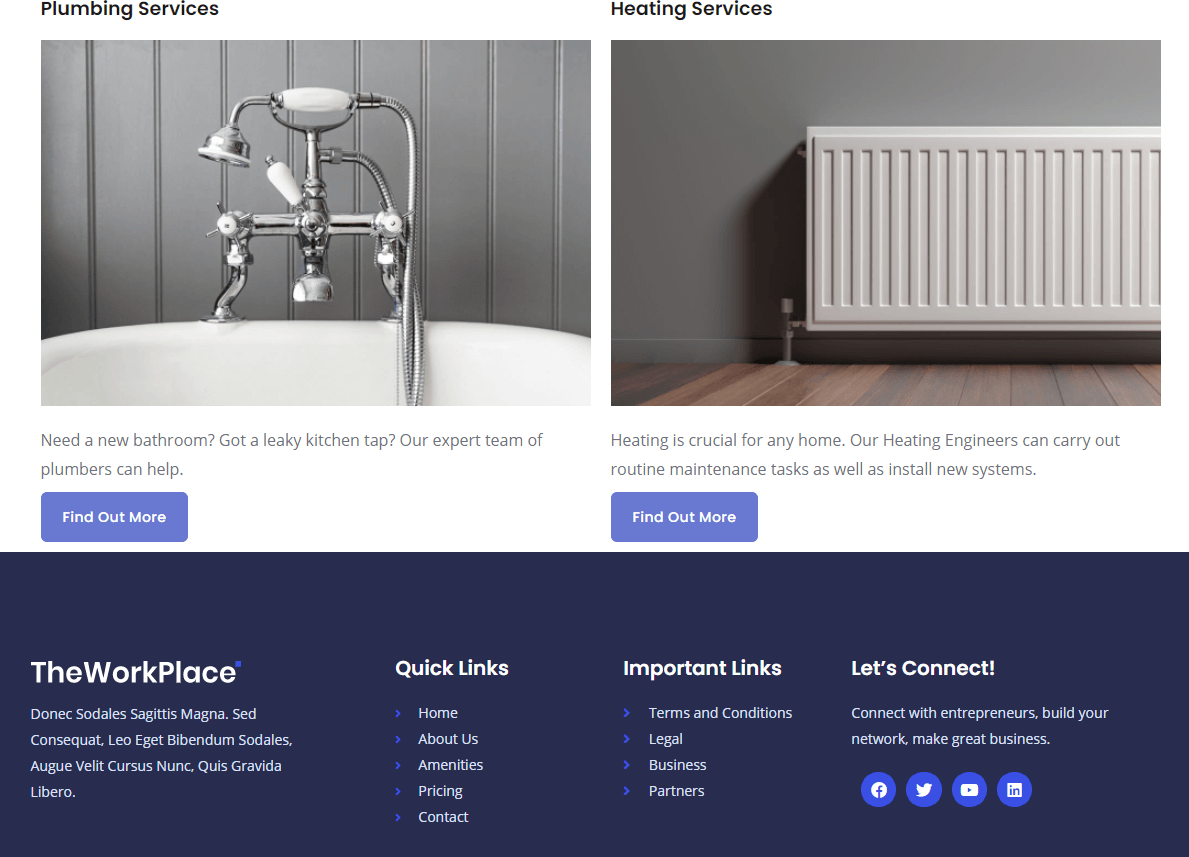
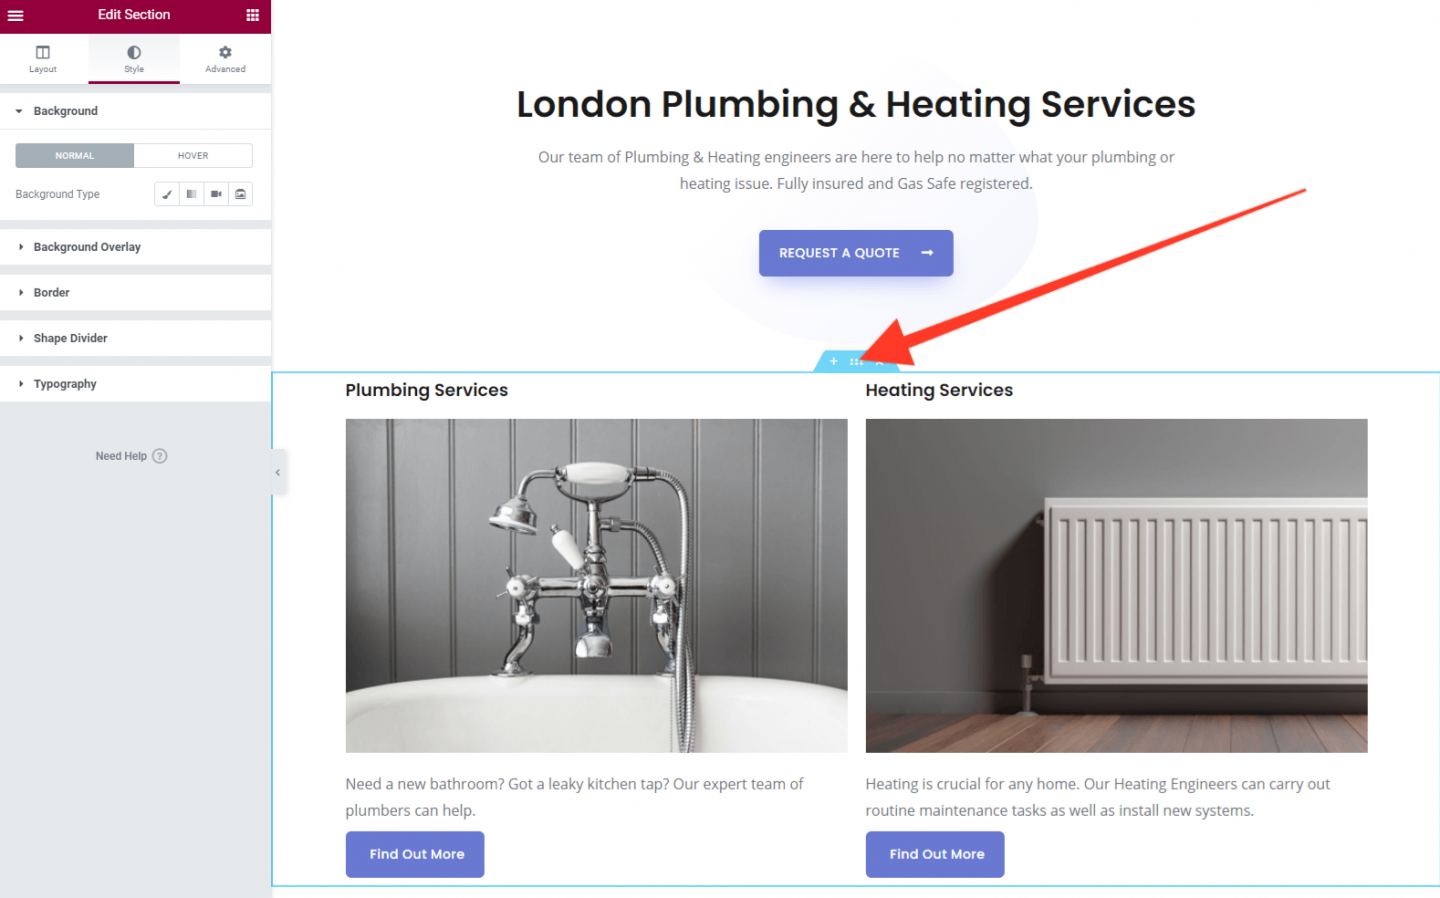
We’ve gone ahead and deleted everything on the homepage that is below the bottom ‘Request a quote’ button and are now left with a nice blank canvas onto which we can add the info we need.
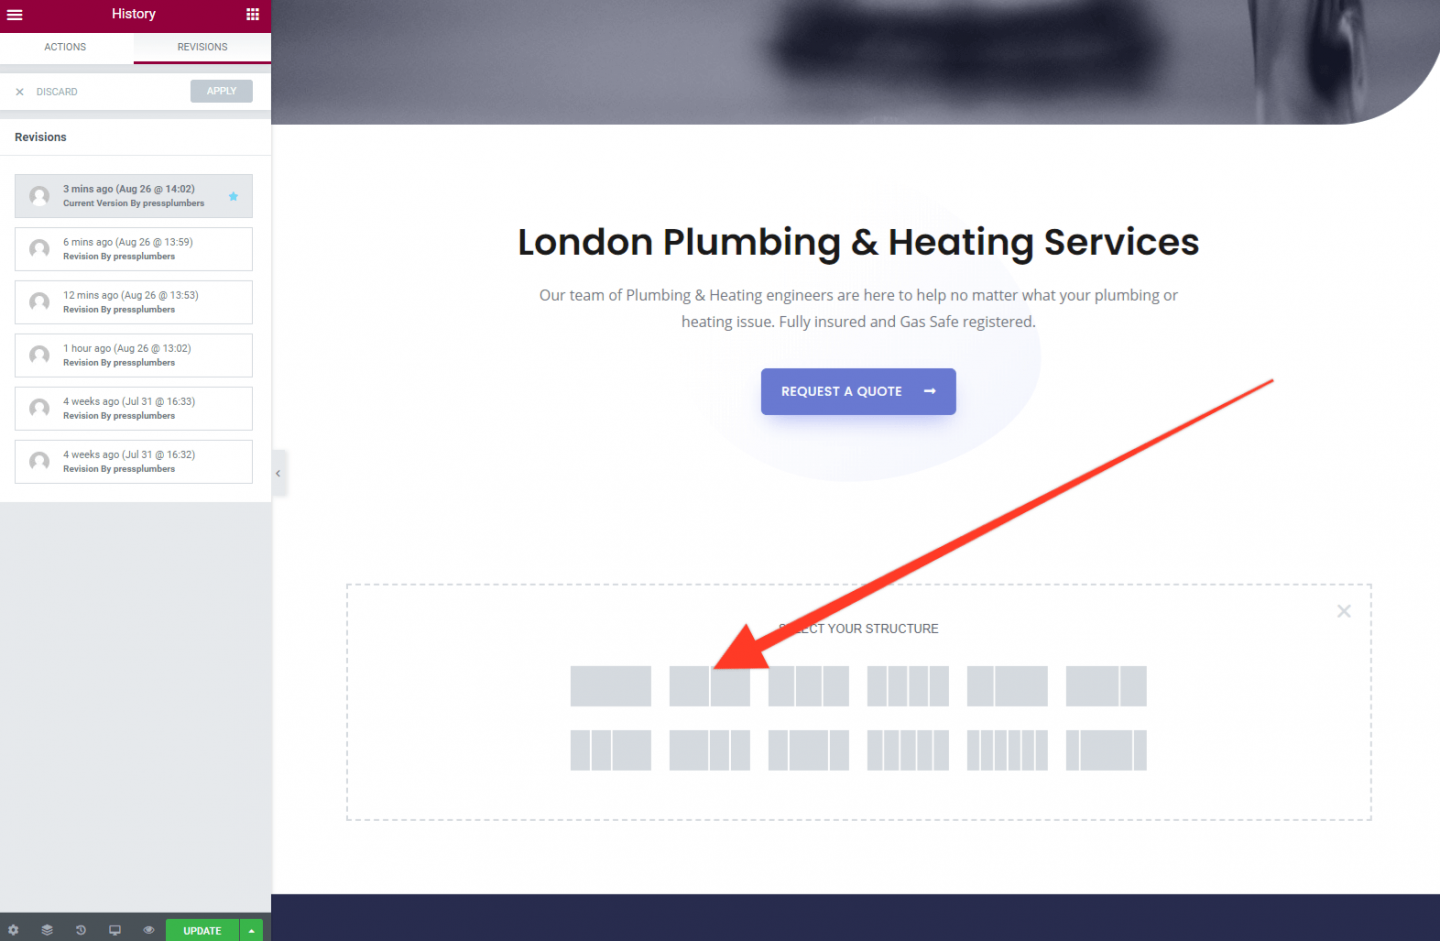
You’ll see a dotted box with three icons in it. Click the + icon and select a two column layout.
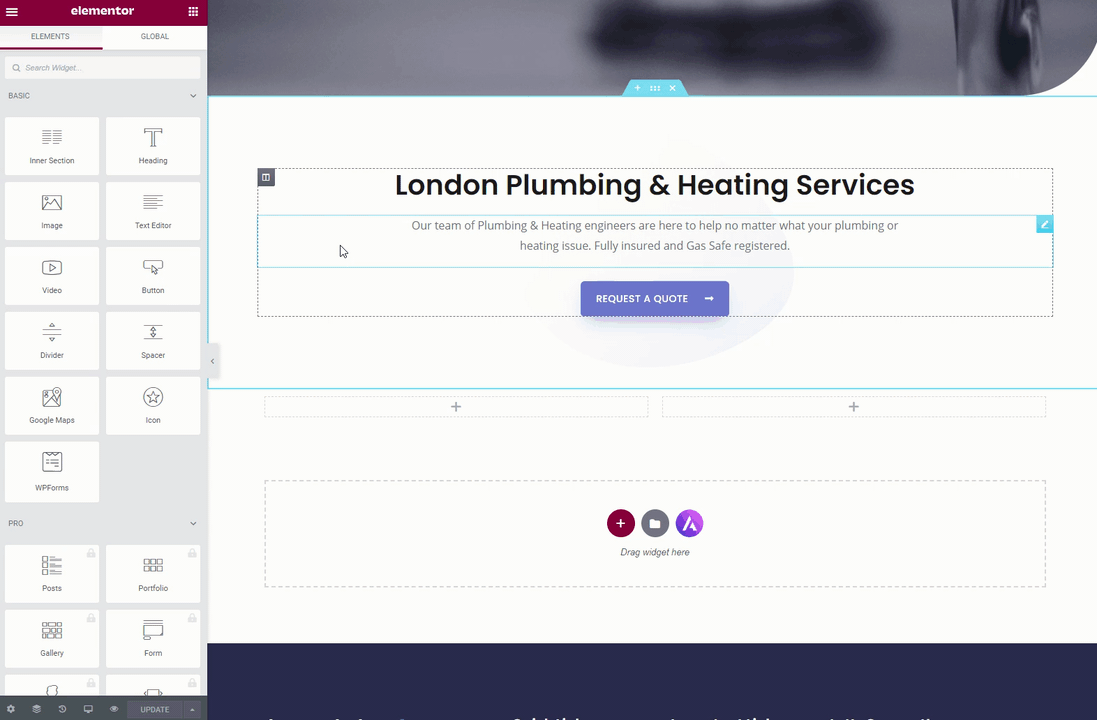
Next, click the + icon in the left hand column and you’ll see a set of options appear in the Elementor editor. We are going to promote our two services in these columns using text, images and buttons. All of these elements can be dragged and dropped from the Elementor panel into the column(s) and rearranged as required. Elements such as text size and so on can be customised as you do this via the options presented in the Elementor panel.
We hope this process is actually fairly self explanatory. Try dragging the ‘Heading’ module into one of the boxes to get a feel of how this works. You’ll notice you can drag it from the left column into the right and back again.
Elementor has lots of pre-built ‘widgets’ that help you create content on your page. A good chunk of these are free to use but you’ll notice that some have a little padlock icon next to them. These are only available for premium users. Whilst it’s perfectly possible to build a great looking website using just the free version of Elementor (as we are doing), you might want to consider purchasing a premium licence if you want to access these extra widgets (along with some other premium features). Pricing starts at just $49/year for a 1 site licence.
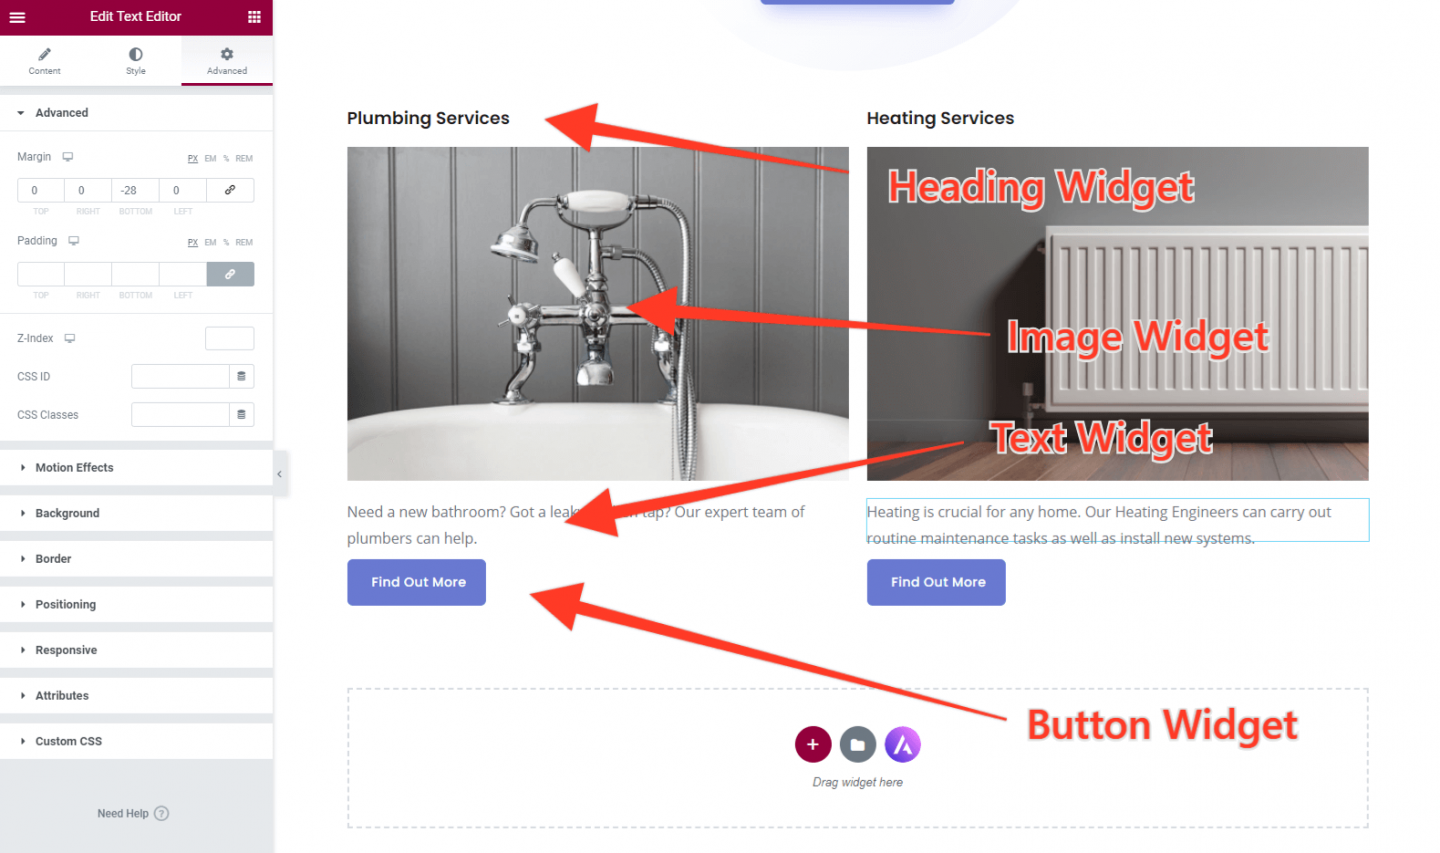
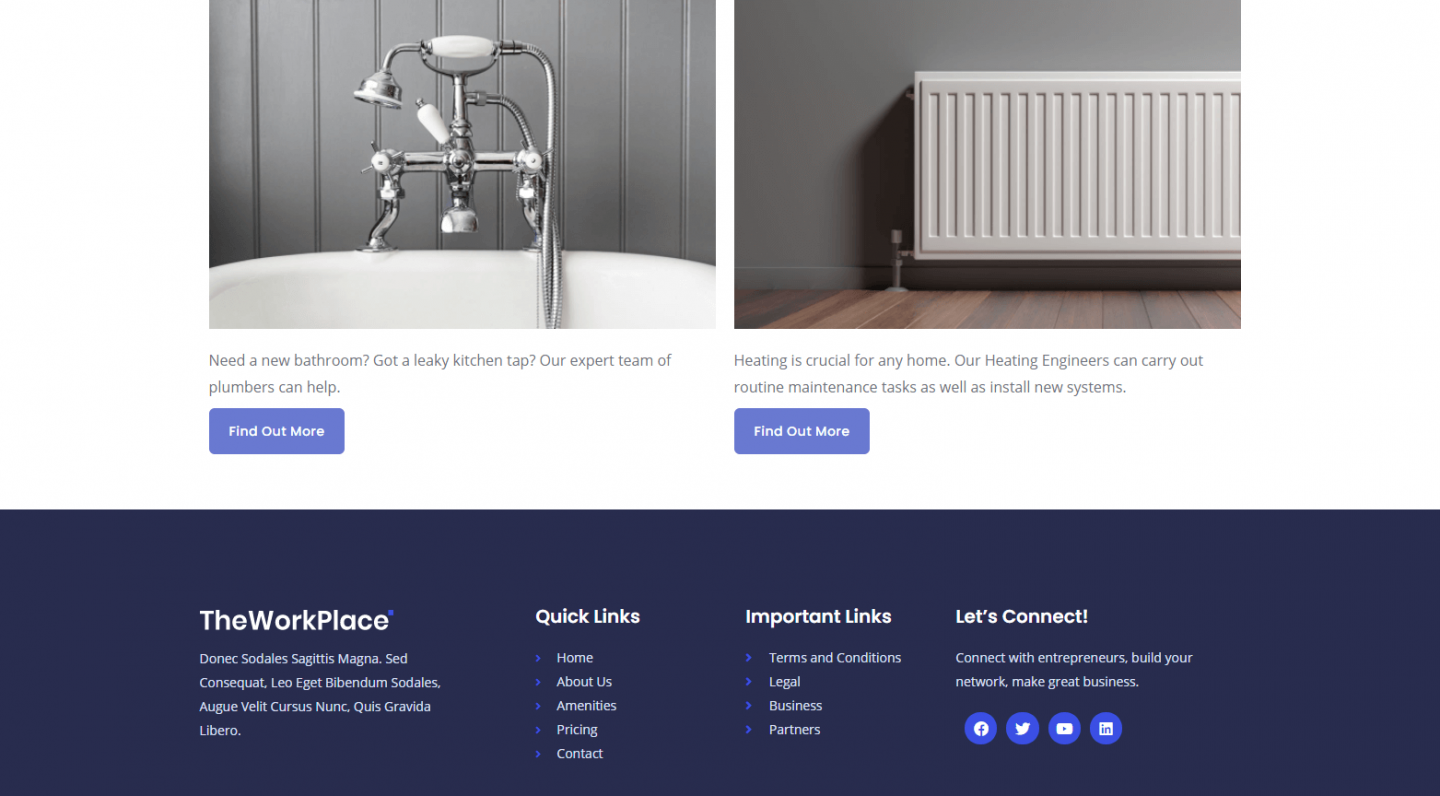
We’re going to use 4 of the free widgets to create the layout we need for our homepage. The ‘Heading’ widget, ‘Image’ widget, ‘Text Editor’ widget and the ‘Button’ widget.
Take a look at how these have been used below:
Our homepage is now beginning to look really good. The final thing we need to do is to tweak the spacing under this section. As you can see from the image below it currently is sitting hard on the footer of the website (we’ll be working on the footer in due course) which doesn’t look great.
Fortunately, adding some space (or margin) is very easy in Elementor. Simply click on the section menu icon and a settings panel will open in Elementor.
Head to the ‘Advanced’ tab and then to the Margin section. You’ll see several boxes which numbers can be added into. First, click the icon on the right that looks a bit like a paperclip. This means each section can be edited independently. Then enter 50 into the Bottom box. It should look like this:
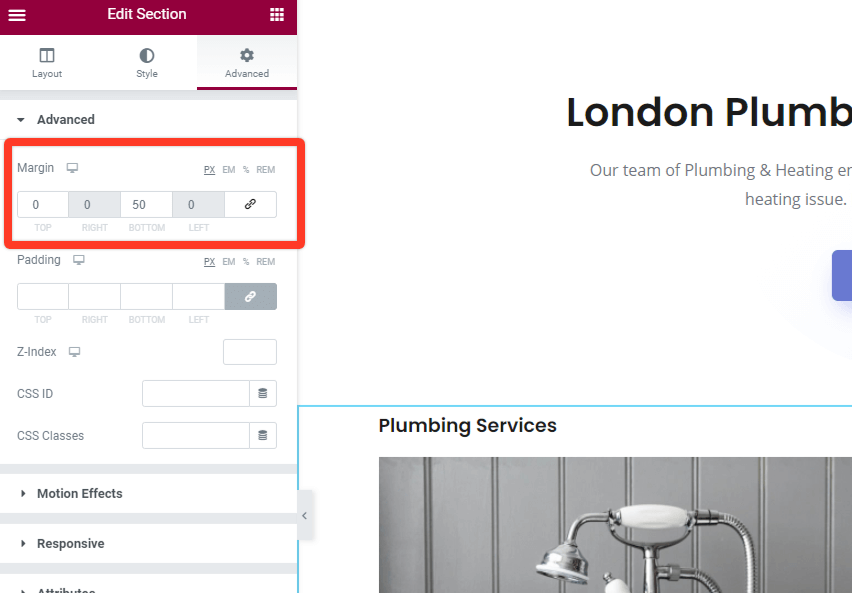
The result of this change is that we now have a nice space between our Homepage content and the footer. Looks much better!
You can add margin to all sorts of elements on your website to change the spacing (such as the gap between the buttons and the text on your homepage). Have a play and see what looks best.
That’s it for Part 4 of this series. We’ve come a long way and now we have a Homepage which dictates the overall style of the website, future pages will be pretty quick to create. Things are looking good!
In Part 5 we’ll be setting up our two service pages for Plumbing and Heating. See you there!
Start Your 14 Day Free Trial
Try our award winning WordPress Hosting!


