

Welcome to the third part of our eight part series that will run through all you need to do to build a WordPress website for a new business using the popular WordPress page builder, Elementor.
In Part 3 we are going to move rapidly forward with building our website. First item on the agenda is selecting some hosting and installing WordPress. We’ll then move into installing our page builder, Elementor and importing our theme that will serve as the foundation of our new website. Finally we’ll take a look around the Elementor builder to familiarize ourselves with the core functions.
Let’s get going!
Choosing a WordPress Host
As discussed in Part 2, we are going to use the self-hosted version of WordPress for our website. This gives us maximum flexibility in terms of design and function for our new site and is the most common route for people using WordPress to go. As it is self-hosted we need to purchase our own website hosting in order to be able to get started with our build.
Note: You can build your WordPress website ‘locally’ on your computer without having any hosting. This approach though takes a significant amount of setup and tech know-how. For most people, setting up WordPress on their host of choice and then building directly on this is the way to go.
WordPress hosting is easy to come by. Google it and you’ll be hit with hundreds of results. There are a LOT of WordPress hosts out there. This is great news in many ways for consumers and this means a lot of choice but equally choice can be a double-edged sword as the sheer volume of options can be confusing.
We’ve written a White Paper that looks at WordPress for businesses and goes into quite a lot of detail about hosting options. Have a read of this here if you want to dive into some detail. If you’re short on time then just carry on reading and we’ll run through hosting options quickly for you.
WordPress Hosting Options
The first thing to get clear in your mind is that not all hosting is equal. In the same way some cars are higher performance than others, the same applies to hosting. Perhaps there are exceptions but in reality cost is a reasonable indicator of performance in the WordPress hosting sector. Let’s take a quick look at the core types f hosting that you’ll find on the market today.
Shared Hosting
This is the most common type of WordPress hosting. It is normally easily distinguishable due to it’s cost which can be as little as $20 or so a year per website. For a really basic website that is going to receive minimal levels of traffic this might be ok (but only just). In reality though, if you’re serious about your business it just won’t cut it.
Problems you will likely experience with this type of hosting are:
- Slow speeds: How quickly your website loads when someone visits it is important. We’ve seen some shared hosting plans taking 15 seconds or more to load a website. Now, take your own experiences in hand here and think about when you last stuck around this long to wait for a website to load… probably never! So, do you want your customers to wait this long? The answer has to be no. It’s important to note that some shared hosting can load quickly (ideally you want a website to load in 3 seconds or less). The problem is that these load times can become erratic. Some days it’ll be fast, other days painfully slow. To achieve consistent load speeds you’ll want something better.
- Security issues: Shared hosting works by literally sharing server resources with a bunch of other websites. It’s the equivalent of letting other people share your computer. Because of this, there is the potential for malware and other security ‘bleed through’ issues to compromise your own website. No matter how well you secure your own website your site is still at risk from being hacked as a result of elements outside of your control.
- Support issues: At some point you will run into a problem where you need to ask for help. It is at this stage that the problems with cheap shared hosting can really shine through. The quality of support you are likely to receive will be low at the best of times. In many ways, this isn’t the ‘fault’ of the host. It’s just reality biting. You can’t expect to pay rock bottom pricing for hosting and then get the best possible support. High quality support means that the host needs to employ highly trained engineers and this just isn’t financially viable for these kind of hosts. As with most things in life you get what you pay for!
- No tools: Particularly if you are building your own website, it can be very useful to have access to a range of tools such as backups and staging sites that will make your life a LOT easier in the long run. Shared hosts won’t provide these kind of WordPress specific tools. Yes, in many cases you can use a third-party add-on to, for example, take a backup of your website but this increases your workload and cost (a good backup system will cost money).
Managed WordPress Hosting
Do a bit of research on hosting options and you’ll also quickly come across another type of WordPress hosting called ‘Managed WordPress Hosting’. WordPress can at time be a little complex. It certainly runs best when the server it is loaded onto has been carefully configured for optimal WordPress performance. This is where a Managed WordPress host steps in. Unlike a standard shared host, Managed WordPress Hosts have specially tuned their servers to work with WordPress. In addition, they normally offer tools and other resources designed specifically for WordPress. This specialism extends to support services where you would expect to find support teams who have specialist WordPress knowledge. This means you should get better, more relevant support if and when you need it.
Try our Award-Winning WordPress Hosting today!


Managed WordPress hosting is normally pitched as a premium service and the price tag does reflect this. A good Managed WordPress host will normally charge around $25/month per website with these prices falling to around $10/month per website if you have several websites to host.
Benefits of good Managed WordPress hosting are:
- Speed: Because your website is hosted on servers that have ben optimized for WordPress it should load much more quickly and reliably. Also, because this type of hosting is sold as a ‘premium’ service, more effort is made on the part of the host to ensure that these load speeds stay consistent.
- Security: Due the design of Managed WordPress hosts server systems, your site should be less vulnerable to being hacked or infected with malware that those hosted on cheaper shared hosting platforms. Again, because the service offered is a premium one, a Managed WordPress host will normally go to considerable efforts to make sure your site(s) stay secure. In the event of a hack they should be able to assist with the cleanup.
- Support: Managed WordPress hosts specialize in WordPress. Because of this their support team should be much more knowledgeable about WordPress related issues and be more willing to help where required.
- Tools: Many Managed WordPress hosts will bundle useful tools like backup systems and website staging servers into their packages. This can make your life a LOT easier and, in the case of backups, help protect your site in the event anything goes wrong.
Whatever host you ultimately choose, you’ll need to think carefully about what your website will need to do for your business. If it’s going to serve as a central ‘gateway’ to your business and be visited by a lot of customers then high quality Managed WordPress hosting is a worthwhile investment. Whilst it might be more expensive (and we understand it can be tempting to look for savings when setting up a new business) the return you are likely to get from a good website that loads quickly will far outstrip this cost.
Conversely, the saving of a few $$ on hosting, whilst tempting at the outset, can quickly turn into hundreds of dollars in unexpected costs when you find yourself spending hours dealing with unhelpful support or trying to recover your website that has been hacked. Not least, you will almost certainly have lost business as a result of performance issues experienced by customers who abandon your website due to slow load times.
Installing WordPress
As a Managed WordPress host ourselves we’ll be using our own hosting to host the website for Press Plumbers. We will be using certain features that may not be available with other hosts (particularly cheaper shared hosts). We’d of course love for you to choose to host your new business website with us. You can do so risk free for 60 days on our standard plans.
Whist there will be differences from host to host when it comes to initially setting up WordPress, the actual process of building your WordPress site will be no different (although you may experience performance issues with cheaper hosting). With this in mind let’s quickly look at how you would go about setting up WordPress using Pressidium. If you’d like to follow along, sign up for an account quickly and easily here.
Step One
Log into your account at https://dashboard.pressidium.com/ . You’ll be taken to your Dashboard where you can create a new website install at the click of a button.
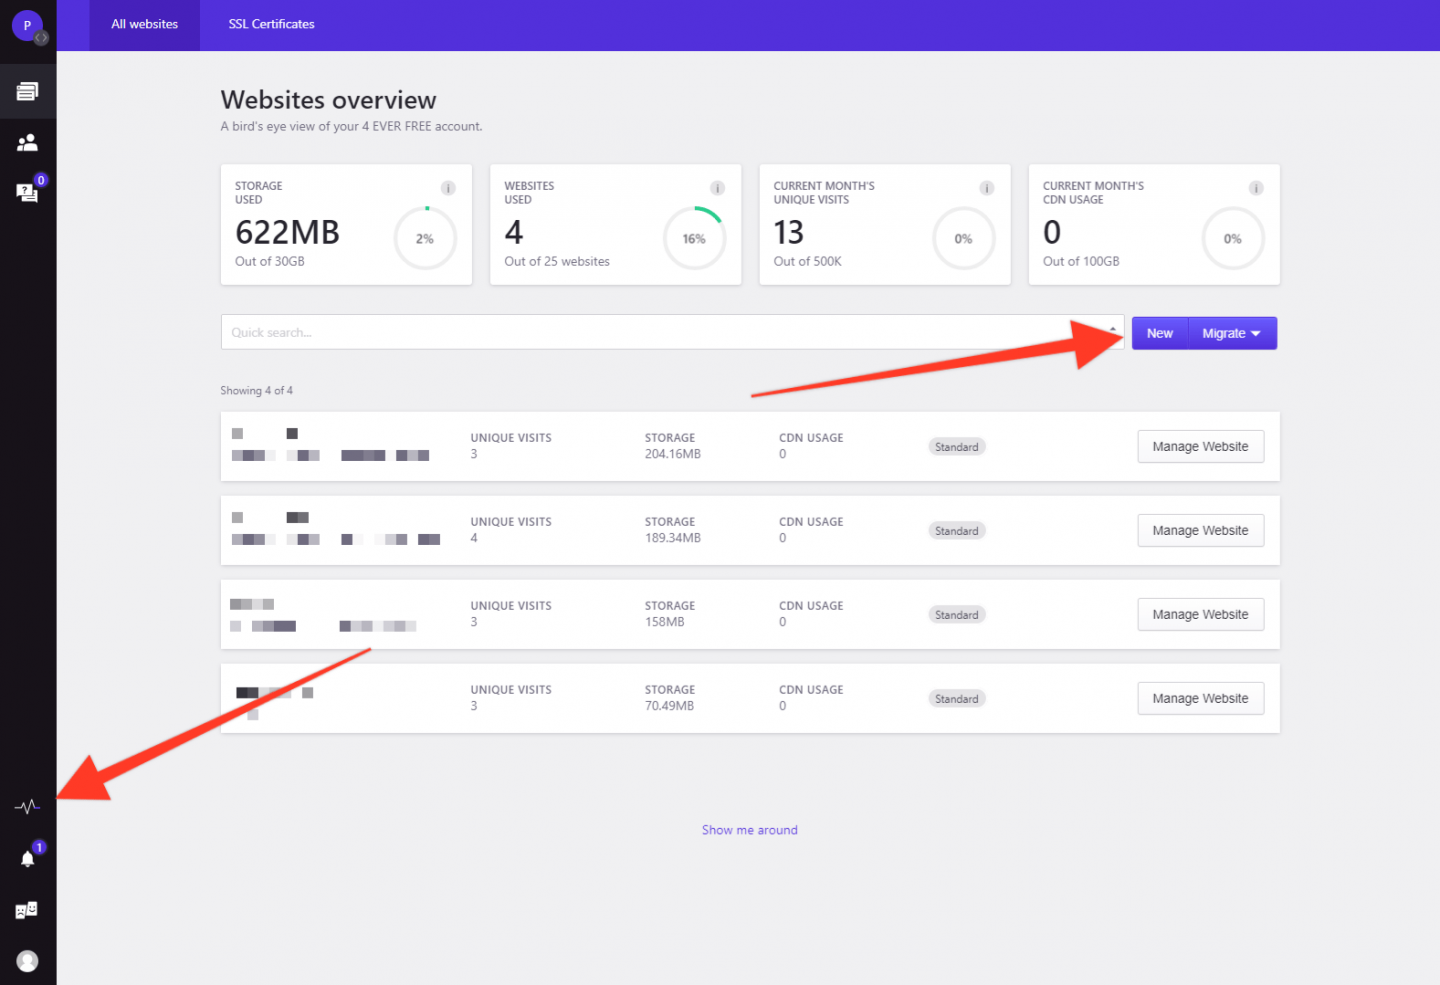
Just click the ‘New’ button and a popup window will open. Fill in the name of your new site (this is just for your reference so don’t worry if your chosen name isn’t available or is too long for the field).
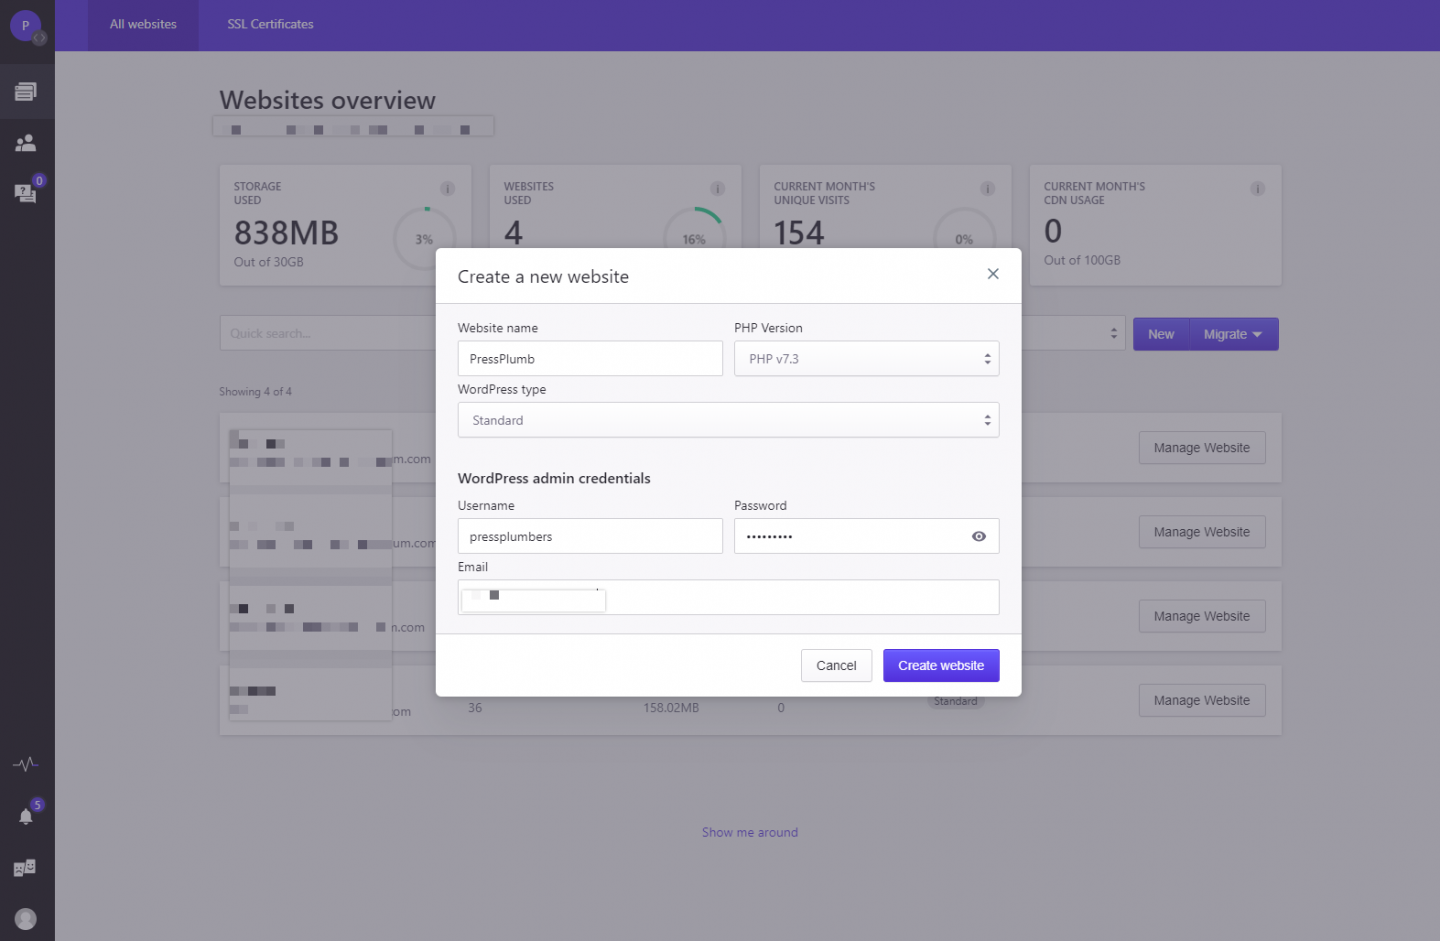
Add an email address and choose a password and click ‘Create Website’. You’ll have just a couple of minutes to go get a coffee whilst your website is setup and the latest version of WordPress is automatically installed for you.
When the setup process has been completed you’ll get an email letting you know it’s ready to go. And that’s it! WordPress has been installed and you can now login to your new site.
If you’d like a more comprehensive overview of setting up a site from within the Pressidium Dashboard then take a look at this article: Launch a WordPress Website in Just Ten Minutes with Pressidium
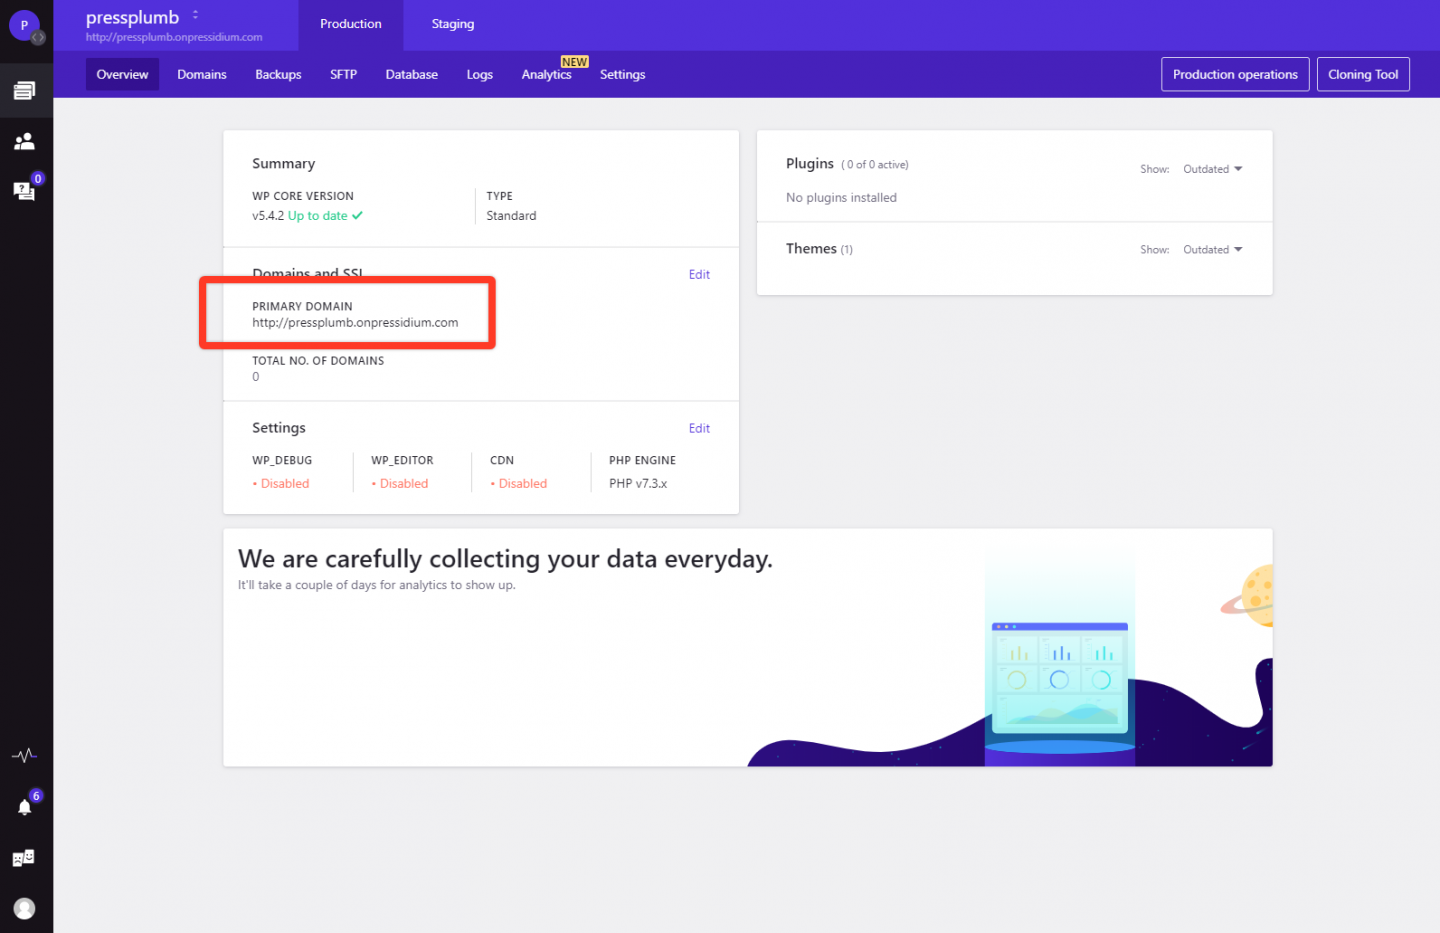
To do this, click on the button that says ‘Manage Website’ site from within the Dashboard. You will be taken to an overview page that provides some basic stats about your site including the current primary domain. This is important. Pressidium assign a special subdomain which is unique to your site when you first create it. It’s via this subdomain that you will initially access your site and work on it. We will in due course add the real domain to your site (in our case this will be pressplumbing.co).
For now, find the unique subdomain that’s been assigned to your site and click on it.
You’ll be taken to a page that looks a bit like this:
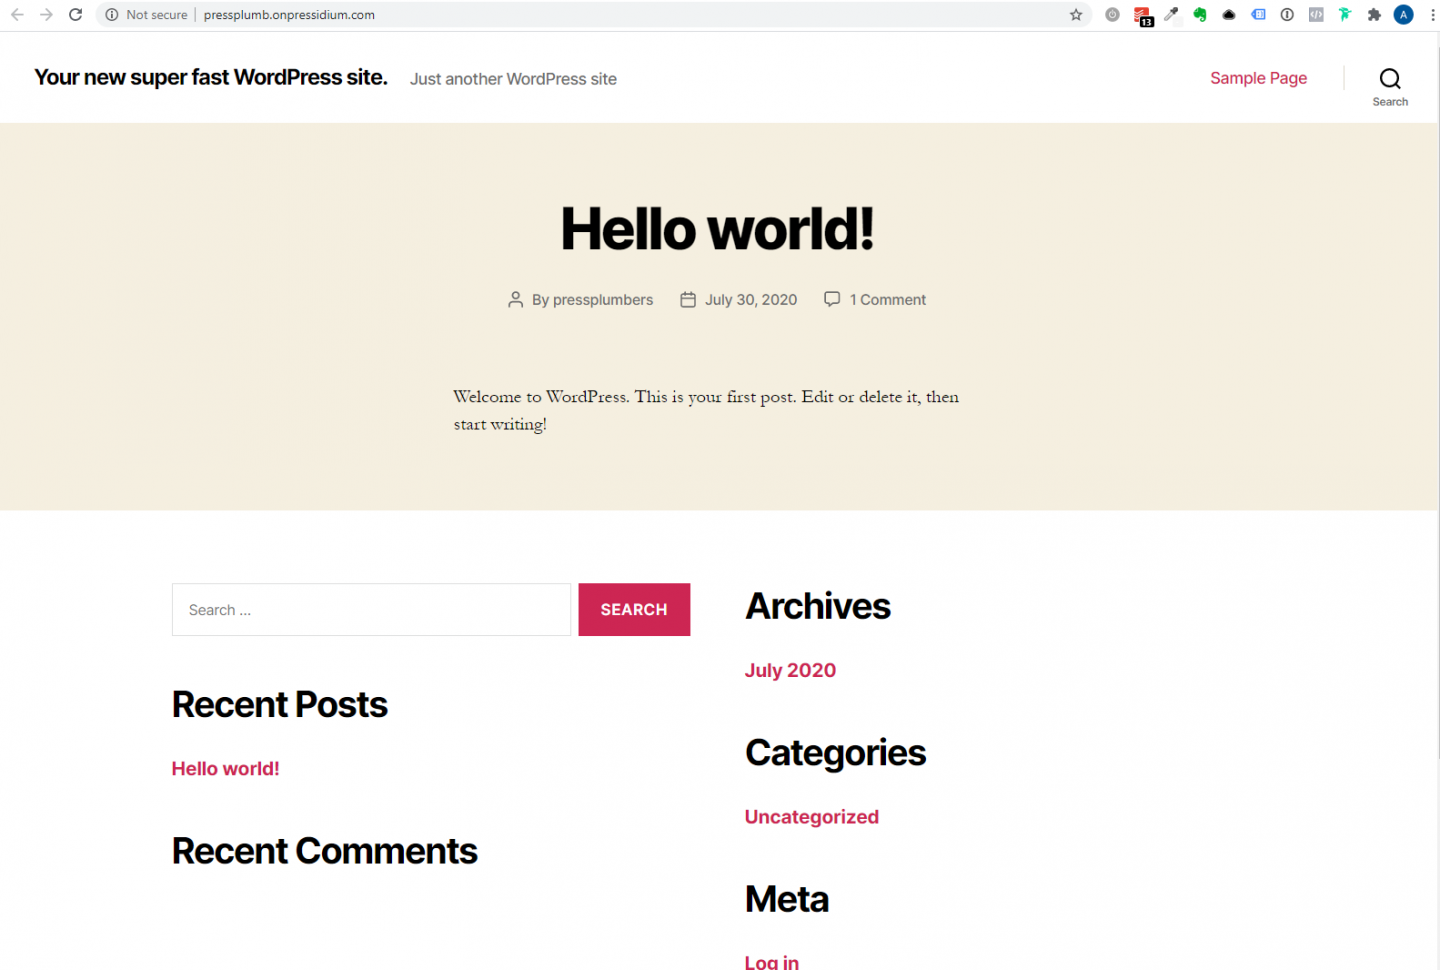
To login to WordPress, add /wp-admin to the end of the url in the search bar and click enter. So, in our case this would look like this: pressplumb.onpressidium.com/wp-admin
You’ll then be presented with the WordPress login screen. Enter the username and password that you provided when first setting up your site and login. If you’ve forgotten these details don’t worry. Just click on the ‘Lost your password’ link and enter the email address used when setting up your site. You’ll get a reminder of the username sent to you along with a link that can be used to reset your password.
Password choice: It’s worth taking the time to make sure your password is a strong one. Because your login page is accessible to anyone in the world, your password is the one thing that stands between your site and them.
When you’re logged in you’ll see the WordPress dashboard. Now we can really get cracking!
Pointing Your Domain Name to your WordPress Website
Before we go any further with our website build we need to first point our domain name to our WordPress install. The method for doing this is common regardless of host with some small exceptions which we will cover off.
Technically we don’t need to point our domain name at our site that is hosted with Pressidium until we’re ready to go live. We can happily use the subdomain that is provided at the outset (in our case pressplum.onpressidium.co) to access and build our site. Pressidium’s advanced domain name search and replace tool makes the process of adding a domain easy at any stage.
The reason for cracking on and pointing a domain to our site right now is so we can load up a ‘Coming Soon’ page which will display our logo and contact details. Having this in place means you can begin to promote your business or contact customers safe in the knowledge that if they did try and visit your website there would be something to see. After all, we’re realists and understand that not all tasks can flow in the ideal order. You might (in the case of our fictional business Press Plumbers) already have a van in the shop which is currently being sign written. You might not have time to finish your website for the next few weeks but in the meantime you need to get out and about and begin providing a service to your customers. Without a holding page, anyone who visits your site will be met with an ‘This site can’t be reached’ error message which doesn’t exactly inspire confidence. A holding page solves this issue in one hit.
Using Cloudflare to handle our domain name DNS
This series of articles isn’t comprehensive enough to delve into the dark and murky world of domain name DNS’s, Nameservers and more! We’ll keep this as brief as we sensibly can to get things working for you.
So, what’s this all about? Well, your domain name is a bit like a zip code but for the internet. People can enter it into a browser and they will be taken to your website. But, in order for this to happen, your domain name has to ‘know’ where your website is located.
Your website is just a collection of files and these files are hosted on a server somewhere in the world. The server could literally be located anywhere. So, you can tell the domain name which server it needs to visit in order to access your website files and in doing so, display a website for you customers.
To do this a worldwide system is in place called the Domain Name System or DNS for short. It’s a bit like an address book and it keeps track of which domain name is pointing to which server. It’s a bit like typing a zip code into a sat nav. The system in the sat nav (the maps) know where this zip code is located and can therefore take you there.
There are various DNS ‘address books’ around the world and some work faster than others. We are going to use a DNS system provided by Cloudflare. Their system is robust and, importantly fast. This means that any updates we make to our domain name ‘phone book’ address will happen quickly. To find out more about Cloudflare you can check out this article here.
To get started you’ll need to sign up for a free Cloudflare account at https://dash.cloudflare.com/sign-up
Once you’ve done this, click the blue ‘Add a site’ button. Enter your domain name (in our case this will be pressplumbing.co’ and then click ‘Add Site’.
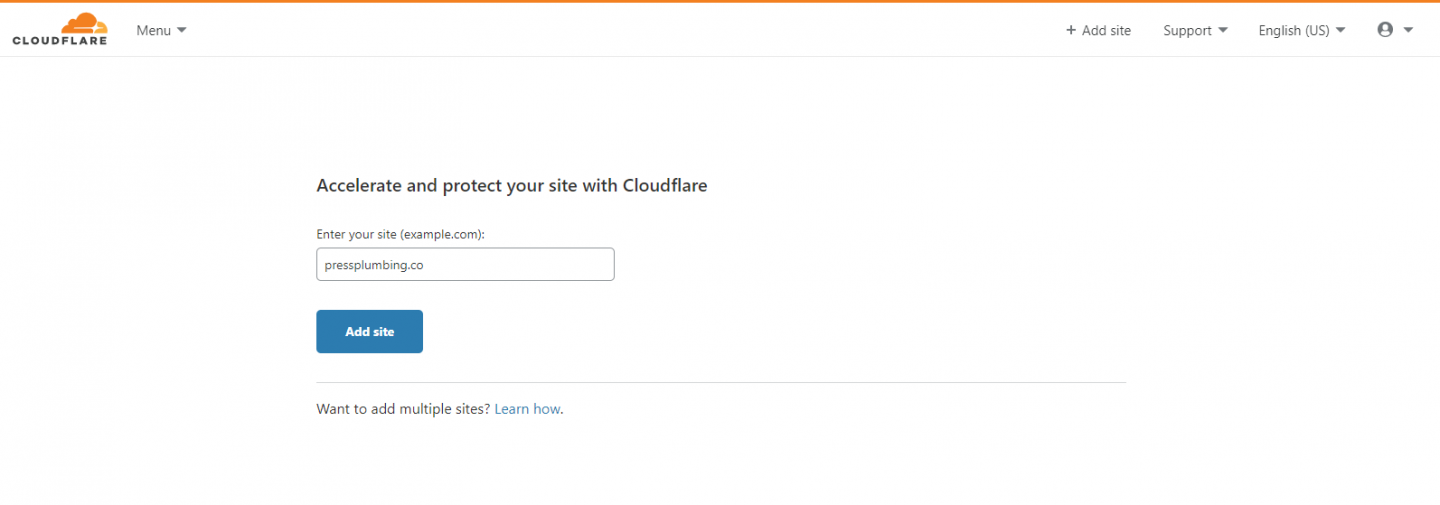
Choose the Free plan ($0/month) and click ‘Confirm plan’. Cloudflare will now scan your domain and pull in a bunch of records that will look a bit like this:
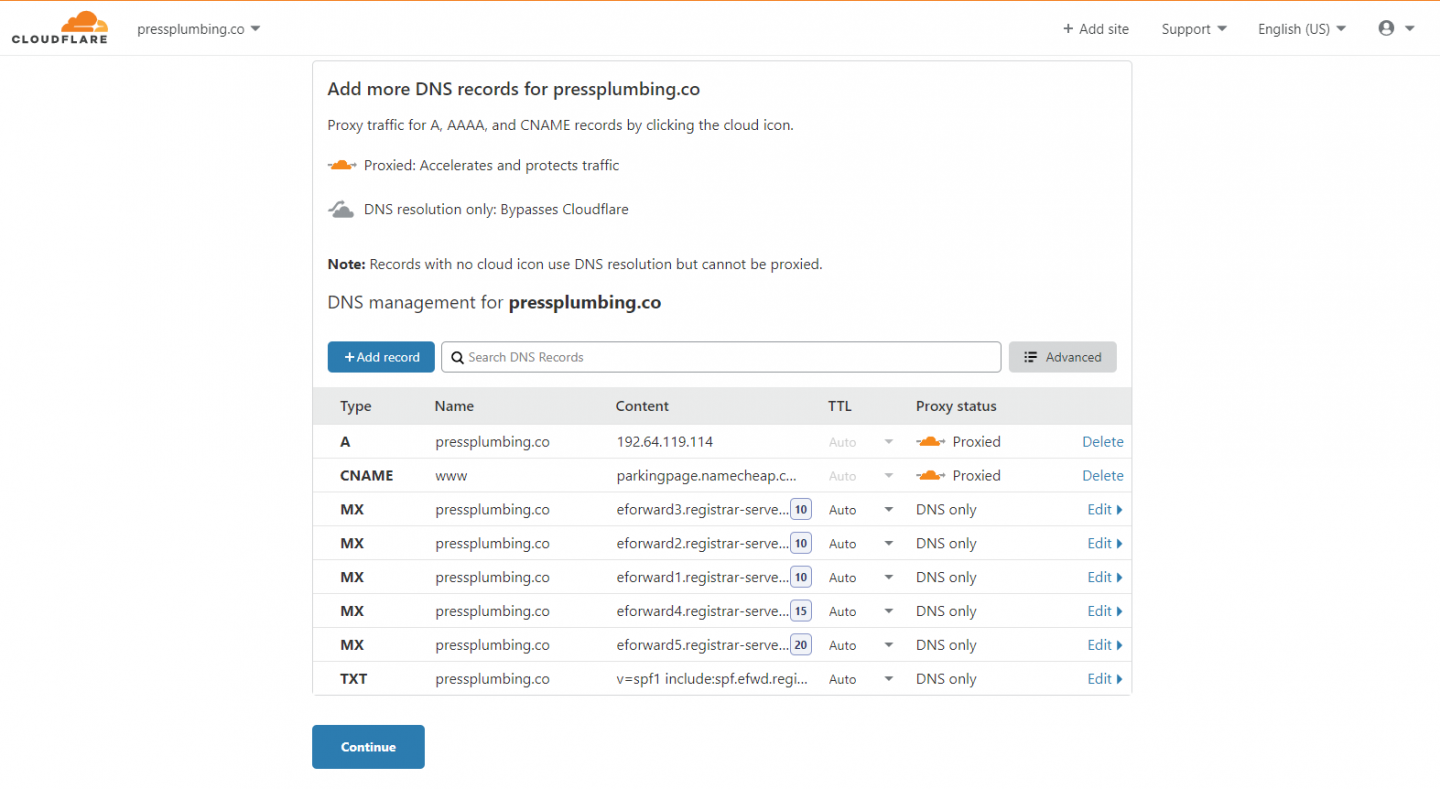
Delete ALL of these records. You’ll see the ‘Delete’ text alongside some. For others, hit the ‘Edit’ button and then you’ll see a Delete button in the bottom left. Once you’ve done this click ‘Continue’.
Note: ONLY delete these records if you are NOT currently using an email service or have any other service linked to your domain name. Deleting these will mean any such service will stop working.
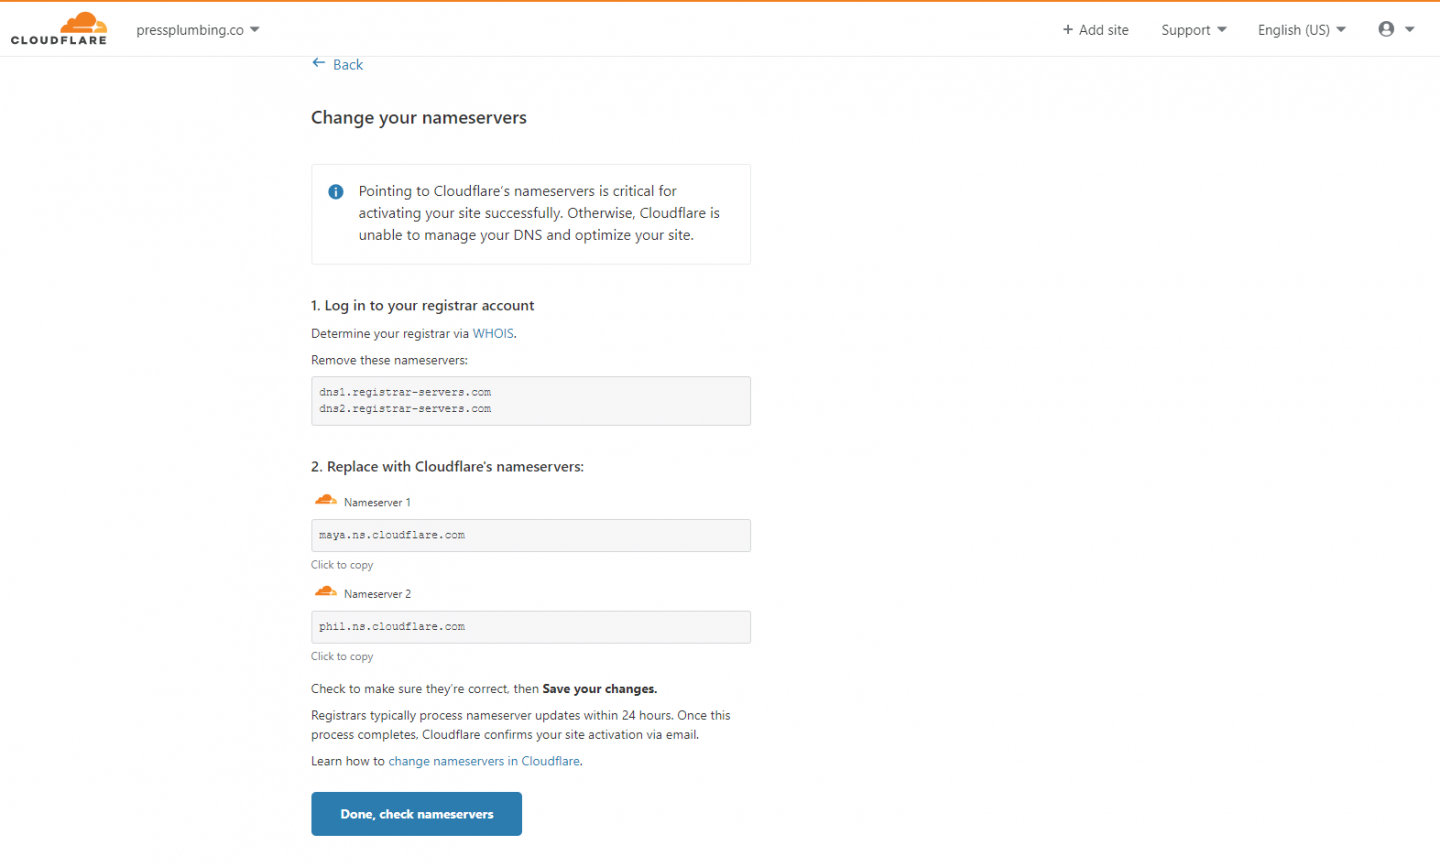
Cloudflare will warn you that it is unable to activate your site. This is fine. Click ‘Confirm’. You will now see a screen like the one below:
Open a new browser window and head to your Domain Registrar’s website and log in. In our case this is Namecheap. Click on the ‘Manage’ button alongside your domain name and you’ll see a dropdown box that says ‘NameCheap Basic DNS’. Select ‘Custom DNS’ from the list.
If you’re not using Namecheap as your Domain Registrar then you’ll need to navigate to the section in your control panel that allows you to update your Domain Nameservers. If you don’t know where to find this your Domain Registrar will be able to help.
In the Custom Nameserver section you will need to paste two values provided by Cloudflare. Go back to Cloudflare and copy the two lines provided under the section entitled ‘Replace with Cloudflare’s nameservers. Click ‘Done’ check nameservers’ when you’ve done this. In Namecheap, make sure you save the Nameservers you copied by clicking the green tick icon.
You will get an email from Cloudflare in about 30 mins (don’t worry if it’s longer) confirming that your Nameservers have been updated. You can now log out of your Namecheap (or other Domain Registrar) account. You won’t need to log back into this until it’s time to renew your domain!
Updating your Domain Name in Pressidium
Now we’ve done the hard work of changing our Nameservers to point to Cloudflare we can take the final steps needed to point your domain to your website on Pressidium. If you’re not using Pressidium to host your website then the steps needed to do this will differ a little but the underlying principle will be the same.
Step One
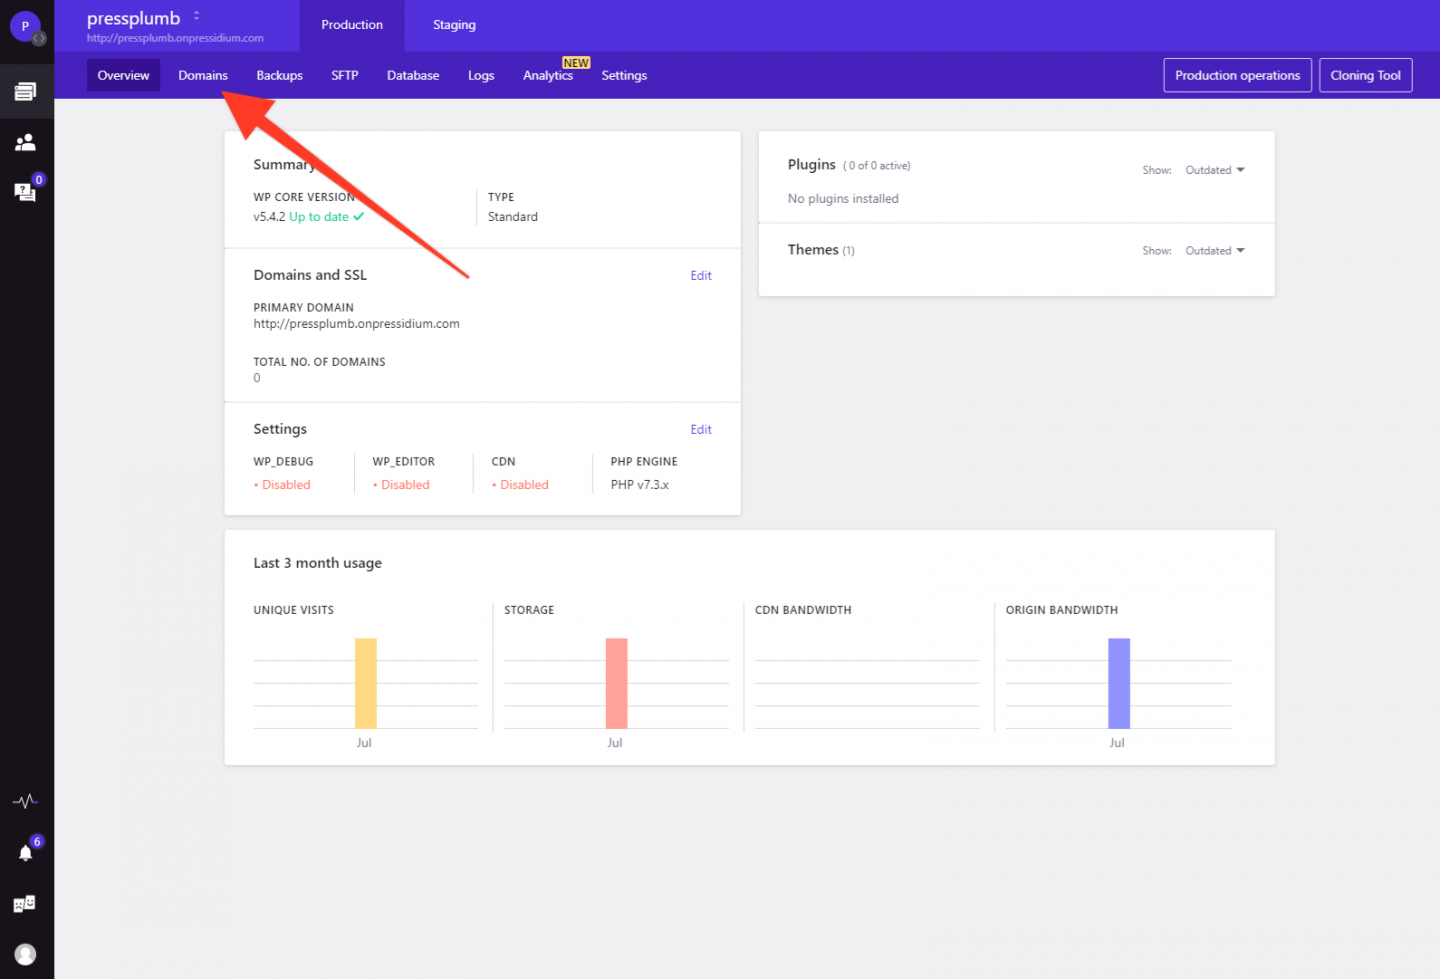
Log into your Pressidium account, click on ‘Manage Website’ and then click on the ‘Domains’ tab.
Next, click on ‘Add Domain’ and type your domain into the box as prompted. In our case we’ll enter ‘pressplumbing.co’. Follow the domain wizard to step 2 where you’ll be provided with some NS Records which will need to be added to Cloudflare.
Step Two
Log into your Cloudflare account and go to your domain. You should have received confirmation form Cloudflare via email that this domain is now active in your Cloudflare account.
Click on the DNS tab and then click on ‘Add Record’. You’ll see a box popup under this button that is helpfully configured as we need as an ‘A Record’ entry. Copy the first www IP Address Value from Pressidium into Cloudflare so it looks like this (but substituted with the IP address provided in your own control panel):
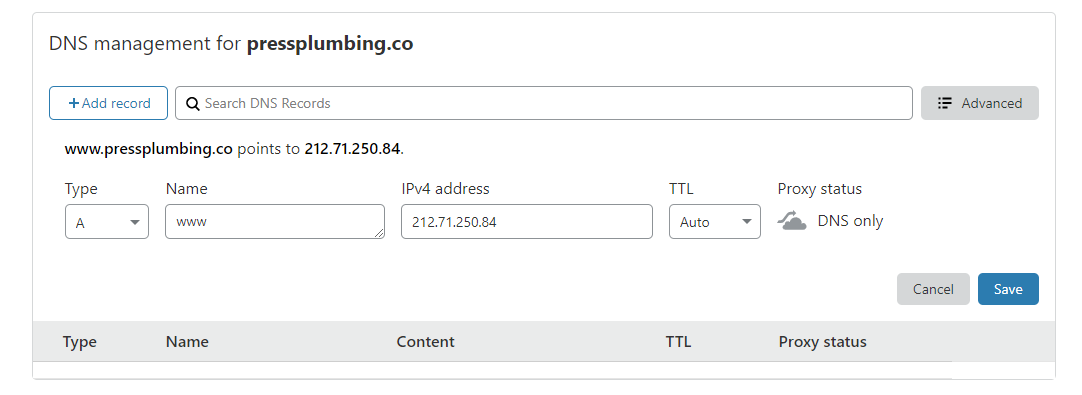
Click the Orange cloud icon to turn it grey and then click ‘Save’. Repeat for the second www value.
Next for the final two IP Values (where the host is @) enter these into Cloudflare in exactly the same way so they look like this:
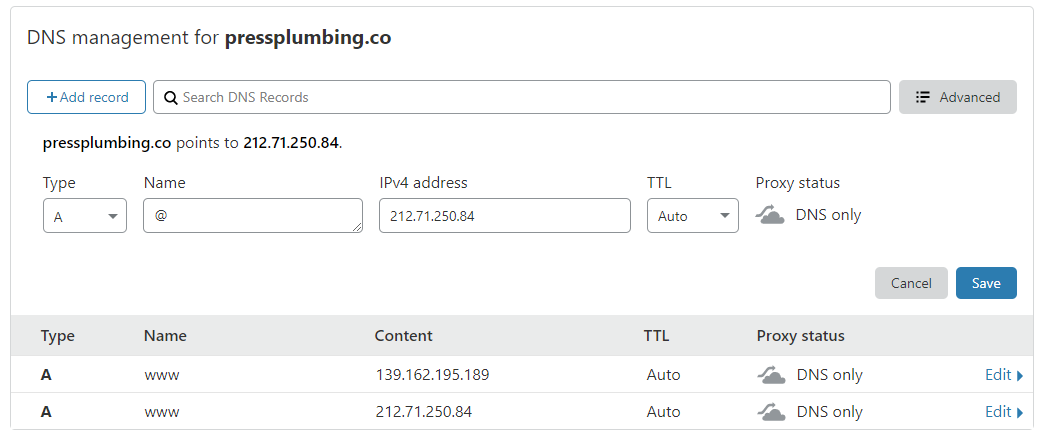
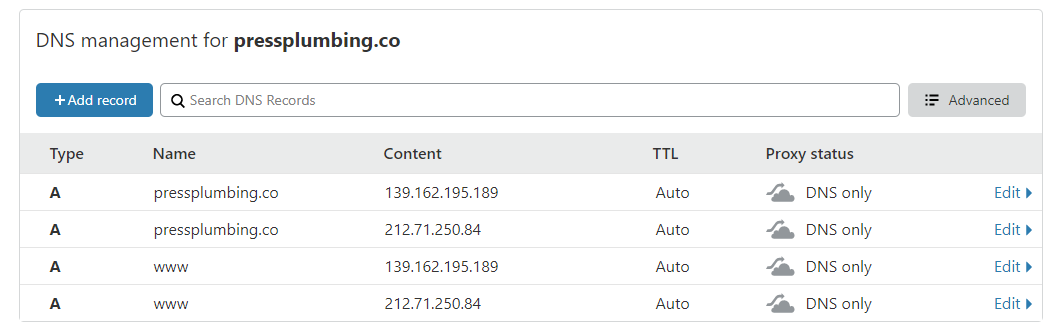
When you’re done you should have something looking like this in Cloudflare:
Step Three
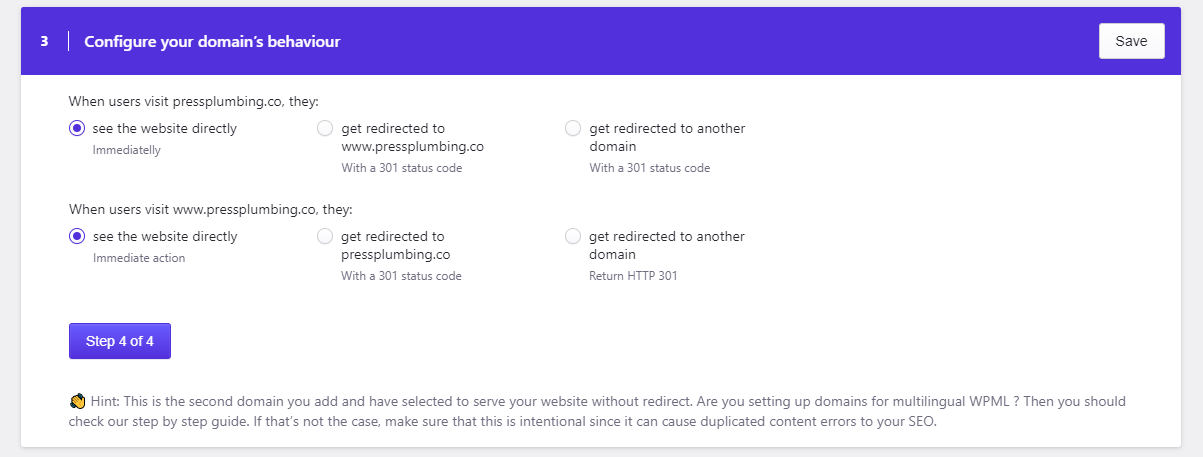
Head back to your Pressidium Dashboard and click on ‘Step 3 of 4’. Click on the radio toggle that says ‘see the website directly’ for both sections. It will look like this:
Click on ‘Step 4 of 4’ and then click ‘Yes’ to all 3 sections so it looks like this:
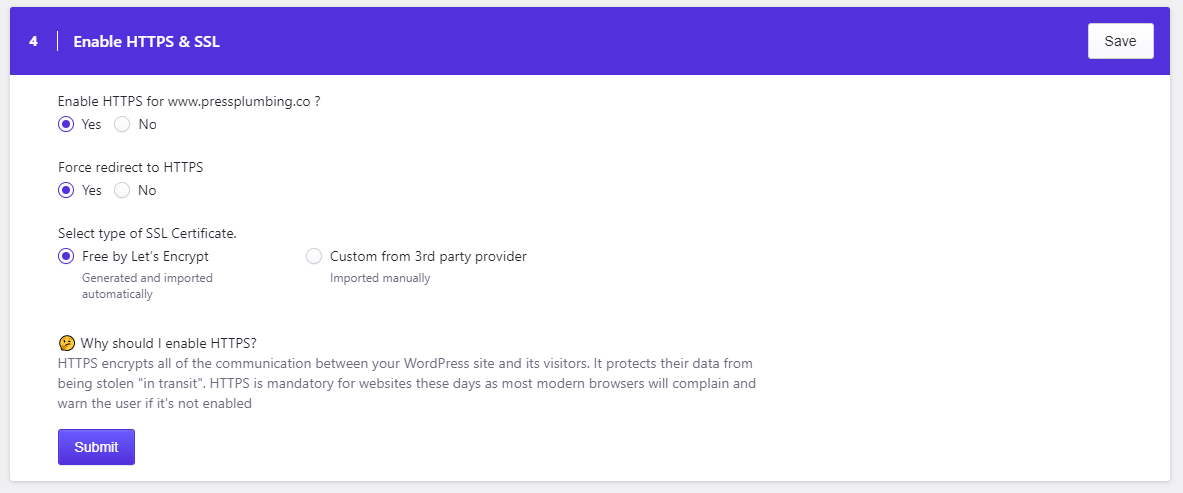
Click Submit and that’s it! The system will take a few minutes to configure all of these settings and provision the domain. You’ll get an email to confirm when this has been done. You can now visit your ‘new’ website at it’s new address which in our case is https://pressplumbing.co .
Note: It can take an hour or so for all systems to fully update and your security certificate to be installed. If this isn’t working properly after this time feel free to reach out to our support team (if you’re hosting with Pressidium).
If you’re not hosting with Pressidium then you’ll need to check out the instructions provided by your host for pointing your domain to your hosting and installing an SSL certificate. Whilst the method for doing this will be different to Pressidium’s, the basic concept will be the same. You will be provided with A Record IP address(s) that will need to be entered into Cloudflare in a very similar way.
Setting up a Maintenance Page
We are now racing ahead. I hope the domain setup process hasn’t put you off building your own website… it can be a bit fiddly but it’s a one-time job. Now you’re all configured and your website is technically ‘live’ we need to crack on and add in a Maintenance page so there is something for visitors to see whilst we get around to building the final website. This is a fairly quick job and will give you a good taste of using WordPress.
Step One
Log into your website. To do this go to https://yourwebsiteadddress.com/wp-admin . For us that means going to https://pressplumbing.co/wp-admin
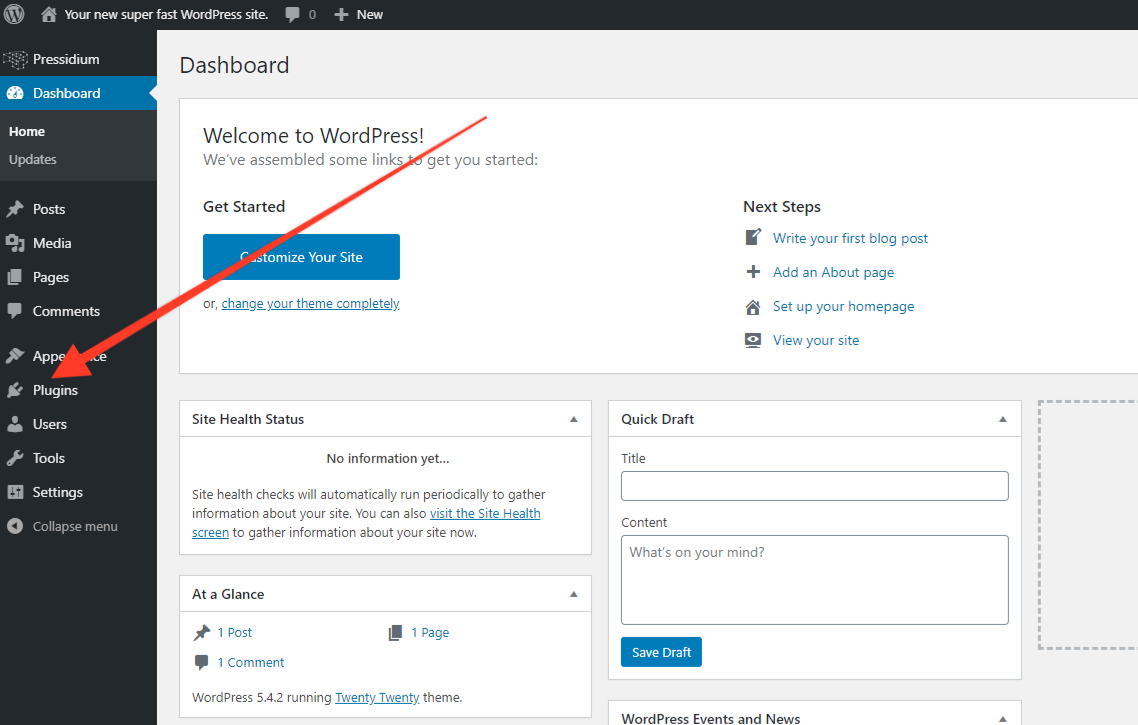
When you’re in go to ‘Plugins’ in the left hand menu. Plugins are an incredible feature of WordPress. They allow you to quickly and easily extend the functionality of your website in loads and loads of ways. The WordPress plugin marketplace is a bit like the Apple App Store. Developers from around the world contribute plugins to the marketplace. Most are free to use but some charge for premium functionality.
In this instance we want to quickly setup a ‘Coming Soon’ homepage. There are a couple of ways of doing this. The first would be to design a ‘Homepage’ and publish this but you’d have to be careful not to reveal any other pages under development. A better way is to use a ‘Maintenance’ plugin that does all the hard work for you.
When you reach the plugin page you won’t see any listed as we haven’t added any yet. Click on ‘Add New’ and then type ‘Maintenance’ into the Search Box. You’ll see something like this come up:
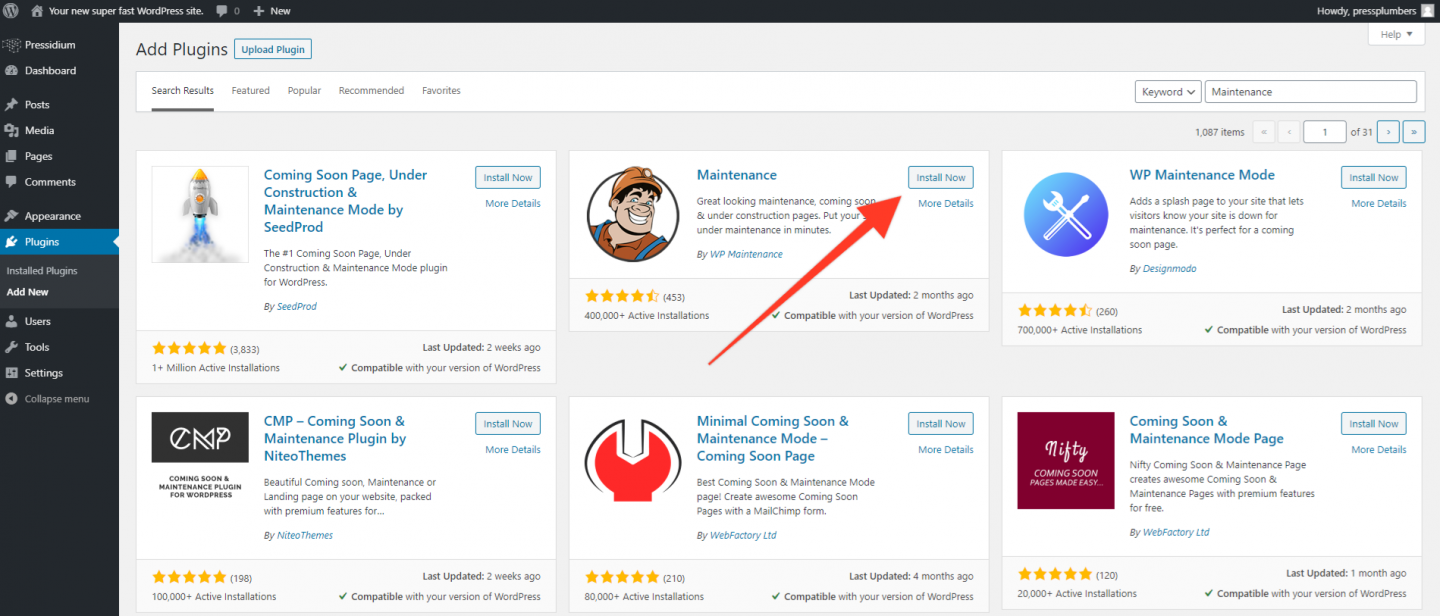
Select the one called ‘Maintenance’ by WP Maintenance (currently second on the list) and click ‘Install Now’. WordPress will now download and install this plugin for you. When this is done you’ll see the ‘Install Now’ button changes blue and now reads ‘Activate’. Click this.
You’ll be taken back to the main Plugin page in WordPress where you’ll now see this listed. It’s from here you can Activate/Deactivate and Delete plugins on your site. Plugins are incredibly powerful but it’s important not to go crazy with them and add loads. You occasionally see sites where people have added 100’s and this isn’t the way to go. For most sites you will probably end up with 6 or so of these.
Step Two
Take a look at the menu on the left. You’ll now see a ‘Maintenance’ link that wasn’t there before. Many plugins will generate a link a bit like this that will appear in the left-hand menu. Clicking on this normally takes you to the plugin settings where you can configure the options for that particular plugin. Click on this to go to the Maintenance page settings now.
You’ll see a screen that looks like this:
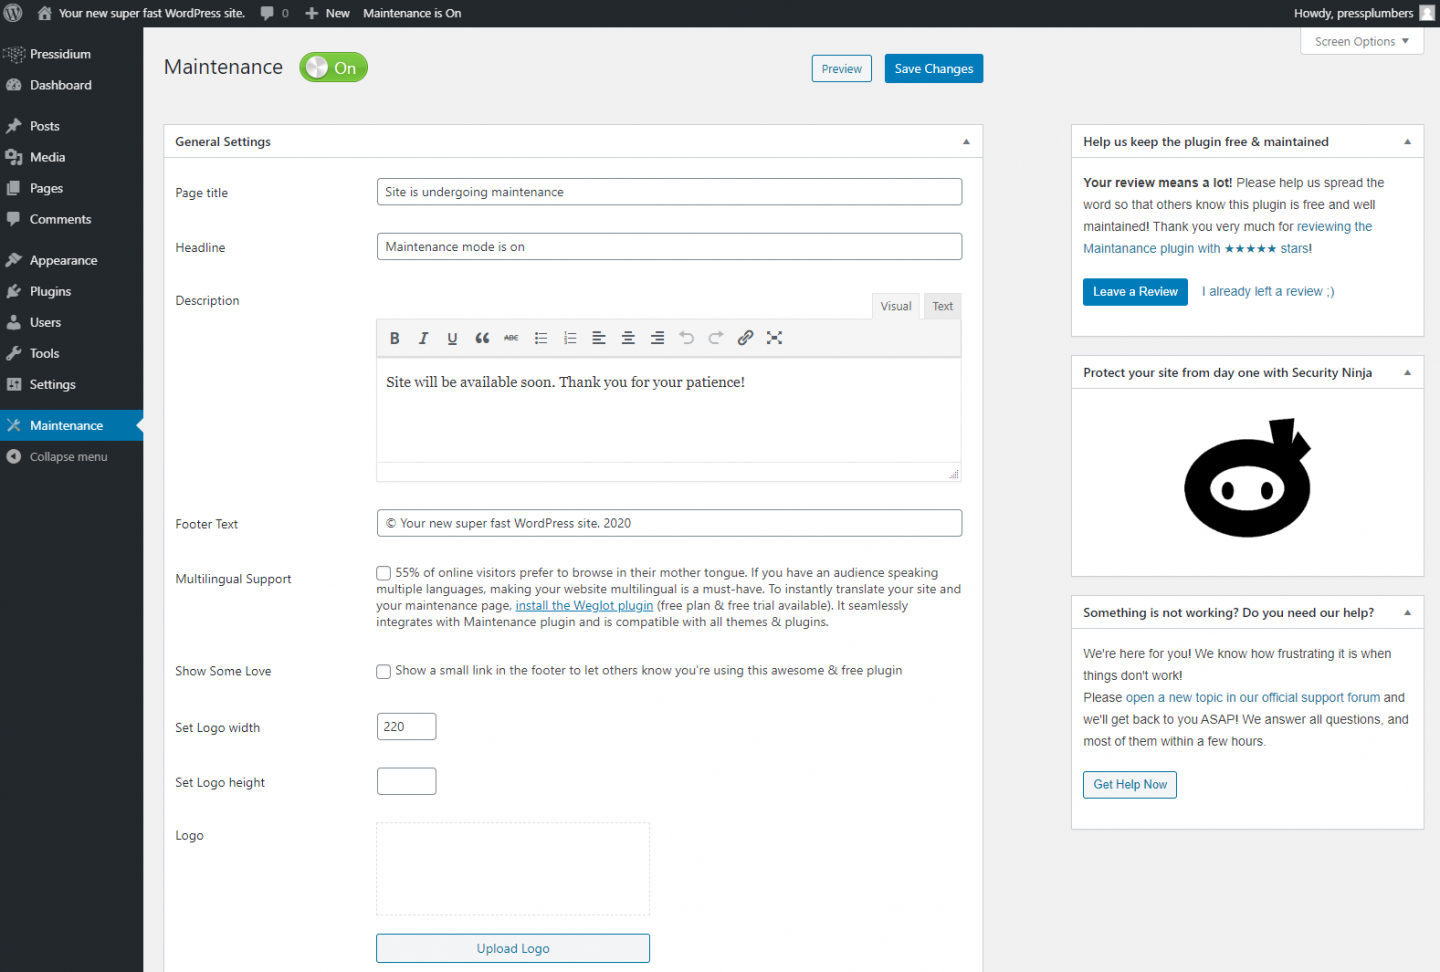
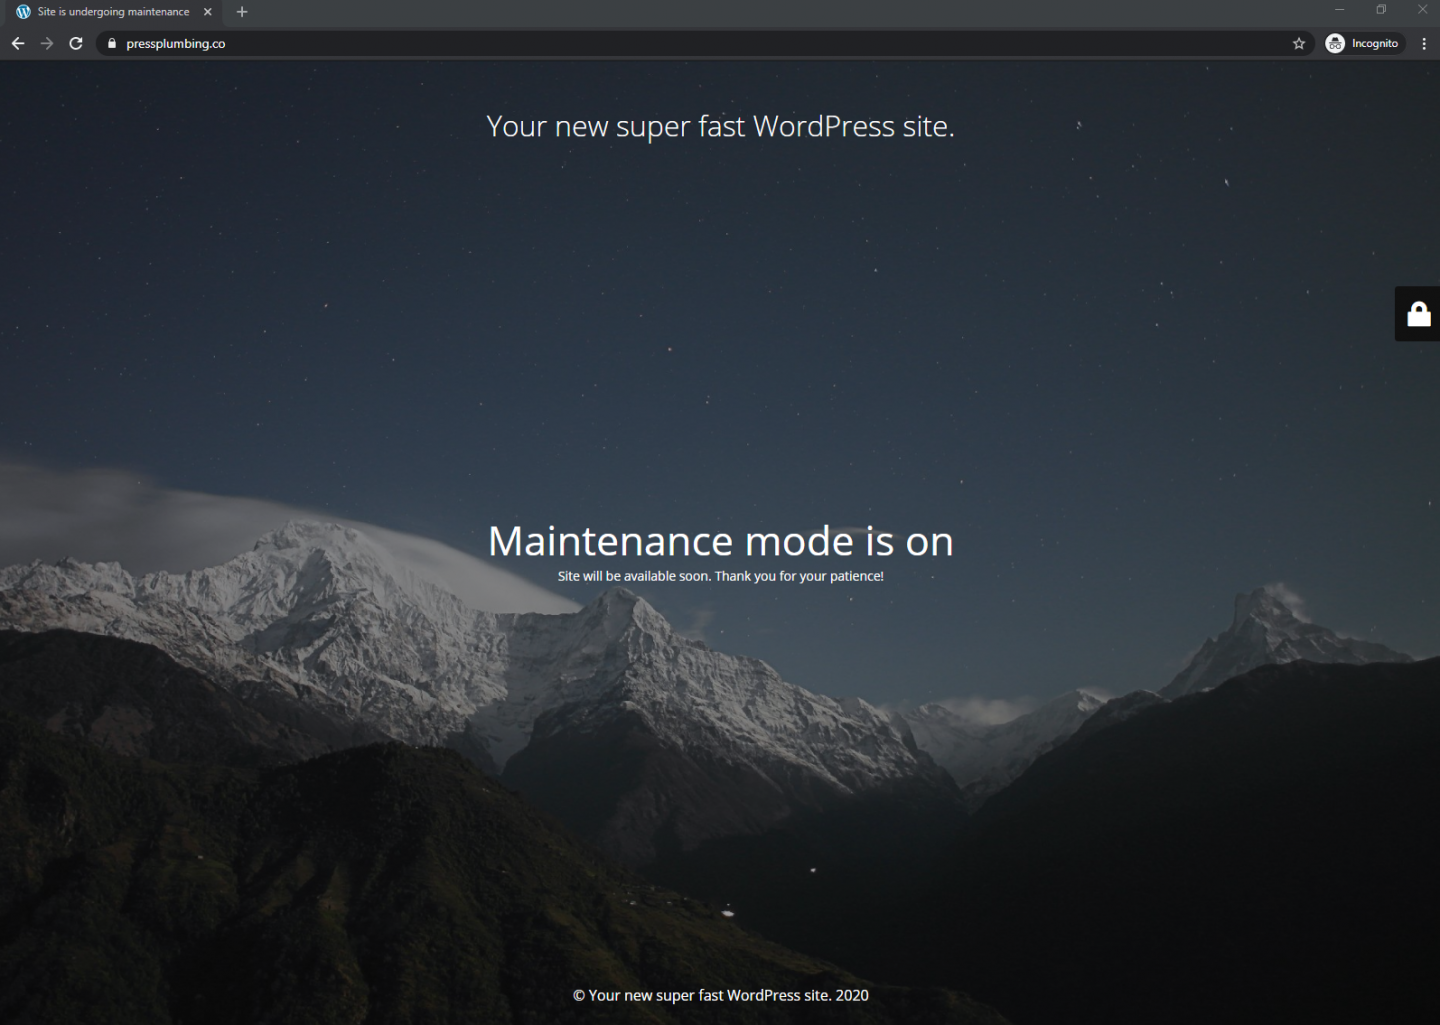
The Maintenance page has been activated on your site but it won’t be displaying your logo or busines info yet. Because you’re logged into your WordPress website you won’t be able to see what this looks like so we’re going to open an Incognito window on your computer and take a look. See here for instructions on how to do this using Chrome (our recommended browser).
You should see this:
We now need to personalize this to fit in with your business.
Head back to the Maintenance screen within WordPress and update the Page Title, Headline, Description and Footer Text to the following (adapting for your business of course):
Page Title: Press Plumbing
Headline: New Website Coming Soon
Description: We are working on a brand-new website which is coming very soon. In the meantime, please contact us on 01234 567890. Thanks. The Press Plumbing Team.
Footer Text: © Press Plumbing & Co 2020
Next, get a copy of your logo (ideally about 1,000px wide – this can be resized at https://picresize.com ) and upload this by clicking on the ‘Upload Logo’ button. Change the size where it says ‘Set Logo Width’ to around 450px. Upload the same logo to were it says ‘Upload Retina Logo’.
Hover over the background image and you’ll see an ‘X’ popup. Click this to remove the background. Change the background color and login block background color to the same color used as a background for your logo (or whichever color you decided works best as a background for your logo) and then click save.
Scroll down and you’ll see a box that say’s ‘Custom CSS’. In this box, copy and paste the following code:
body > .main-container:after { background-color: transparent; }
.logo-box img {
max-width: 100%;
margin-top: 200px;
}
.site-content h2.heading {
font-size: 35px;
font-weight: lighter;
margin-bottom: 20px;
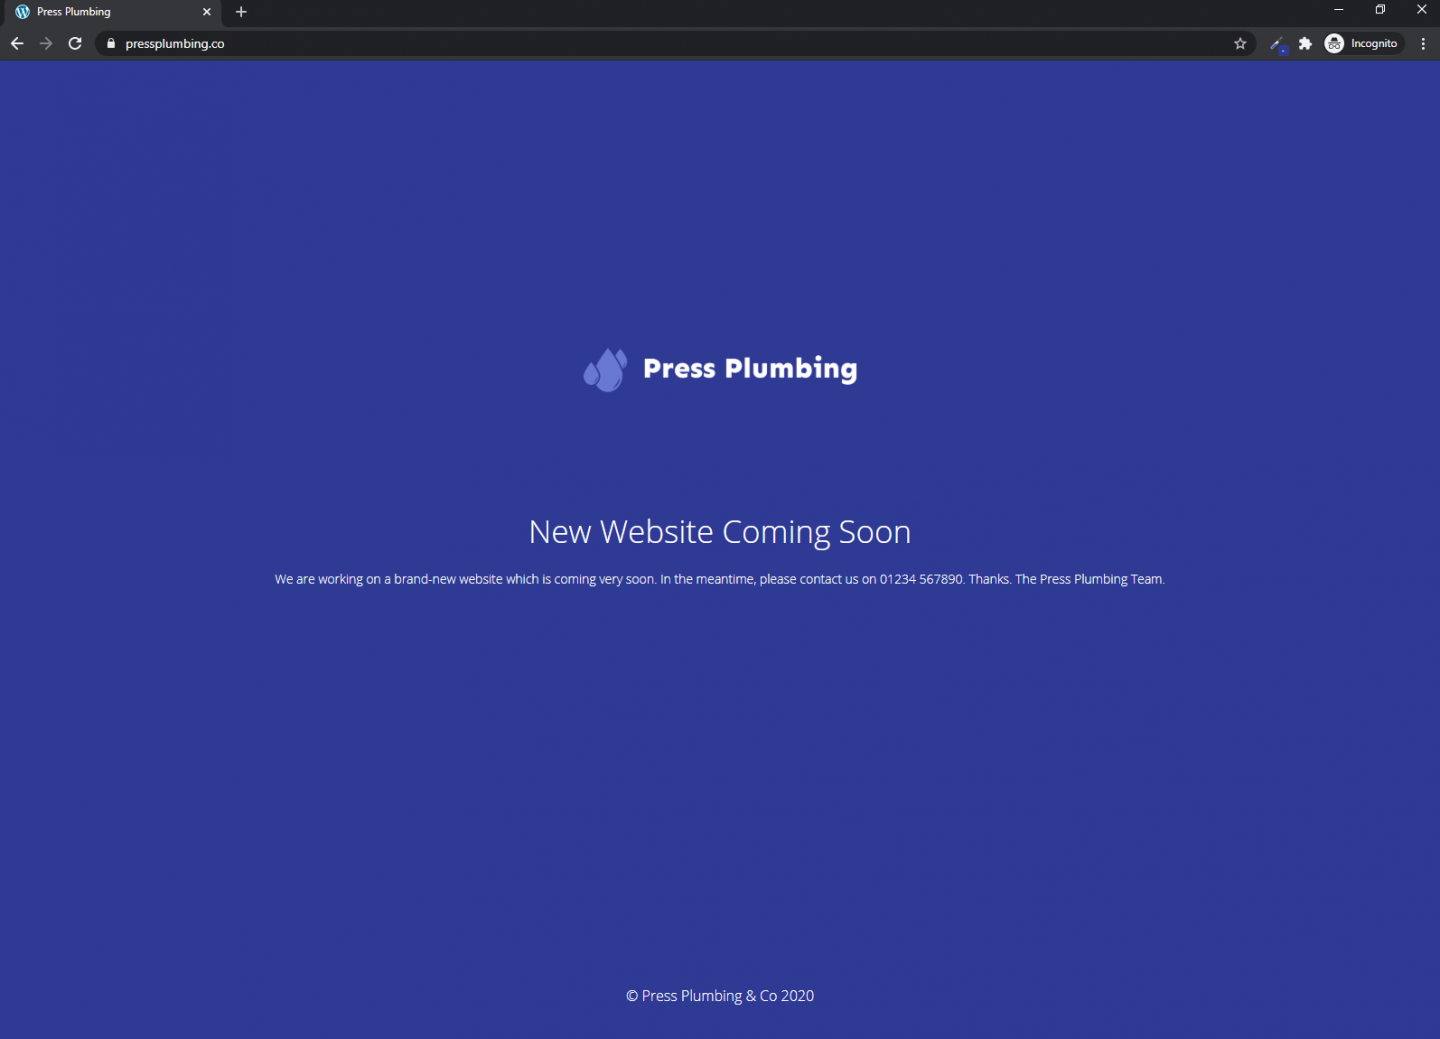
}Press ‘Save changes’ and then refresh the Incognito window and you should see everything has updated. You can of course go back and tweak the color, text and so on to better suit your needs. Keep refreshing the page in the Incognito window to see these changes.
Our new Maintenance page looks like this:
The Maintenance page will stay active and will be all that anyone who visits your website will see until we turn this off after your website has been built. You can of course update this page periodically with other relevant info about your business.
A quick recap on the tasks that have been completed thus far:
- Purchased a domain name
- Designed a Logo
- Setup Hosting and Install WordPress
- Configured Cloudflare and pointed our domain name to our hosting
- Installed a Maintenance Screen
Now we’ve done all of the above we can move forward with designing our Website!
Installing Elementor and our Starter Theme
To begin work on our new website we need to do two things:
- Install Elementor
- Install the Starter theme that will act as the foundation for our website.
Both of these jobs will involve adding more plugins to WordPress. The process for doing this is exactly like that we did when installing the Maintenance plugin.
Installing Elementor
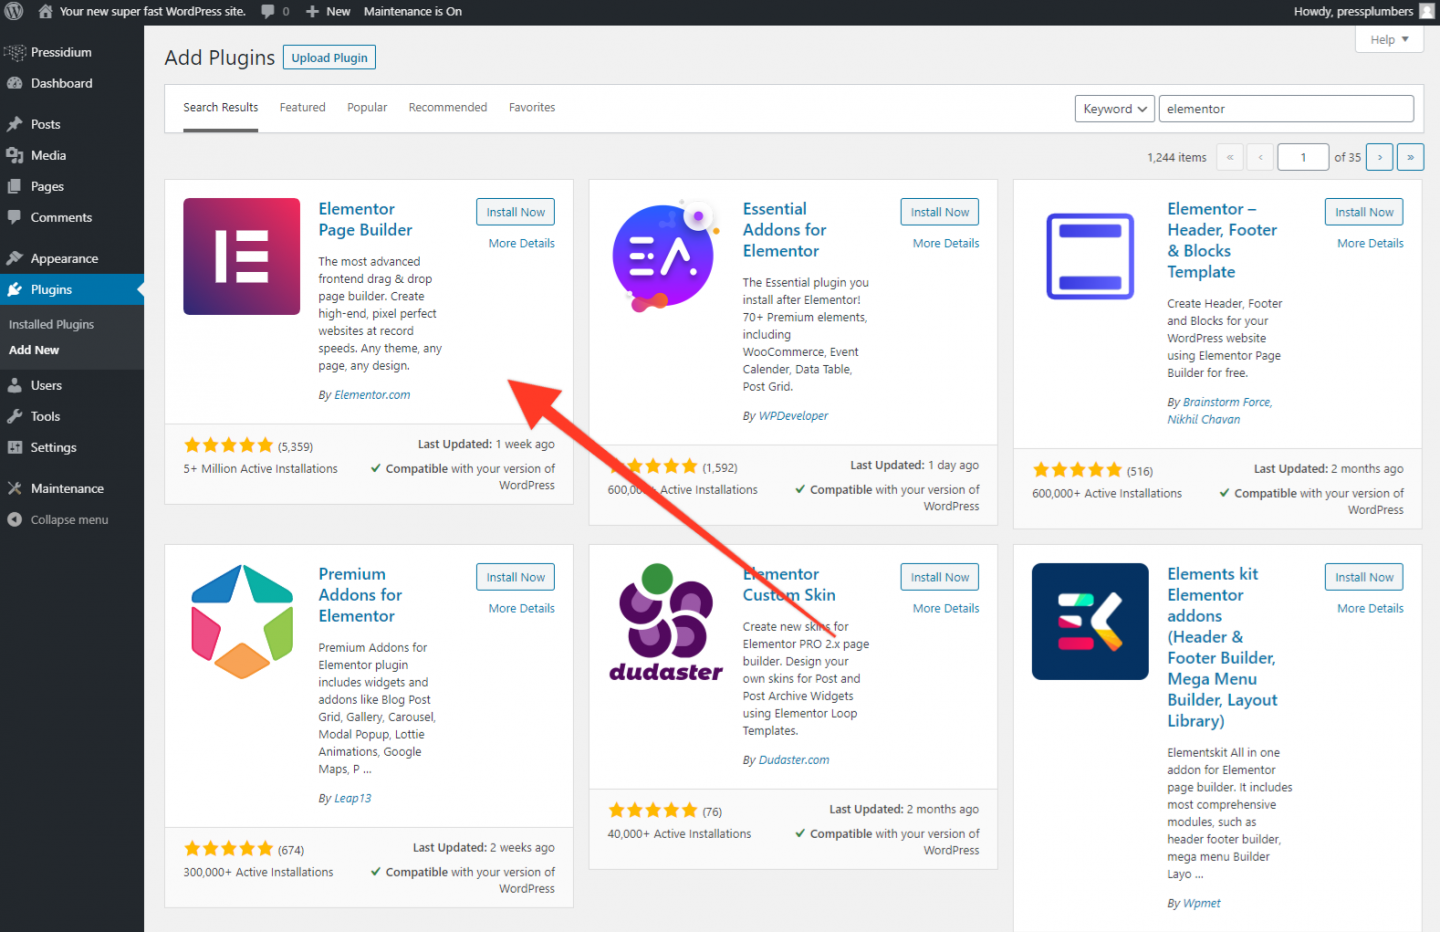
Head to the Plugins page. Click ‘Add New’ and in the search bar on the Add Plugins page enter ‘Elementor’. You should see this:
As you did for the Maintenance plugin, click Install Now and then Activate. At the moment this is all you need to do with regards to Elementor.
Installing Your Starter Theme
As discussed, we are going to use a theme called Astra which is highly rated, well coded and works seamlessly with Elementor. To install it we’re going to add another plugin to our site.
Head to the Plugins page. Click ‘Add New’ and in the search bar on the Add Plugins page enter ‘Astra’. You should see this:
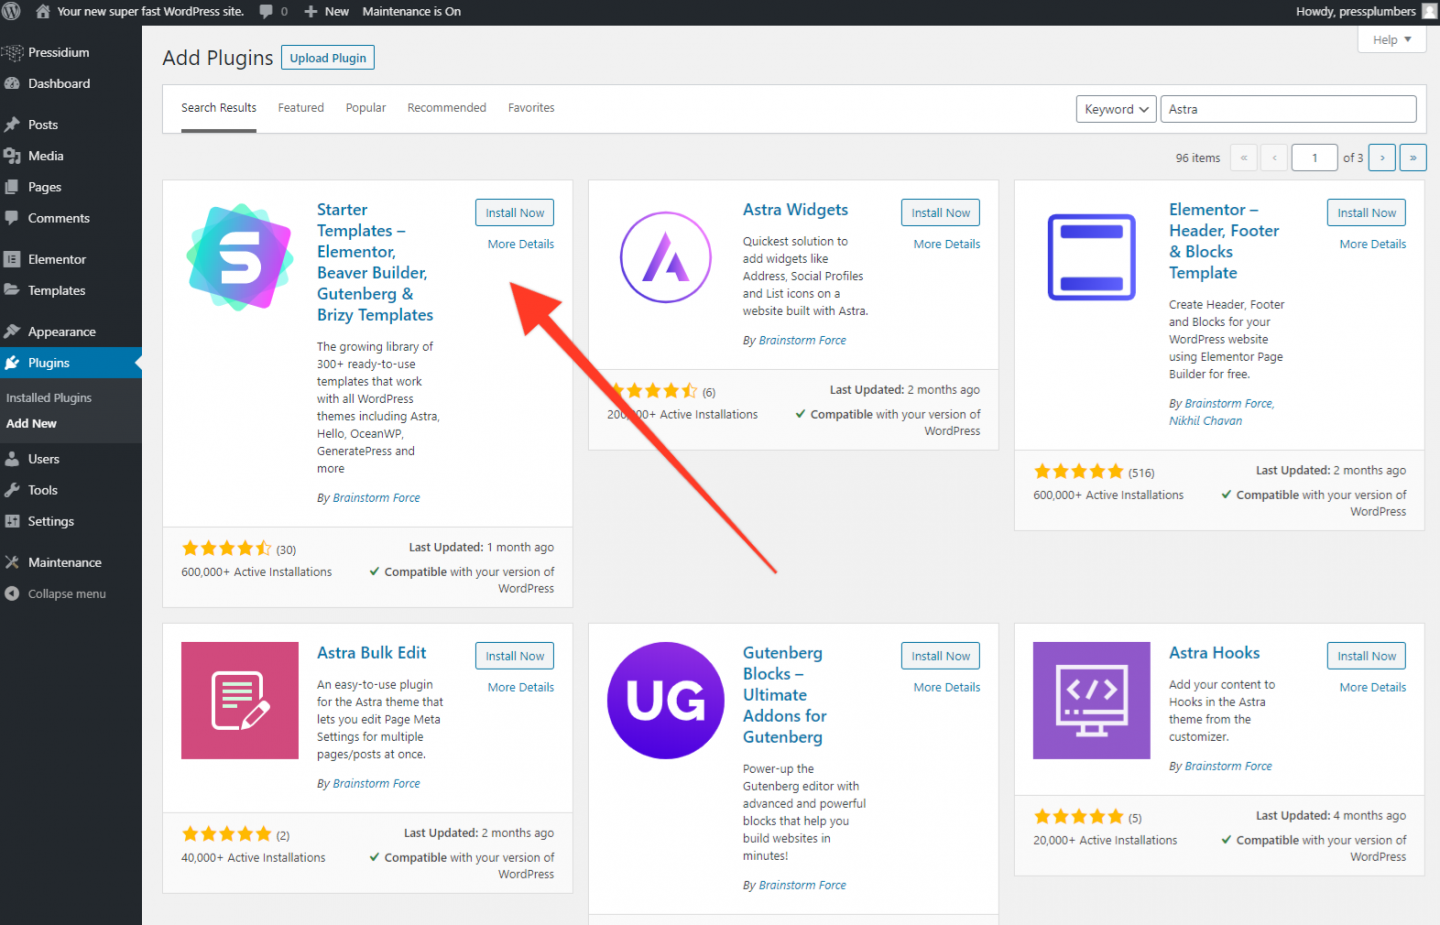
Astra helpfully provide a plugin that allows you to seamlessly import the theme. This plugin is called ‘Starter templates’ and is built by Brainstorm Force. Install and activate this plugin.
When this is done click on ‘Appearance’ which is in the left hand menu and then under this select ‘Starter Templates’ in the sub menu. You’ll see this:
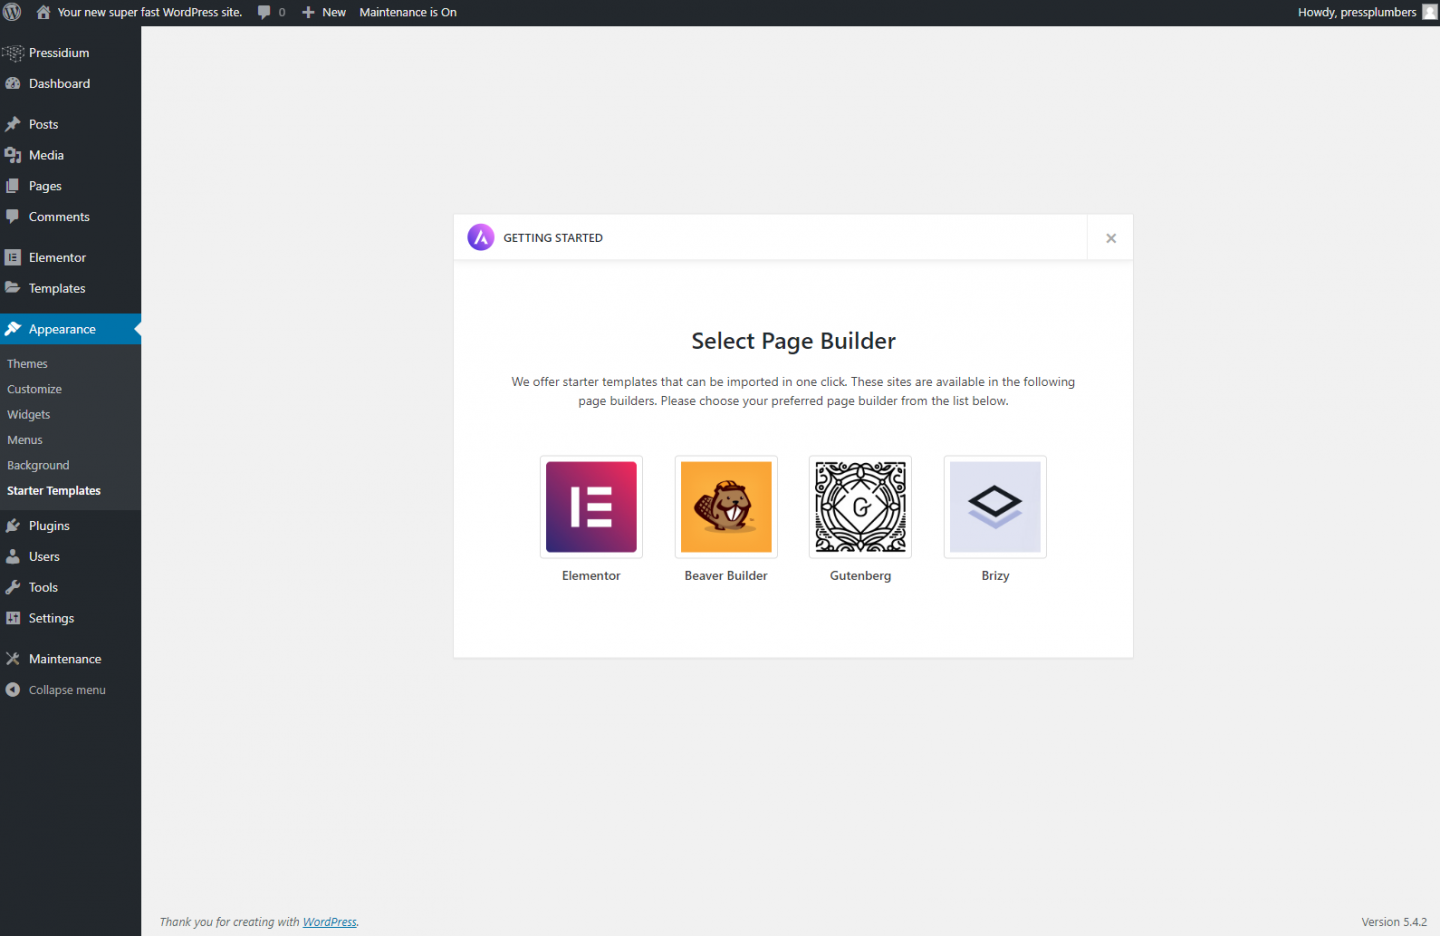
As you’ll have hopefully realised by now, we’re going to use Elementor as our Page Builder. You’ll note that there are some other options but we think Elementor offers the most robust and feature rich page building experience available.
Click on the Elementor icon and you’ll be present with a list of ready to go website designs. Some are marked with an ‘Agency’ tag. This means they are premium designs thar are only available if you subscribe to an Agency plan. If you want to look at doing this go to the Astra website. They are excellent value for money so if you see a design you love but it’s an Agency one do consider purchasing it.
In this instance we are going with a free template called Co Working Space. It only takes one click to import this template into our website.
Note: Backing up your website
If you are hosting with Pressidium then you have access to our snapshot backup service. This allows you to quickly take an instant backup of your website. This is super helpful. Think of it like a time machine. By taking a backup you can roll back changes made after the backup was taken to the point in time of the backup.
Taking a backup makes a lot of sense when you’re about to undertake more significant work to your website. Whilst it’s unlikely you’d have problems just updating some text on your site (for example), a more major process like importing a new theme has a greater potential for problems to occur. By backing up your site prior to undertaking tasks like this you can rest easy knowing that you can ‘roll back’ your site if something were to go wrong.
To take a backup head to the Pressidium Menu top left of your WordPress site. From the sub menu select ‘Backup Service and then ‘Perform Instant Backup’. You’ll receive an email when this has been completed (this normally takes around a minute). Once this is done you an confidently move forward with importing the template.
In the Starter Template section, scroll down and select ‘Co-Working’ Space. Click on ‘Import Complete Site’.
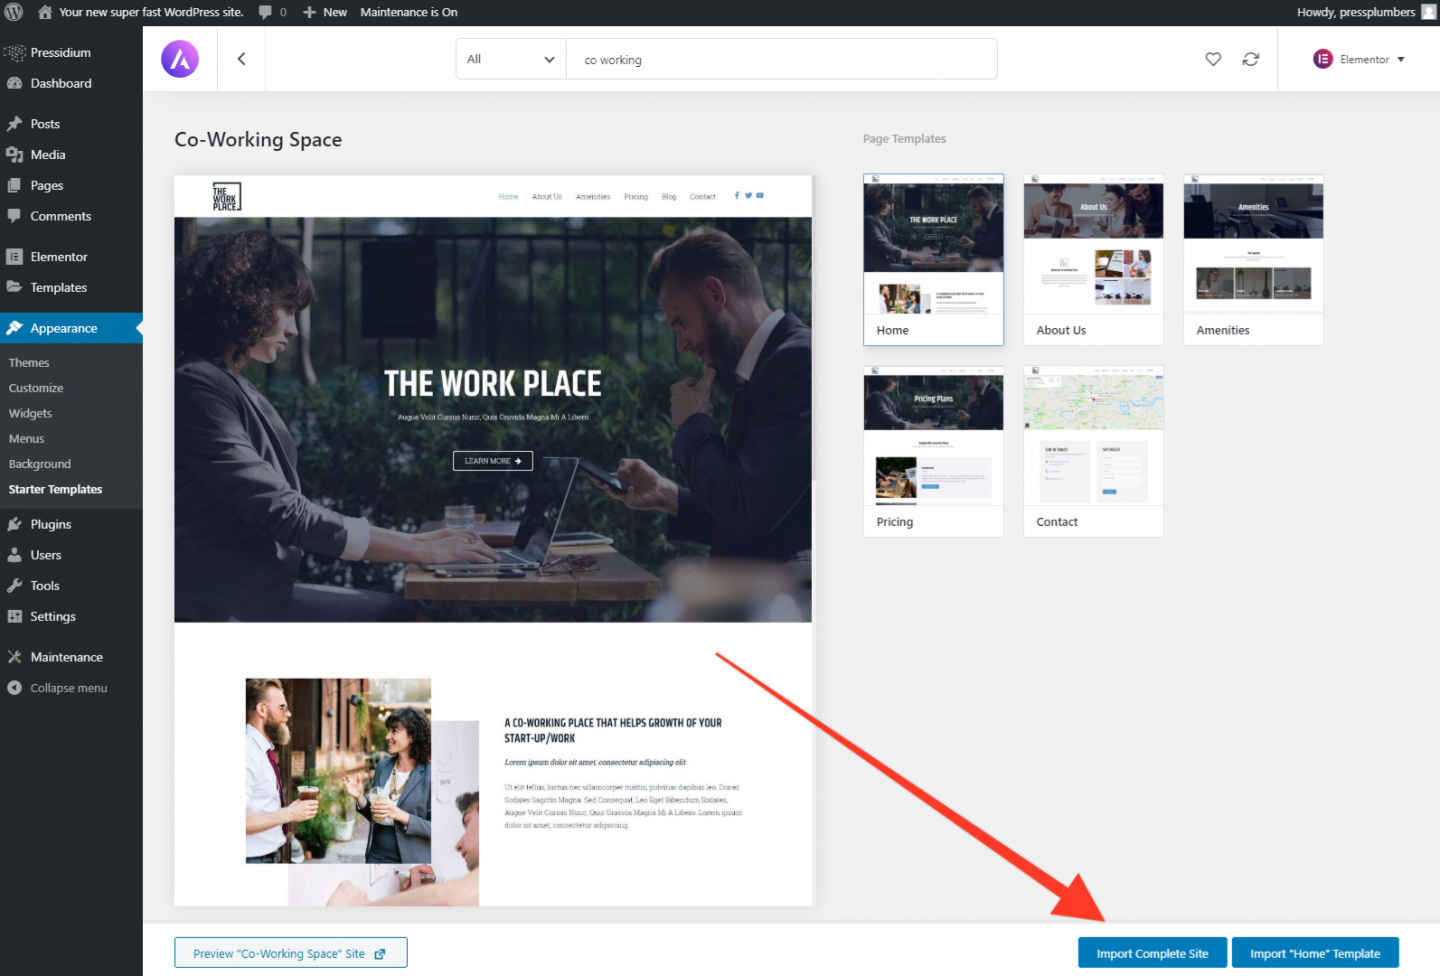
Wait for the import to complete. This may take a few minutes. Do not close the page until the import has been completed. When the import has finished you’ll see a button that allows you to visit the site. Click on this and you should see your Homepage now looks like this:
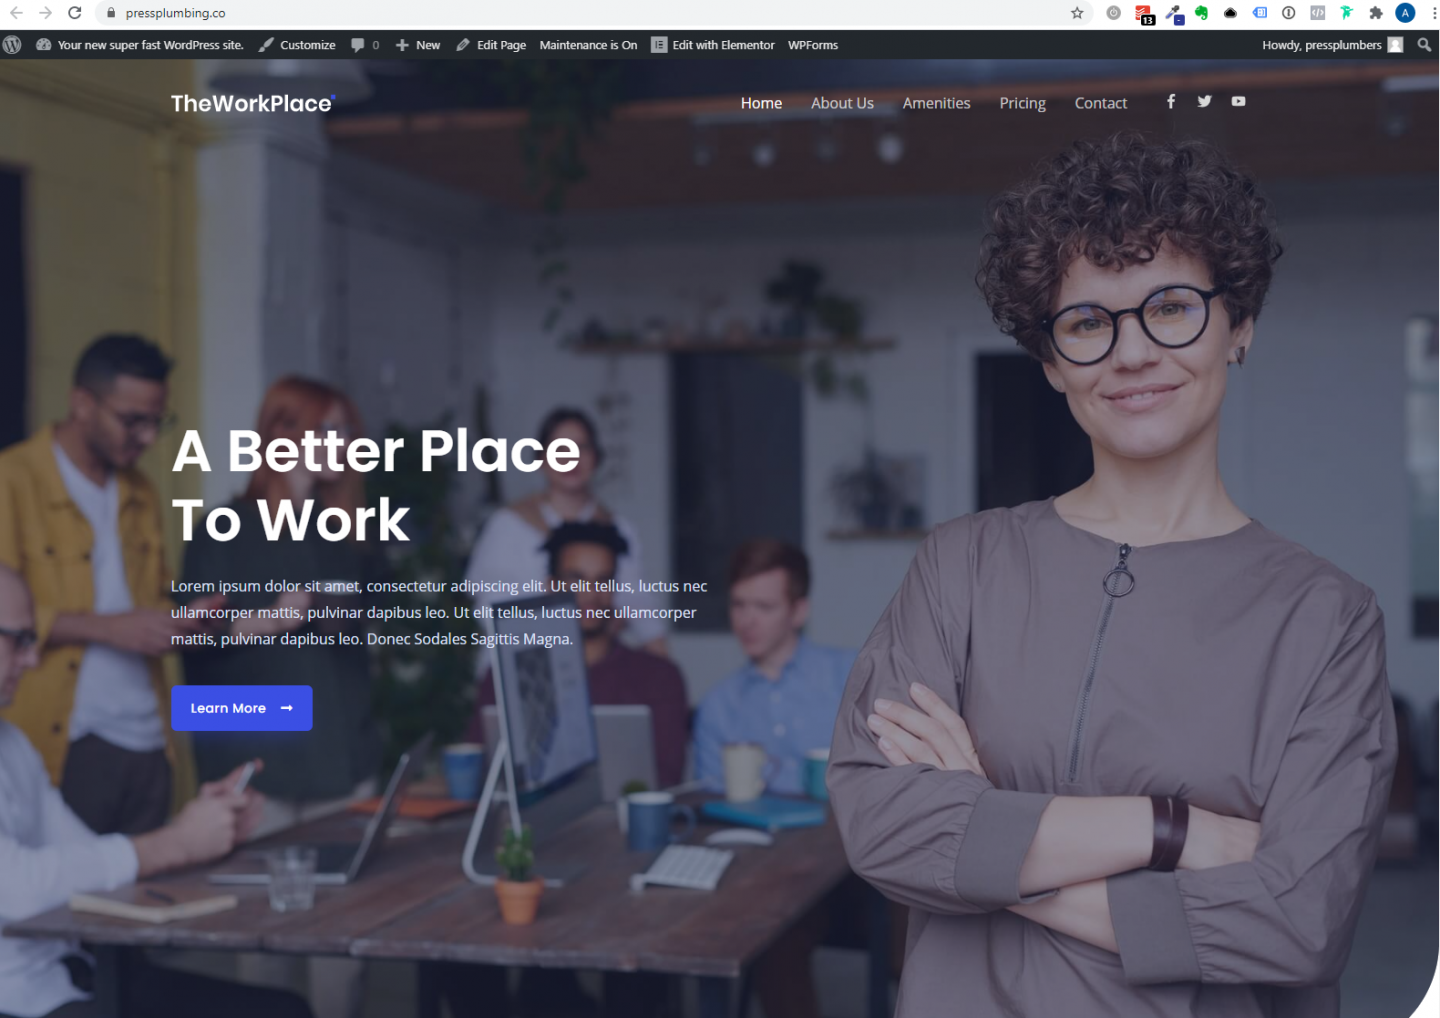
And that’s it! We now have a solid foundation on which we can build our website.
In Part 4 of this series we’ll be making some significant inroads into building our site. First we will re-design the Homepage so it is relevant to our business. This will involve changing the layout, content and images to create a style and look that is unique to Press Plumbers. Then, we’ll move forward with designing the layout of our service pages. Once we’ve done both these things we won’t be far off having a brand new site ready to launch for our business!
Start Your 14 Day Free Trial
Try our award winning WordPress Hosting!


