

So far, in our series of articles on the Admin Tables in WordPress we’ve looked at various ways of customizing the layout of the WordPress Admin Tables including how to add new columns. In this final article in the series we’re going to take a look at one more customization you might want to consider… extending the ‘Quick Edit’ function found in the Admin Tables.
Let’s get started!
Extending the Quick Edit Field
For our example in this tutorial we will add a custom field that will display a URL which will be described as a ‘Source’ which we’ll populate with a url linking to some additional information relating to our article. We will see how it can be added in the Quick Edit area of the Posts Admin screen and how to save updates made to this field.
Step One: Add the Custom Field
We ran through how to create the ‘Source’ field in our article Getting Started with WordPress Custom Fields. For the sake of brevity, we won’t repeat those instructions here. You can of course create any Custom Field you like.
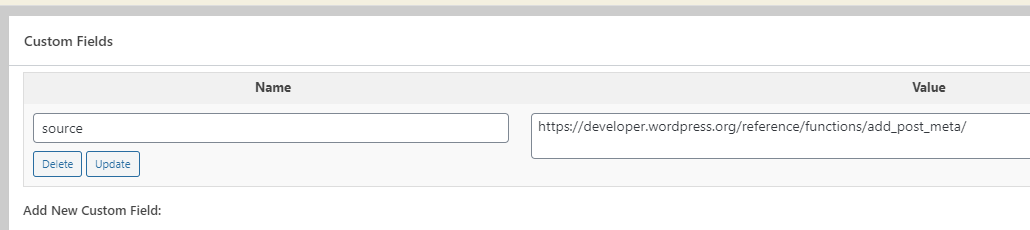
If you are not familiar with how we add the ‘Source’ custom field or any other custom field for that matter please take a look at our article on this. Once you have added an appropriate custom field it’s time to move onto the next step.
Step Two: Add the Custom Column
We need to add a custom column to our Admin Table. We explained how to do this in-depth in our article Customizing WordPress Admin Tables: Getting Started. Take a look and follow the steps.
Ultimately you should end up with some code in your active theme’s functions.php that looks like this:
add_filter('manage_posts_columns','add_custom_columns');
function add_custom_columns( $columns ) {
$columns['source'] = 'Source';
return $columns;
}
add_action( 'manage_posts_custom_column','custom_columns_content', 10, 2 );
function custom_columns_content ( $column_id, $post_id ) {
switch( $column_id ) {
case 'source':
echo get_post_field('source', $post_id);
break;
}
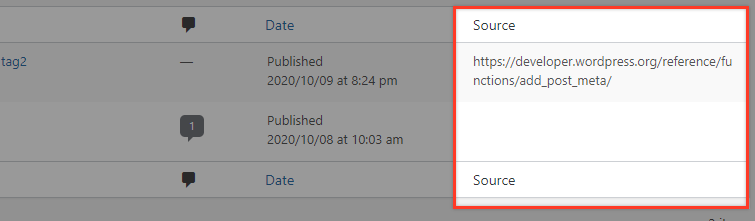
}By now you should see the new column in the Posts Admin table.
Add the Custom Quick Edit Box
Let’s go to our Posts list table and click the ‘Quick Edit’ link under one of our posts.
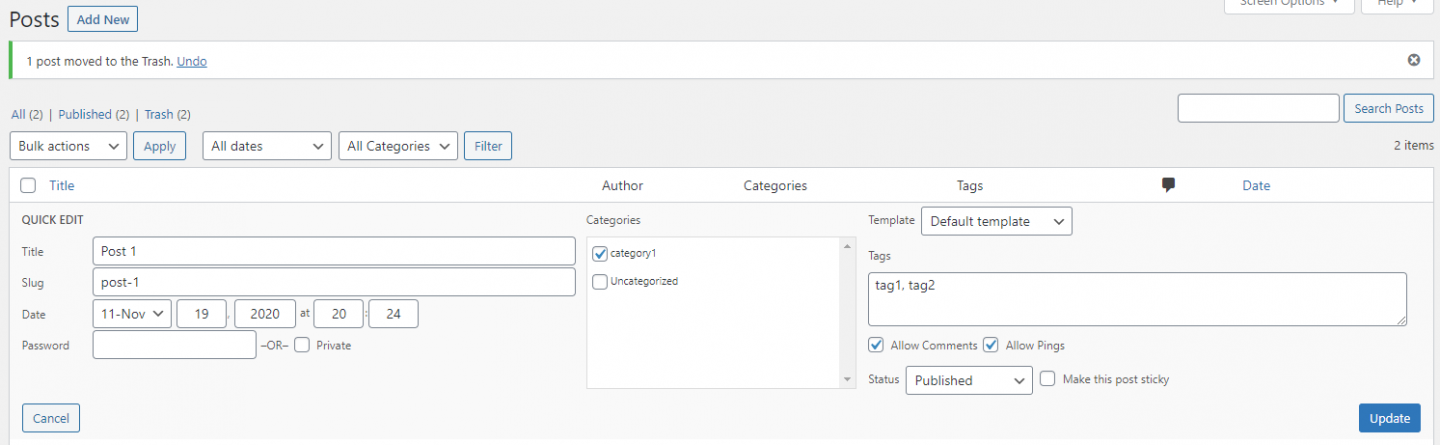
What we’ll see here are all the default available options that WordPress provides in the Quick Edit screen. At the moment we won’t see our new ‘Source’ field.
We’ll add this by using the quick_edit_custom_box hook that WordPress provides. This action parses all the default actions in ‘Quick Edit’ mode by executing once for each column including custom columns.
It is structured as follows: do_action( 'quick_edit_custom_box', $column_name, $post_type, $taxonomy ). The parameters are the $column_name which is the name of the column to edit, the $post_type which is the post type slug and the $taxonomy for the taxonomy name if necessary.
In your functions.php file, add the following lines:
add_action( 'quick_edit_custom_box', 'source_custom_edit_box', 10, 2 );
function source_custom_edit_box( $column_name, $post_type ) {
global $post;
switch ( $post_type ) {
case 'post':
if( $column_name === 'source' ):
?>
<fieldset class="inline-edit-col-right" id="#edit-">
<div class="inline-edit-col">
<label>
<span class="title">Source</span>
<span class="input-text-wrap"><input type="text" name="source" value="<?php echo $post->source; ?>"></span>
</label>
</div>
</fieldset>
<?php
endif;
break;
default:
break;
}
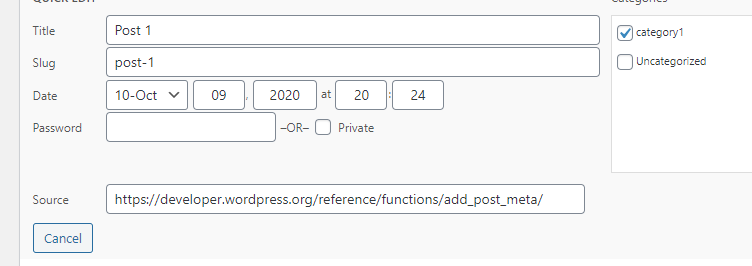
}Please bear in mind that we get the ‘source’ field value in the PHP code by echoing $post->source;.
Now, if you refresh the page and click on ‘Quick Edit’ again you should now see the ‘source’ field with a correct value.
Step Three: Save Inline Editing
To save data input into our custom field, we will use the save_post action that is triggered when a post is updated.
In our example where we work on quick edits, the data for the post is stored in $_POST after the save_post executes.
That the code required to achieve this is as follows and should be to be inserted in the functions.php file:
add_action( 'save_post', 'update_source_custom_edit_box' );
function update_source_custom_edit_box() {
    if( isset( $_POST ) && isset( $_POST['source'] ) ) {
        update_post_meta($_POST['post_ID'], 'source', $_POST['source']);
    }
    return;
}
No this has been done, let’s try changing the field’s input value to something else like “https://random.url” and hit the update button at the bottom right.
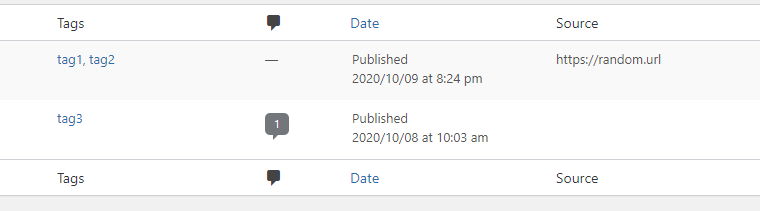
You note the value in our source field is updated as expected. However, if you click on the Quick Edit button again and take another look at your custom field (in our case ‘Source’) you’ll see that the value hasn’t changed in the edit box.
As many times as you change the value, you will always see the change in the Admin table column cell, but this input will not be reflected in the Quick Edit field.
Try our Award-Winning WordPress Hosting today!


So, why is this happening?
Remember that we get the ‘source’ field value by echoing $post->source;. The Quick Edit content is populated when the user presses the ‘edit’ button, which means it is created dynamically and not pre-populated when the post admin screen is loaded. We cannot show our metadata correctly by retrieving it via our PHP code as we will always see the value that was populated when we entered the Admin screen instead of the new value.
Instead, we have to collect our values by using JavaScript. So before we proceed we will go into our previous PHP code and remove the echoed value by replacing this line…
<span class="input-text-wrap"><input type="text" name="source" value="<?php echo $post->source; ?>"></span>…with this one:
<span class="input-text-wrap"><input type="text" name="source" value=""></span>Step Four: Retrieving Input Values Using JS
First, we will have to include our JS script by adding these lines to your functions.php file:
// RETRIEVE FIELDS with JS
add_action( 'admin_enqueue_scripts', 'enqueue_admin_scripts_and_styles' );
function enqueue_admin_scripts_and_styles(){
    wp_enqueue_script('UNIQUE-SCRIPT-NAME', '/PATH-TO-YOUR-JS-FILE', array('jquery','inline-edit-post' ));
}
So if for example you create an extend-quick-edit.js file and put it under your active theme folder, then in the above code you should replace ‘UNIQUE-SCRIPT-NAME’ with something like ‘extend-quick-edit-script’ and ‘/PATH-TO-YOUR-JS-FILE’ with get_template_directory_uri() . '/extend-quick-edit.js'
// RETRIEVE FIELDS with JS
add_action( 'admin_enqueue_scripts', 'enqueue_admin_scripts_and_styles' );
function enqueue_admin_scripts_and_styles(){
    wp_enqueue_script('extend-quick-edit-script', get_template_directory_uri() . '/extend-quick-edit.js', array('jquery','inline-edit-post' ));
}
In the array('jquery','inline-edit-post' ) we have added jQuery since our script uses jQuery, and defined that the original inline-edit-post function will be modified.
In the extend-quick-edit.js the content will look like this:
jQuery(document).ready(function($){

    var $inline_editor = inlineEditPost.edit;
    inlineEditPost.edit = function(id){

        $inline_editor.apply( this, arguments);

        var post_id = 0;
        if( typeof(id) == 'object'){
            post_id = parseInt(this.getId(id));
        }

        if(post_id != 0){
            $post_modified_col_value = $('#post-' + post_id).find('.source').text();
            $('#edit-' + post_id + ' input[name=source]').val($post_modified_col_value);
        }
    }

});
Let’s break down a bit what we did here.
At first, we grab the inlineEditPost.edit object, which is introduce in the /wp-admin/js/inline-edit-post.js WordPress core file if you would like to look further into it. So we’ve now got a copy of the object in the $inline_editor variable.
After that we modify the inlineEditPost.edit functionality by applying the existing one in the $inline_editor.apply( this, arguments); and adding the extra functionality we want right after.
Note: Before we continue, we would like to remind you that if you look in the element inspector you will notice that each row in the post list table has an id like “post-POSTID” . For example “post-5” for a post with id 5. Also, the corresponding “Source” column cell has a “source” class. Further, in the quick edit area, the ‘source’ input has an id like “edit-POSTID”
So, in the next lines of our JS code what we will eventually do is replace the value of the ‘Source’ input field of the quick edit area with the value of the ‘Source’ column cell.
Now all should work as expected. If you save the value and re-open the quick edit area, the Source input should be altered as well.
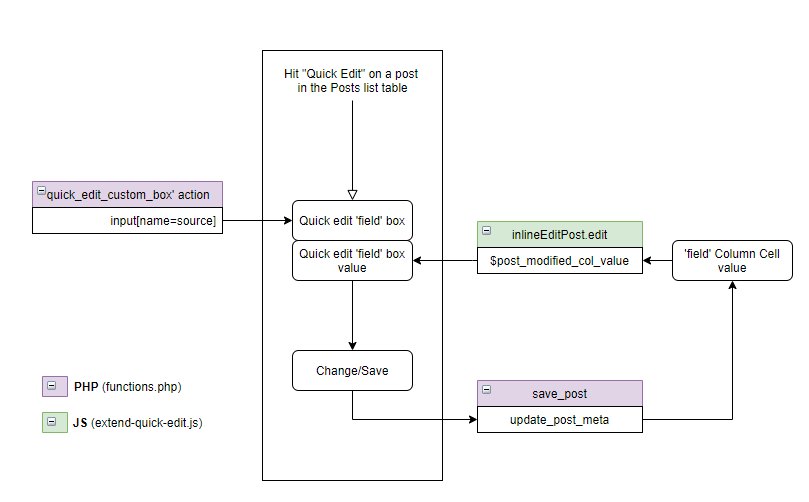
Provided that a custom field is already registered along with its custom column, our workflow would look like this:
Conclusion
Adding a custom field to the Quick Edit module of the Admin List tables is not easy. However, if you are adding a field that is regularly updated then it can obviously save a lot of time in the long run. As always, what can be achieved in WordPress is pretty limitless. Straight out-of-the-box it allows extensive customization but with some additional coding there isn’t much you can’t do!
Start Your 14 Day Free Trial
Try our award winning WordPress Hosting!


