

When using any WordPress plugins you’ve probably noticed that the author has provided some settings that you can use to customize the plugin’s functionality. Technically, the author has created a menu item and a settings page where this menu item redirects you to. In this article you will go through the steps you have to follow in order to do the same for you own plugin.
The article requires that you already applied the code provided in the example in the Adding Fields To The WordPress Menu Items – Custom Plugin article. We will resume from there and see how we can make our plugin more user-friendly by adding its setting page in the admin area so that you will allow admin users to set their preferences on how the plugin will operate.
Initial Steps
For the purpose of this article, we will create a nice simple settings menu. As we saw in our previous article, by using our plugin, the admin user can add a subtitle to any menu item. In the next steps, we will provide an option so that the user can choose the type of HTML element that the subtitle field will be wrapped in.
At this point, our plugin main PHP file looks like this:
<?php
/*
Plugin Name: Menu Item Field Creator
Description: My custom plugin to create menu item fields
*/

class MyCP_Menu_Item_Field_Creator {

    public function __construct() {
        add_action( 'wp_nav_menu_item_custom_fields', array( $this, 'menu_item_sub' ), 10, 2 );
        add_action( 'wp_update_nav_menu_item', array( $this, 'save_menu_item_sub' ), 10, 2 );
        add_filter( 'wp_nav_menu_args', array( $this, 'menu_item_sub_custom_walker' ) );
    }

    public function menu_item_sub( $item_id, $item ) {
        $menu_item_sub = get_post_meta( $item_id, '_menu_item_sub', true );
        ?>
        <div style="clear: both;">
            <span class="subtitle"><?php _e( 'Subtitle', 'menu-item-sub' ); ?></span><br />
            <input type="hidden" class="nav-menu-id" value="<?php echo $item_id; ?>" />
            <div class="logged-input-holder">
                <input type="text" name="menu_item_sub[<?php echo $item_id; ?>]" id="menu-item-sub-<?php echo $item_id; ?>" value="<?php echo esc_attr( $menu_item_sub ); ?>" />
            </div>
        </div>
        <?php
    }

    public function save_menu_item_sub( $menu_id, $menu_item_db_id ) {
        if ( isset( $_POST['menu_item_sub'][ $menu_item_db_id ]  ) ) {
            $sanitized_data = sanitize_text_field( $_POST['menu_item_sub'][ $menu_item_db_id ] );
            update_post_meta( $menu_item_db_id, '_menu_item_sub', $sanitized_data );
        } else {
            delete_post_meta( $menu_item_db_id, '_menu_item_sub' );
        }
    }

    public function menu_item_sub_custom_walker( $args ) {
        if ( class_exists( 'My_Custom_Nav_Walker' ) ) {
            $args['walker'] = new My_Custom_Nav_Walker();
        } else {
            echo 'DOES NOT EXIST';
        }

        return $args;
    }
}

$mycp_menu_item_field_creator = new MyCP_Menu_Item_Field_Creator();

if ( ! class_exists( 'My_Custom_Nav_Walker' ) ) {

    class My_Custom_Nav_Walker extends Walker_Nav_Menu {

        public function start_el( &$output, $item, $depth=0, $args=[], $id=0 ) {
            $menu_item_sub = get_post_meta( $item->ID, '_menu_item_sub', true );

            $output .= '<li class="' . implode( ' ', $item->classes ) . '">';
            if ( $item->url && $item->url != '#' ) {
                $output .= '<a href="' . $item->url . '">';
            } else {
                $output .= '<span>';
            }

            $output .= $item->title;
            if ( $item->url && $item->url != '#' ) {
                $output .= '</a>';
            } else {
                $output .= '</span>';
            }
            if ( ! empty( $menu_item_sub ) ) {
                $output .= '<div class="menu-item-sub">' . $menu_item_sub . '</div>';
            }

        }

    }

}
The next thing we’ll do is proceed and create a menu item for the settings page of our plugin as well as a simple example of what you could include in the settings page as content.
Try our Award-Winning WordPress Hosting today!


We will need to work with two WordPress hooks. The admin_menu hook to register the admin menu item(s) and the admin_init hook to register the plugin options later on when we will add the plugin settings page with its forms. Of course, we will also make the most of the APIs WordPress provides and use some built-in functions. Let’s dive deeper.
In order to add the menu item, we will add the corresponding admin_menu hook inside the __construct() method under the currently added hooks.
class MyCP_Menu_Item_Field_Creator {

    public function __construct() {
        add_action( 'wp_nav_menu_item_custom_fields', array( $this, 'menu_item_sub' ), 10, 2 );
        add_action( 'wp_update_nav_menu_item', array( $this, 'save_menu_item_sub' ), 10, 2 );
        add_filter( 'wp_nav_menu_args', array( $this, 'menu_item_sub_custom_walker' ) );
        add_action( 'admin_menu', array( $this, 'plugin_settings_menu_page' ) );
    }
.
.
.
We used the admin_menu hook and defined the plugin_settings_menu_page() method (that we’ll describe below) to specify the information for the menu item and the plugin’s settings page.
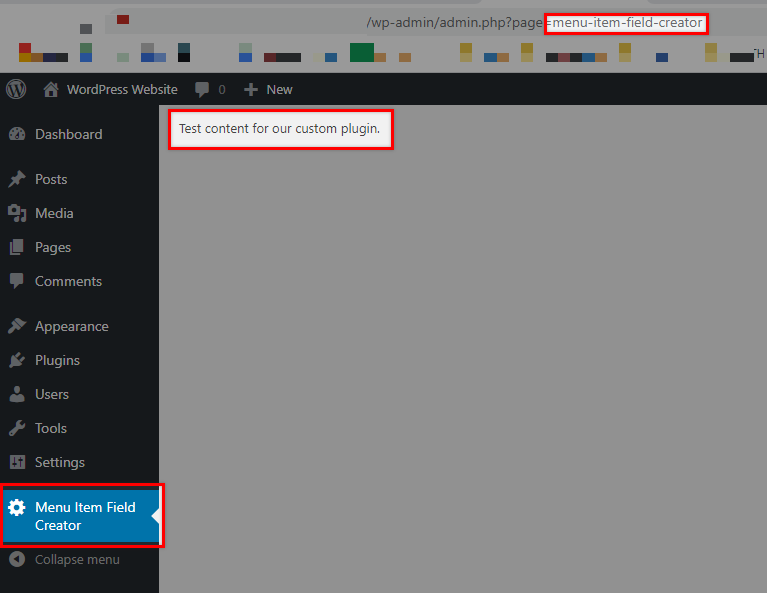
public function plugin_settings_menu_page() {
    add_menu_page(
        __( 'Page Title Attribute Text', 'oop-menu-item-sub' ),
        __( 'Menu Item Field Creator', 'oop-menu-item-sub' ),
        'manage_options',
        'menu-item-field-creator',
        array( $this, 'plugin_settings_page_content' )
    );
}
The method should be put inside the main plugin Class as well. Take note that inside our plugin_settings_menu_page() method we used the add_menu_page() function that WordPress provides. This function accepts the following arguments:
add_menu_page( $page_title, $menu_title, $capability, $menu_slug, $function, $icon_url, $position )- The
$page_titleis required to be defined and it is basically the first part of title tags of the page you are redirected to when selecting this menu item. - The
$menu_title-also required- is the text to be used for the menu. $capabilityis the capability required for this menu to be displayed by the user. In our case, we chose themanage_optionspermission as it is given to Super Users and Administrators only. If you want to understand which role or capability fits your needs, you can consult the related official documentation.- The
$menu_slugis also required and should be unique. It is the slug name to refer to this menu by. Do not forget that you must only use lowercase alphanumeric, dashes, and underscores characters that are compatible with sanitize_key(). - The
$icon_urlis an optional argument and is the URL which links to the icon file that will be used for the menu item. - The
$functionargument is where you define the callback function that will create the content of the settings page. In our case, it is theplugin_settings_page_content()plugin_settings_menu_page()method.
public function plugin_settings_page_content() {
    $html = "<p>Test content for our custom plugin</p>";
    echo $html;
}
At this point you should see the “Menu Item Field Creator” menu item and the content page test content and recognize the menu URL you defined in the arguments.
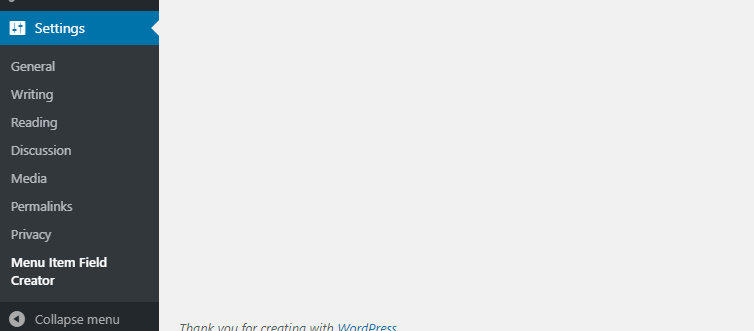
We would also like to note that if you wish to include your plugin’s option under the built-in Settings menu and not as a separate top level menu item, you can easily do it by using the add_options_page() function instead. In that case you should replace this:
public function plugin_settings_menu_page() {
    add_menu_page(
        __( 'Page Title Attribute Text', 'oop-menu-item-sub' ),
        __( 'Menu Item Field Creator', 'oop-menu-item-sub' ),
        'manage_options',
        'menu-item-field-creator',
        array( $this, 'plugin_settings_page_content' )
    );
}
with this:
public function plugin_settings_menu_page() {
    add_options_page(
        __( 'Page Title Attribute Text', 'oop-menu-item-sub' ),
        __( 'Menu Item Field Creator', 'oop-menu-item-sub' ),
        'manage_options',
        'menu-item-field-creator',
        array( $this, 'plugin_settings_page_content' )
    );
}
This will result in a menu location here:
In our next section, we will put some simple content in the settings page that the admin user can use to set the plugin’s behavior.
Add Functionality to Our Settings Page
What we have done so far is to add our menu item and define the function that will display the settings content page. If we want functionality in our settings page we will have to register some fields and then show them in the plugin’s settings page. As an example, we will create a form where the user can define the type of HTML element to wrap the subtitle field with.
The Output
Replace the plugin_settings_page_content code with this:
public function plugin_settings_page_content() {
    ?>
    <form action="options.php" method="post">
    <?php
        do_settings_sections( 'options_page' );
        settings_fields( 'option_group' );
        submit_button( __( 'Save Subtitle', 'oop-menu-item-sub' ) );
    ?>
    </form>
    <?php
}
In these lines we use the do_settings_sections() and settings_fields() functions. The do_settings_sections() will print all the settings sections and fields that are registered. Τhe settings_fields() will output the nonce, action, and option_page hidden input fields for the settings page.
Now let’s proceed and register our settings.
Register your Settings
To register the fields required, we will use the admin_init hook as it fires when an admin screen is being initialized.
class MyCP_Menu_Item_Field_Creator {

    public function __construct() {
        add_action( 'wp_nav_menu_item_custom_fields', array( $this, 'menu_item_sub' ), 10, 2 );
        add_action( 'wp_update_nav_menu_item', array( $this, 'save_menu_item_sub' ), 10, 2 );
        add_filter( 'wp_nav_menu_args', array( $this, 'menu_item_sub_custom_walker' ) );
        add_action( 'admin_menu', array( $this, 'plugin_settings_menu_page' ) );
        add_action( 'admin_init', array( $this, 'plugin_register_settings' ) );
    }
.
.
.
We will insert the plugin_register_settings() method inside our class like this:
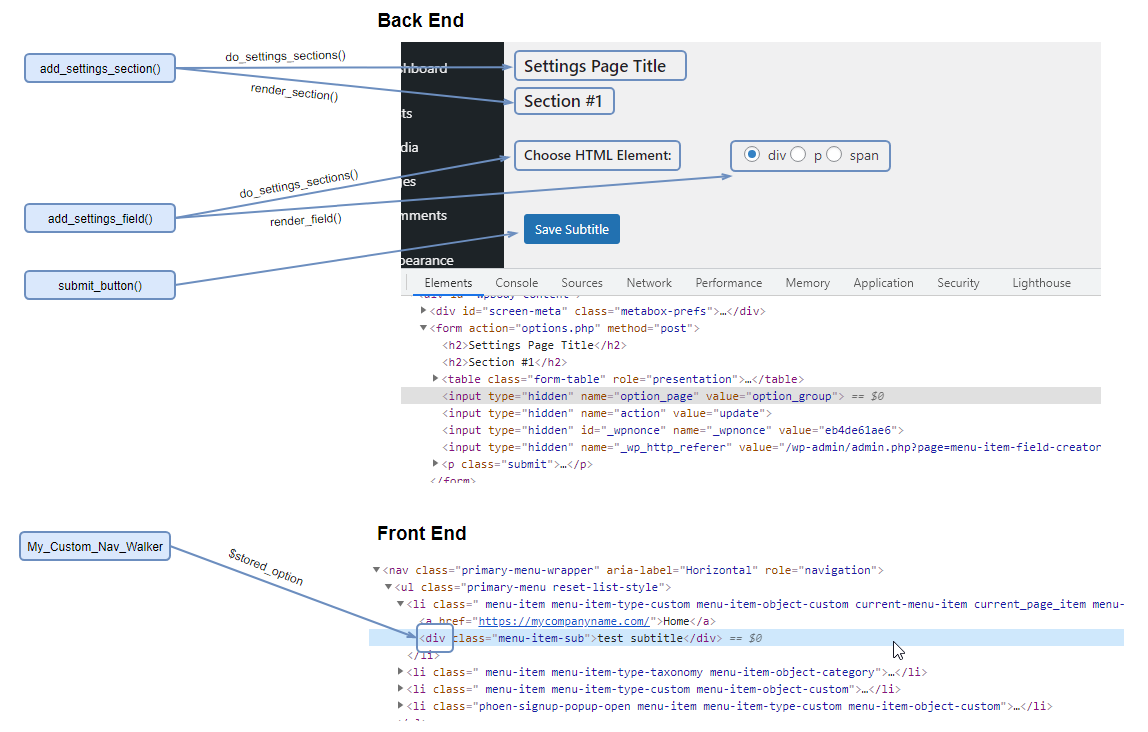
public function plugin_register_settings() {
    register_setting( 'option_group', 'option_name' );
    add_settings_section(
        'section_id',
        __( 'Settings Page Title', 'oop-menu-item-sub' ),
        array( $this, 'render_section' ),
        'options_page'
    );
    add_settings_field(
        'html_element',
        __( 'Choose HTML Element:', 'oop-menu-item-sub' ),
        array( $this, 'render_field' ),
        'options_page',
        'section_id'
    );
}
Now let’s step back and take a look again at what we’ve done so far.
- To register a setting and its data, we used the
register_setting() function which according to the documentation is structured like this:
register_setting( $option_group, $option_name, $args )- The
$option_groupis a required parameter and should match the group name used insettings_fields(). - The
$option_nameis also required and is the name of the option to be sanitized and saved. It is the value under theoption_namecolumn in the options database table. - The
$argsis not needed here. It is an optional data array that describes the setting when registered. What you can specify here is its type, description, asanitize_callback()function for the option’s value, a “show_in_rest” option that defines whether the current data should be included in the REST API and a default option where you can define the default value when callingget_option(). - We also introduced the
add_settings_section()andadd_settings_field()functions that will help us complete this step. - The
add_settings_section()function is used to register a section with a certain slug-name with WordPress. Here, the$idis the slug-name to identify the section and is used in the ‘id’ attribute of tags.
add_settings_section( $id, $title, $callback, $page )- The
$titleis the formatted title of the section that will be shown as the heading for the section,$callbackis the function that will echo the content at the top of the section and$pageis the slug-name of the page that should match the$pageargument ofdo_settings_sections(), which in our case is “options_page”.
All the above parameters are required.
- The
add_settings_field() function that WordPress provides allows you to add a new field to a section.
add_settings_field( $id, $title, $callback, $page, $section, $args )- The
$id,$title,$callbackand$pageare used as previously explained. The$sectionis the slug-name of the section of the settings page in which to show the box and the$argsis used when outputting the field. Both$sectionand$argsare optional.
For the purpose of this article we will not introduce an extra function to sanitize our values. We will note however that it is highly recommended that you always sanitize your form fields.
Now we have two public methods that need to be introduced, the render_section() and the render_field().
For the render_section() method we will output just a heading for our section:
public function render_section() {
    ?>
    <h2><?php _e( 'Section #1', 'oop-menu-item-sub' ); ?></h2>
    <?php
}
For the render_field() method we will output 3 radio buttons with our choices for the HTML element:
public function render_field() {
    $stored_option = get_option( 'option_name' )['html_element'];
    ?>
    <input type="radio" name="option_name[html_element]" value="div" <?php checked( $stored_option, 'div' ); ?> /> div
    <input type="radio" name="option_name[html_element]" value="p" <?php checked( $stored_option, 'p' ); ?> /> p
    <input type="radio" name="option_name[html_element]" value="span" <?php checked( $stored_option, 'span' ); ?> /> span
    <?php
}
This should be the result you see now:
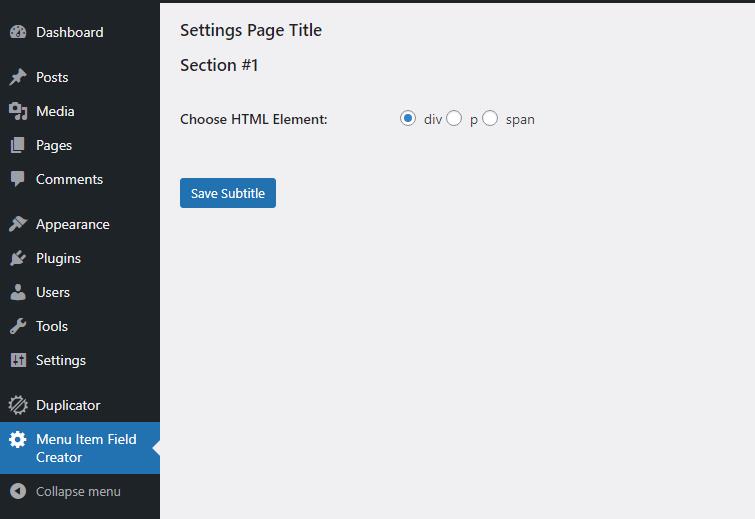
If you choose another element, like span for example, and save, it should also be working correctly.
Reflect Options Page Changes on your Website
The last step remaining to explain is how to apply the HTML element the admin users will choose to the subtitle element under the menu item on the front end of the website.
This step is really simple as the only thing we need is to retrieve the selected field from the database options table and modify the “My_Custom_Nav_Walker” Class in our code. Specifically, we will have to replace the part of code where we add the menu_item_sub entry to the $output variable.
$output .= '<div class="menu-item-sub">' . $menu_item_sub . '</div>';We will first get the element with get_option( 'option_name' )['html_element']; and keep it in a $stored_option variable and then apply it to the above line. The final Class should look like this:
if ( ! class_exists( 'My_Custom_Nav_Walker' ) ) {

    class My_Custom_Nav_Walker extends Walker_Nav_Menu {

        public function start_el( &$output, $item, $depth=0, $args=[], $id=0 ) {
            $menu_item_sub = get_post_meta( $item->ID, '_menu_item_sub', true );

            $output .= '<li class="' . implode( ' ', $item->classes ) . '">';
            if ( $item->url && $item->url != '#' ) {
                $output .= '<a href="' . $item->url . '">';
            } else {
                $output .= '<span>';
            }

            $output .= $item->title;
            if ( $item->url && $item->url != '#' ) {
                $output .= '</a>';
            } else {
                $output .= '</span>';
            }

            $stored_option = get_option( 'option_name' )['html_element'];
            if ( ! empty( $menu_item_sub ) ) {

		$output .= '<'. $stored_option .' class="menu-item-sub">' . $menu_item_sub . '</'. $stored_option .'>';
	    }

        }

    }
}
It helps sometimes to visualize how the WordPress functions work when building a settings page while looking at our plugin’s code. Here is how it looks in our example:
Conclusion
As you have hopefully realized, the WP Settings API is the main tool here that allows us to create the bones for our plugin’s options page. Other than that, it is your choice to decide whether you will use a more Object Oriented approach with Classes or use the simpler route where you just paste the functions and hooks in the main plugin PHP file.
Let’s point out here that the route we followed to reconstruct the plugin is not really OOP but definitely moved a step in that direction. If you are interested in taking your custom plugin to the next level, we highly recommend that you study our extensive series on how to create a WordPress plugin with object-oriented programming.
In these articles, we have tutorialized the techniques that will improve your plugin’s reusability and extensiveness, as well as security, scalability and maintenance. Don’t miss out on this valuable resource!
Creating a settings page for our custom plugin may become a little bit confusing but hopefully after reading this article, you understand what’s required. Happy coding!
Also Read
- Adding Custom Fields to WordPress Menu Items
- Adding Fields To The WordPress Menu Items – Custom Plugin
Start Your 14 Day Free Trial
Try our award winning WordPress Hosting!


