

Pressidium has dedicated a series of articles specifically focused on Object-Oriented Programming (OOP) in the development of a WordPress plugin. Our goal with this tutorial is that when you conclude reading this series, you’ll be confident to use OOP to create your own WordPress plugin or in other relevant situations.
This article offers a concise review of the highlights from this multi-part series. It provides the highlights of the series to get you closer to the concept. We strongly recommend though that you read the full series to fully comprehend the process of creating such plugins. You can also find the full code of the improved version of the plugin in our GitHub repository.
So let’s crack on!
Object-oriented programming (OOP) is a programming paradigm that is commonly used in software development and is compatible with many programming languages including PHP that WordPress is built on. This means that developers can use OOP principles and techniques when creating more efficient and maintainable WordPress websites and plugins.
Object-Oriented vs Procedural programming
Object-Oriented Programming (OOP) is a style of programming that is different from procedural programming that WordPress developers are probably used to. It is used to solve more complicated problems, allowing for scalable and secure solutions.
In our overview of the series, before we get into the plugin development, we get familiar with the OOP concept and mindset both in general and around WordPress. We compare the benefits of Object-Oriented Programming (OOP) to procedural programming commonly used in WordPress development. Specifically, we highlight how OOP can effectively address the limitations and messy coding resulting from procedural programming. We also explain the way of thinking behind this programming style, and when or why a certain project should better be written in object-oriented code.
How Object-Oriented Programming Solves Problems: Classes and Objects
Object-oriented programming has two important concepts: Classes and Objects. Classes are a template used to make objects, while Objects have their own methods and set of properties.
To create an OOP solution, you actually connect these “bricks” in a certain way. First, you define the problem and what the application should do to solve it. Then describe and visualize the classes and their relationships and then turn everything into code. Lastly, you review and test the project, and rewind and re-design, if necessary until you eventually get the desired results.
The Features of Object-Oriented Programming
Object-Oriented programming has three valuable characteristics: encapsulation, inheritance and polymorphism. Encapsulation groups the data and behavior inside a single entity, while inheritance gives the ability to reuse code between classes. Polymorphism is what makes all those relationships work together, defining what your Classes have in common, how to reuse these common elements and whether they are related to anything else. These characteristics make OOP more robust and secure, as well as easier to maintain and use.
Let’s get more familiar with the help of a real-life example.
Object-Oriented vs Procedural Programming: Real World Example
Now that we spelled out the theory behind Object-Oriented programming, in Part 2, we showcase the advantage of OOP over procedural programming through the real-world example of sending messages via your phone.
A Real-Life Scenario: Sending an SMS
A simplified scenario of sending a text message to one of your contacts includes
- preparing the message in the device editor
- selecting the recipient, and finally
- sending the message.
The Application with a Procedural Approach
In a procedural approach of the example above, maybe a variable would hold the text content, a function with a “contact” parameter would return the phone number, and a function would send the message.
So, you would complete a series of tasks that will lead you to the desired result. Procedural programming is more than enough to achieve your goal, but if the application could expand in the future, it could have issues in terms of scalability.
Expanding the Application with the Procedural Approach
An application can be improved by providing, let’s say, the ability to send other kinds of messages, such as an email. To do this, the function that delivers the message must be different depending on the type of technology used, such as email or SMS.
In a procedural way, If we had different types of messages, some statements would become annoyingly large and you would likely have to add more and more parameters along the way. As your code grows, functions would probably be scattered, forcing you to copy/paste code and potentially breaking other functions.
Object-oriented programming (OOP) helps us structure our plugin into small, reusable bricks that avoid this and allows you to add features to your code without changing the structure.
Programming the Application with an Object Oriented Approach
So, there is a device which has an interface that we use to send the SMS message. We have the message content, we choose a contact as a recipient and finally the message.
<?php
/**
 * Plugin Name: Send Message
*/

interface MessagingCapable {
    public function send_message( $contact, $message );
}

class Phone implements MessagingCapable {
    public function send_message( $contact, $message ) {
        print "You sent" . $message ;
    }
}

function say_hi( MessagingCapable $device, $contact, $message ) {
    $device->send_message( $contact, $message );
}
The function requires 3 parameters:
- a device that supports messaging
- a contact and
- a message
We declare the Phone class which implements the MessagingCapable interface. So we have to implement all the methods declared in it. The say_hi() function requires 3 parameters:
- A device that supports messaging
- A contact
- The message
In order to actually send a message we use this function like this:
$phone = new Phone();
say_hi( $phone, "John Doe", "Hello John" );
This would output: You sent "Hello John"
Now, how could we expand this following the OOP approach?
Expanding the Application
To add the ability to send emails, as we did before procedurally, you would go like this:
<?php
/**
 * Plugin Name: Send Message
*/

interface MessagingCapable {
    public function send_message( $contact, $message );
}

class Phone implements MessagingCapable   {
    public function send_message( $contact, $message ) {
        print ('You sent a "' . $message . '" SMS to ' . $contact );
    }
}

class Computer implements MessagingCapable {
    public function send_message( $contact, $message ) {
        print ('You sent a "' . $message . '" email to ' . $contact );
    }
}

function say_hi( MessagingCapable $device, $contact, $message ) {
    $device->send_message( $contact, $message );
}
When we use this piece of code, we would pick up the mobile device to send an SMS and the computer to send an email. We would either:
say_hi ( new Phone(), "John Doe", "Hello John" );or:
say_hi ( new Computer(), "John Doe", "Hello John" );that would output You sent a “Hello John” SMS to John Doe and You sent a “Hello John” email to John Doe correspondingly.
Now let’s try adding some more functionality: the ability to browse the internet.
interface InternetBrowsingCapable {
    public function visit_website( $url );
}
The implementation of this interface will be coded like this:
class Computer implements MessagingCapable, InternetBrowsingCapable {
    public function send_message( $contact, $message ) {
        print ('You sent a "' . $message . '" email to ' . $contact );
    }
    public function visit_website( $url ) {
        print ('You visited "' . $url );
    }
}
As visiting a url is totally irrelevant with the say_hi() function we will also introduce a new function, something like:
function visit_url( InternetBrowsingCapable $device, $url ) {
    $device->visit_website( $url );
}
And that’s it! For any device that can visit a URL we can use this function without worrying that you will break the rest of functionality.
Inside our detailed article on this, you will find more examples and also diagrams of what we described above.
Try our Award-Winning WordPress Hosting today!


Next, we will create a copy of the Limit Login Attempts plugin version 1.7.1 created by Johan Eenfeldt. We will follow the whole process of converting this plugin to an OOP WordPress plugin, step by step.
We are confident that, once you’ve finished reading this article series, you can create an OOP plugin of your own.
Defining the Scope of Your WordPress Plugin
To follow along, you can download, install and activate Limit Login Attempts version 1.7.1 of the plugin.
The admin page of the plugin looks like this:
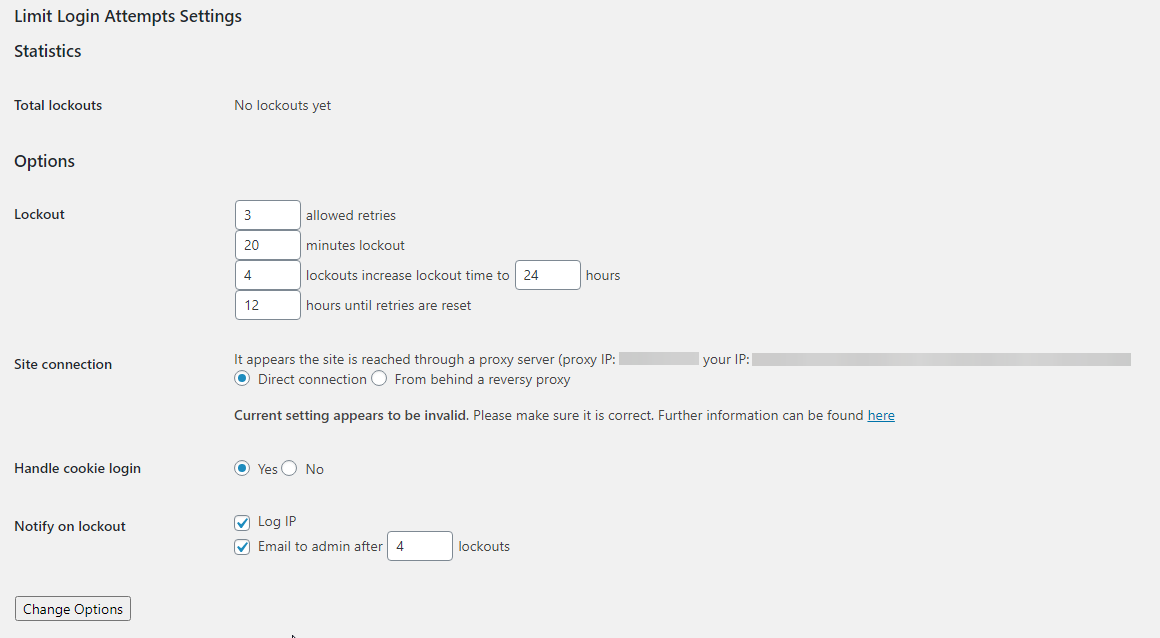
What it does is:
- Limits the number of retries when logging in (for each IP address), also providing a customizable limit
- Limits the number of attempts to log in using auth cookies in the same way
- Informs the user about their remaining retries or lockout time on the login page
- Notifies administrators when a user gets locked out
- Supports both direct and reverse proxy connections
- Offers a WordPress filter to whitelist IP addresses
Now let’s take a closer look at its flow.
Breaking it down
By hooking into various parts of WordPress during the authentication of a user, the plugin handles login/failed attempts, authentication, and locks IP addresses out if necessary.
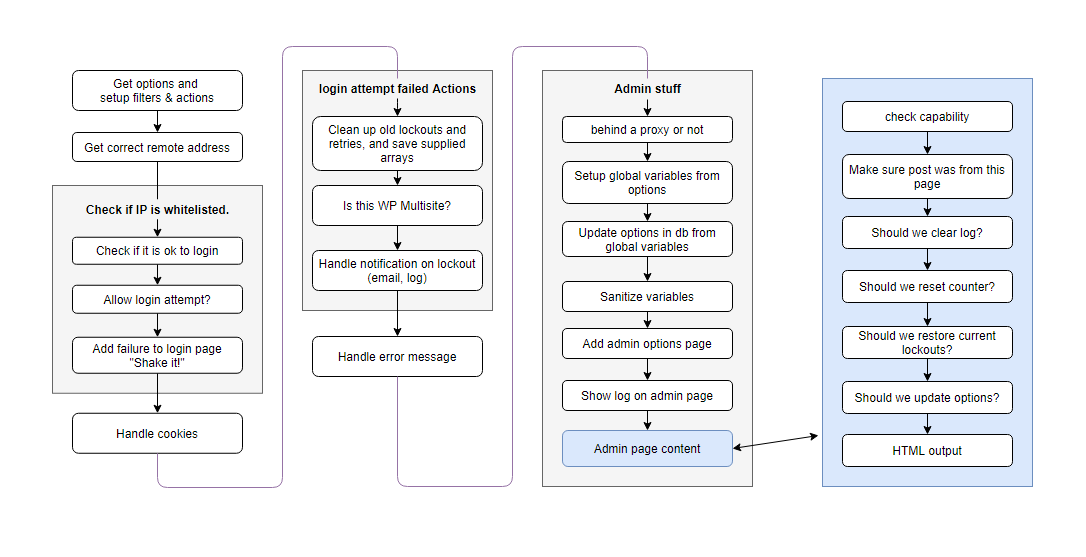
In the admin menu it provides the Configuration Options below:
- Client type
- Allowed retries
- Lockout duration
- Allowed lockouts
- Long duration
- Valid duration
- Cookies
- Lockout notify
- Notify email after
The plugin also handles error messages depending on the case.
If the user failed to login, it displays the remaining retries. If a user is already locked out, it will display the time remaining till their lockout gets lifted etc.
Now that we defined the requirements, next up, we will proceed with studying the design of our new plugin version.
Designing your WordPress OOP Plugin
In Part 4 of this tutorial on how to build a WordPress OOP plugin, we’ll discuss in detail how we came up with the design. Let’s sum it up.
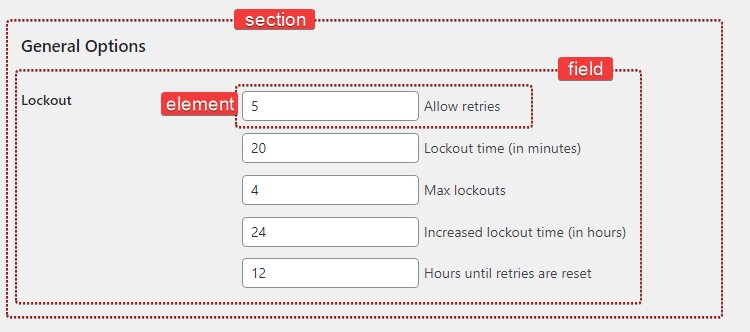
Dissecting the Settings Page
Inspired from the plugin‘s settings page structure, we notice that there is:
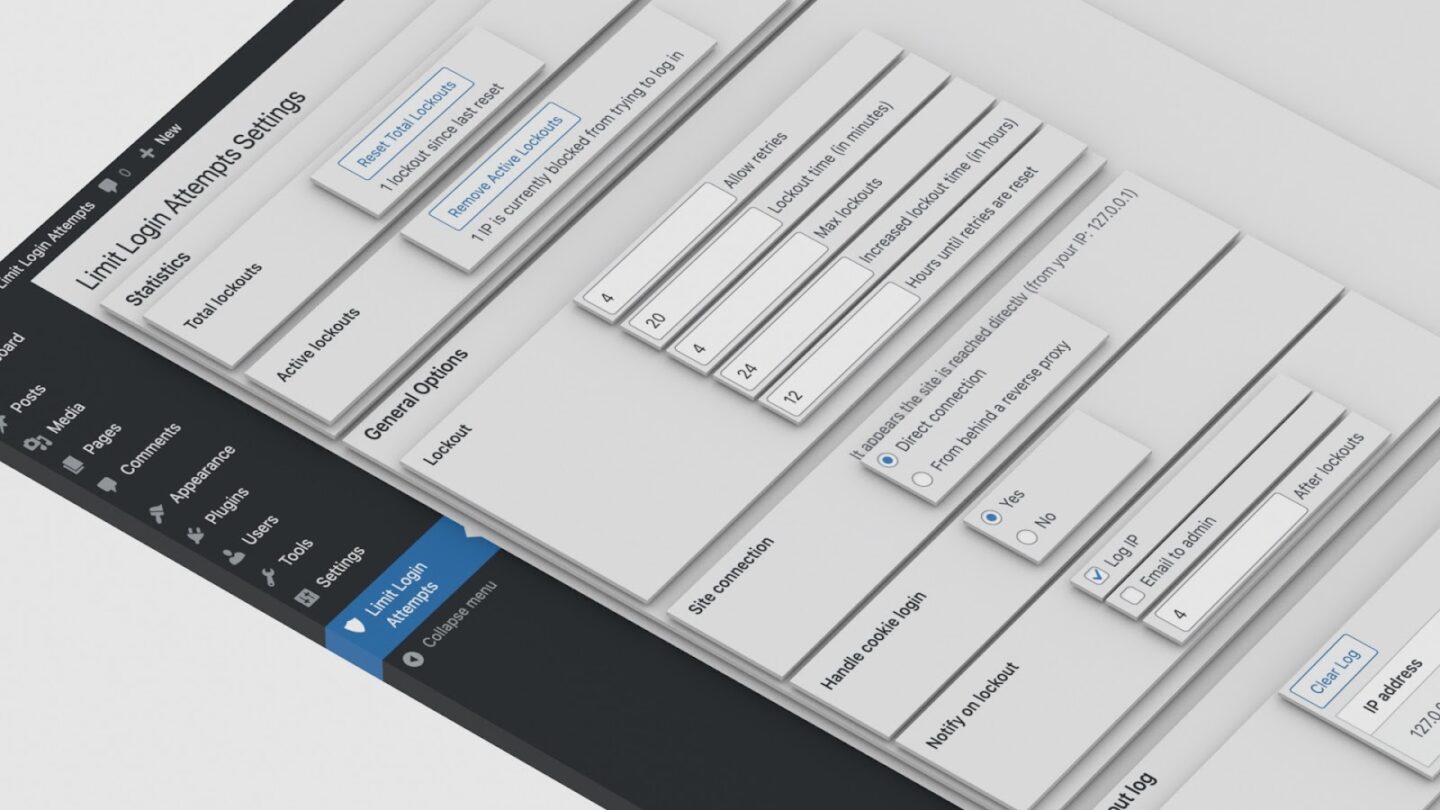
- A page (“Limit Login Attempts Settings”)
- A number of sections (eg “Statistics”)
- A group of fields for each section (text fields, radio buttons, checkboxes) or just information that the admin user cannot directly modify
As a better alternative, we decided to go like this:
Pages → Sections → Fields → Elements
where other classes will extend the Element class, in order to instantiate the desired type (checkboxes, radio buttons etc.).
We may also need to add more pages and sections in the future. The same goes for the fields. So some classes need to be extendable.
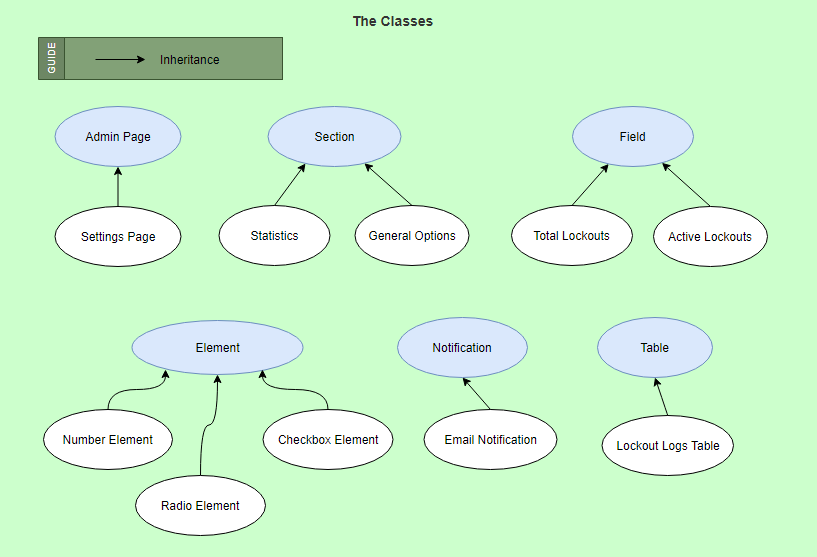
The above diagram, of course, does not include all “components”.
Thinking and Abstracting
Brainstorming the components functionality we notice that some functionality will be common.

The parent classes: Statistics, Lockout Logs, Table, and Element classes implement the UI interface.
Main Plugin File
Depending on how the classes of our plugin will work together, the main class will have to instantiate most of them. In our case, it will include classes related to options, admin pages, retries and lockouts. Other potential Classes will be:
- Retries
- Lockouts
- Cookies
- Error messages
- Email notifications
- Admin notices
- Buttons
- Lockout logs
- Active/Total lockouts
- IP address
In the next section , we move on to the implementation phase.
Implementation of your WordPress OOP Plugin
Moving on with this tutorial, we will now discuss about the WordPress administration menu classes of the OOP plugin.
Let’s start by creating a prsdm-limit-login-attempts.php file, under our plugin directory (i.e. /wp-content/plugins/prsdm-limit-login-attempts) and insert the code below:
<?php

namespace Pressidium\Limit_Login_Attempts\Pages;

class Admin_Page {

    /**
     * Admin_Page constructor.
     */
    public function __construct() {
        add_action( 'admin_menu', array( $this, 'add_page' ) );
        add_action( 'admin_init', array( $this, 'register_sections' ) );
    }

    /**
     * Add this page as a top-level menu page.
     */
    public function add_page() {
        add_menu_page(
            $this->get_page_title(),    // page_title
            $this->get_menu_title(),    // menu_title
            $this->get_capability(),    // capability
            $this->get_slug(),          // menu_slug
            array( $this, 'render' ),   // callback function
            protected function get_icon_url() {
                return 'dashicons-admin-generic';
            }
            $this->get_position()       // position
        );
    }

    /**
     * Register sections.
     */
    public function register_sections() {
        // TODO: Implement this method.
    }

    /**
     * Render this admin page.
     */
    public function render() {
        ?>

        <div class="wrap">
            <form action="options.php" method="post">
                <h1><?php echo esc_html( $this->get_page_title() ); ?></h1>
                <?php
                settings_fields( $this->get_slug() );
                do_settings_sections( $this->get_slug() );
                submit_button( __( 'Change Options', 'prsdm-limit-login-attempts' ) );
                ?>
            </form>
        </div>

        <?php
    }


    protected function get_page_title() { /* ... */ }
    protected function get_menu_title() { /* ... */ }
    protected function get_capability() { /* ... */ }
    protected function get_slug() { /* ... */ }
    protected function get_icon_url() { /* ... */ }
    protected function get_position() { /* ... */ }

}
In a nutshell:
- We created a generic Admin_Page Class that can we can extend in order to create the settings page or any other pages we want in the future.
- We used the Pressidium\Limit_Login_Attempts\Pages namespace to avoid name collisions.
- We declared the add_page() and register_sections() methods that we defined as protected, so they can be accessed only within the class itself and by its child/parent classes
- We replaced our hardcoded values in add_page() with a few methods
- We set a generic icon for all menu pages, by defining our get_icon_url() method
- We also defined the render() method there as well, as it will be common for all child classes.
We can now create a separate Settings_Page that extends that Admin_Page base class and override the get_icon_url() or any other method in our child class, like so:
class Settings_Page extends Admin_Page {

    protected function get_icon_url() {
        return 'dashicons-shield-alt';
    }
    protected function get_slug() {
        return 'prsdm_limit_login_attempts_settings';
    }
}
That’s a great example of inheritance, one of the core concepts of object-oriented programming. When extending a class, the child class—Settings_Page, in this case—inherits all of the public and protected methods, properties, and constants from the parent class.
For a more detailed explanation of the above code, please visit the implementation part of the series.
Registering the Sections
It is now time to register the sections, fields, and elements.
Here is the code we want to use for the related method:
public function register_sections() {
    $my_section = $this->register_section( /* ... */ );
    $my_field   = $my_section->add_field( /* ... */ );
    $my_element = $my_field->add_element( /* ... */ );
}
We can already tell that we’ll probably need to create three new classes: Section, Field, and Element.
The Section Class
We need to call add_settings_section(), when a new section is created, using the constructor method once again.
<?php

class Section {

    /**
     * @var Field[] Section field objects.
     */
    protected $fields = array();

    /**
     * @var string Section title.
     */
    private $title;

    /**
     * @var string Section id.
     */
    private $id;

    /**
     * @var string Slug-name of the settings page this section belongs to.
     */
    private $page;

    /**
     * @var string Section description.
     */
    private $description;

    /**
     * Section constructor.
     *
     * @param string $id          Section id.
     * @param string $title       Section title.
     * @param string $page        Slug-name of the settings page.
     * @param string $description Section description.
     */
    public function __construct( $id, $title, $page, $description ) {
        $this->id          = $id;
        $this->title       = $title;
        $this->page        = $page;
        $this->description = $description;

        add_settings_section(
            $this->id,
            $this->title,
            array( $this, 'print_description' ),
            $this->page
        );
    }

    /**
     * Print the section description.
     */
    public function print_description() {
        echo esc_html( $this->description );
    }

    /**
     * Create and add a new field object to this section.
     */
    public function add_field() {
        $field = new Field( /* ... */ );

        $this->fields[] = $field;

        return $field;
    }

}
NOTE: Beware that $this->title refers to the title class property, where $title refers to the constructor’s argument. We also declared our $title property as private to prevent it from being accessed outside the class (visibility principle).
We can use the code to set the title of the section like this:
$section = new Section();
$section->title = __( 'Hello world', 'prsdm-limit-login-attempts' );
The Field Class
In a similar way to Section, we can now proceed and build the Field class
class Field {

    /**
     * @var int Number of fields instantiated.
     */
    private static $number_of_fields = 0;

    /**
     * @var Element[] Field elements.
     */
    private $elements = array();

    /**
     * @var string ID of the section this field belongs to.
     */
    private $section_id;

    /**
     * @var string Field description.
     */
    private $description;

    /**
     * Field constructor.
     *
     * @param string $section_id  ID of the section this field belongs to.
     * @param string $page        Slug-name of the settings page.
     * @param array  $options     Options.
     */
    public function __construct( $section_id, $page, $options = array() ) {
        self::$number_of_fields++;

        $options = wp_parse_args(
            $options,
            array(
                'label'       => sprintf(
                    /* translators: %s is the unique s/n of the field. */
                    __( 'Field #%s', 'prsdm-limit-login-attempts' ),
                    self::$number_of_fields
                'id'          => 'field_' . self::$number_of_fields,
                'description' => ''
            )
        );

        $this->section_id  = $section_id;
        $this->description = $options['description'];

        add_settings_field(
            $options['id'],
            $options['label'],
            array( $this, 'render' ),
            $page,
            $this->section_id
        );
    }

    /**
     * Create a new element object.
     *
     * @return Element
     */
    private function create_element( $element_type, $options ) {
        $element_type = __NAMESPACE__ . '\\Elements\\' . $element_type;

        if ( ! class_exists( $element_type ) ) {
            throw new Exception( 'No class exists for the specified type' );
        }

        $element = new $element_type( $this->section_id, $options );

        if ( ! ( $element instanceof Element ) ) {
            throw new Exception( 'The specified type is invalid' );
        }

        return $element;
    }

    /**
     * Add a new element object to this field.
     *
     * @param string $element_type
     * @param array  $options
     */
    public function add_element( $element_type, $options ) {
        try {
            $element = $this->create_element( $element_type, $options );
            $this->elements[] = $element;
        } catch ( Exception $e ) {
            // Handle the exception
        }
    }

    /**
     * Render the field.
     */
    public function render() {
        if ( ! empty( $this->description ) ) {
            printf(
                '<p class="description">%s</p>',
                esc_html( $this->description )
            );
        }

        foreach ( $this->elements as $key => $element ) {
            $element->render();
        }
    }

}
NOTE: The private function create_element, and public function add_element contents will make sense in the next section about the Element Class.
So, we passed an options array to the constructor to provide default values for the ID, label, and description of the field. The wp_parse_args() function will allow us to merge the user defined values (the $options array) with the default values.
We also set the label to a prefix (‘field_’) followed by a number, which will be increased every time a new Field object is created, in order to have unique labels for each field. We made it a static property so that it can be accessed directly without having to create an instance of a class first.
'id' => 'field_' . self::$number_of_fieldsThe Element Class
Going forward, we’ll build the Element class in a similar fashion! The output should differ depending on the element type, so we’ll turn render() into an abstract method. That means, of course, that the class itself should also be abstract.
abstract class Element {

    /**
     * @var int Number of elements instantiated.
     */
    private static $number_of_elements = 0;

    /**
     * @var string Element label.
     */
    protected $label;

    /**
     * @var string Element name.
     */
    protected $name;

    /**
     * @var mixed Element value.
     */
    protected $value;

    /**
     * Element constructor.
     *
     * @param string $section_id Section ID.
     * @param array  $options    Options.
     */
    public function __construct( $section_id, $options = array() ) {
        self::$number_of_elements++;

        $options = wp_parse_args(
            $options,
            array(
                'label' => sprintf(
                    /* translators: %s is the unique s/n of the element. */
                    __( 'Element #%s', 'prsdm-limit-login-attempts' ),
                    self::$number_of_elements
                ),
                'name'  => 'element_' . self::$number_of_elements
            )
        );

        $this->label = $options['label'];
        $this->name  = $options['name'];
        $this->value = '';
    }

    /**
     * Render the element.
    */
    public function render() {
        ?>

        <fieldset>
            <label>
                <input
                    type="number"
                    name="<?php echo esc_attr( $this->name ); ?>"
                    id="<?php echo esc_attr( $this->name ); ?>"
                    value="<?php echo esc_attr( $this->value ); ?>"
                />
                <?php echo esc_html(); ?>
            </label>
        </fieldset>

        <?php
    }

}
NOTE: We used the esc_attr() and esc_html() WordPress functions to sanitize the input and prevent any cross-site scripting attacks. So, for example, a Number_Element class would look like this:
class Number_Element extends Element {

    /**
     * Render the element.
     */
    public function render() {
        ?>

        <fieldset>
            <label>
                <input
                    type="number"
                    name="<?php echo esc_attr( $this->name ); ?>"
                    id="<?php echo esc_attr( $this->name ); ?>"
                    value="<?php echo esc_attr( $this->value ); ?>"
                />
                <?php echo esc_html(); ?>
            </label>
        </fieldset>

        <?php
    }

}
Notice that:
- We can use any child class in place of its parent class without any unexpected behavior (Substitutability principle)
- we’re building our classes so they can all be used in the same way. Calling the render() method on any child of Element will output some HTML (polymorphism)
- all child objects can be used in the exact same way (i.e. calling their render() method), while still being able to behave differently (inheritance)
Extending your WordPress OOP Plugin
Getting closer to the end of this tutorial series, we would like to share how you can also extend your WordPress OOP plugin functionality. The way we handled this, we should be able to extend a class like Admin_Page and reuse it, but we shouldn’t have to modify it to do that.
These base classes do not include any code that needs to be changed to add a new page, section, or element.
Moving on, we’ll take a closer look at how we can improve the way we manage our WordPress hooks.
Managing WordPress Hooks
Up to this point, interacting with the Plugin API meant calling add_action() and add_filters() in the constructor of each class.
Now, here is the problem with that: If an object registers all of its hooks when it’s created, things like unit testing become tricky.
If you need to go this further and make a product that allows you to test your entities in isolation, you can study our part 7 of the series where we introduce the Hooks Manager. It’s a new class that is responsible for the better handling of registering all of our hooks.
There you can learn more about interfaces in Object-Oriented programming and Interface Segregation as a principle.
We use an interface for each class that needs to register hooks to implement. You can think of an interface as a contract, where a class that implements that interface is “contractually bound” to implement all methods defined in that interface.
Interface Segregation
We can fix this by splitting our interface into smaller, more specific ones so our classes will only have to know about the methods that are of interest to them.
class Hooks_Manager {

    /**
     * Register the actions of the given object.
     *
     * @param object $object
     */
    private function register_actions( $object ) {
        $actions = $object->get_actions();

        foreach ( $actions as $action_name => $action_details ) {
            $method        = $action_details[0];
            $priority      = $action_details[1];
            $accepted_args = $action_details[2];

            add_action(
                $action_name,
                array( $object, $method ),
                $priority,
                $accepted_args
            );
        }
    }

    /**
     * Register the filters of the given object.
     *
     * @param object $object
     */
    private function register_filters( $object ) {
        $filters = $object->get_filters();

        foreach ( $filters as $filter_name => $filter_details ) {
            $method        = $filter_details[0];
            $priority      = $filter_details[1];
            $accepted_args = $filter_details[2];

            add_filter(
                $filter_name,
                array( $object, $method ),
                $priority,
                $accepted_args
            );
        }
    }

}
To actually use the hooks manager:
$hooks_manager = new Hooks_Manager();
$hooks_manager->register( $login_error );
$hooks_manager->register( $cookie_login );
This is actually one of the ways to do this in an object-oriented approach.
Next, in the last part, we will see how we can better handle the options.
Our WordPress OOP plugin’s options
Our OOP plugin has to be able to read/write options itself to “remember” how many times an IP address has attempted to login unsuccessfully, if it’s currently locked out, etc.
Let’s start by turning options into an interface:
interface Options {

    /**
     * Return the option value based on the given option name.
     *
     * @param string $name Option name.
     * @return mixed
     */
    public function get( $name );

    /**
     * Store the given value to an option with the given name.
     *
     * @param string $name       Option name.
     * @param mixed  $value      Option value.
     * @param string $section_id Section ID.
     * @return bool              Whether the option was added.
     */
    public function set( $name, $value, $section_id );

    /**
     * Remove the option with the given name.
     *
     * @param string $name       Option name.
     * @param string $section_id Section ID.
     */
    public function remove( $name, $section_id );

}
Ideally, we’d be able to interact with the WordPress Options API, by doing something like this:
$options = new WP_Options();
$options->get( 'retries' );
Our WP_Options class is going to implement our Options interface.
class WP_Options implements Options {
    private $options;
    public function __construct() {
        $this->options = get_option( Plugin::PREFIX );
    }

    /**
     * Return the option value based on the given option name.
     *
     * @return mixed
     */
    public function get( $option_name ) {
        if ( ! isset( $this->options[ $option_name ] ) ) {
            return false;
        }
        return $this->options[ $option_name ];
    }
}
At this point, you might be wondering why we don’t just use the get_option() WordPress function, instead of going into the trouble of creating our own interface and class. That is because we want to go a step further and create an interface to depend on, to stay flexible.
For instance, we might need to store our options in a custom table, in an external database, in memory (e.g. Redis), you name it. By depending on an abstraction (i.e. interface), changing something in the implementation is as simple as creating a new class implementing the same interface.
Default options
Now it’s a good time to think about default options.
const DEFAULT_OPTIONS = array(
    'general_options' => array(
        'allowed_retries'                  => 4,
        'normal_lockout_time'              => 1200,  // 20 minutes
        'max_lockouts'                     => 4,
        'long_lockout_time'                => 86400, // 24 hours
        'hours_until_retries_reset'        => 43200, // 12 hours
        'site_connection'                  => 'direct',
        'handle_cookie_login'              => 'yes',
        'notify_on_lockout_log_ip'         => true,
        'notify_on_lockout_email_to_admin' => false,
        'notify_after_lockouts'            => 4
    ),
    'state' => array(
        'lockouts'       => array(),
        'retries'        => array(),
        'lockout_logs'   => array(),
        'total_lockouts' => 0
    )
);
Next, we need to store the default option values in the database upon the plugin’s initialization.
class WP_Options {

    public function __construct() {
        $all_options = array();

        foreach ( self::DEFAULT_OPTIONS as $section_id => $section_default_options ) {
            $db_option_name  = Plugin::PREFIX . '_' . $section_id;
            $section_options = get_option( $db_option_name );

            if ( $section_options === false ) {
                add_option( $db_option_name, $section_default_options );
                $section_options = $section_default_options;
            }

            $all_options = array_merge( $all_options, $section_options );
        }

        $this->options = $all_options;
    }

}
- We retrieve all options using the get_option() WordPress function in its constructor.
- We declared it private so it may only be accessed by the class that defined it, the WP_Options class.
We’ve bundled everything together in a single class. All options-related data (i.e. our properties) and the implementation details (i.e. the methods we just implemented) are encapsulated in the WP_Options class.
In our separate article on options implementation, we demonstrate how we further improved the options handling by satisfying principles like Encapsulation, Abstraction, the Dependency Inversion Principle, Decoupling, Single Responsibility,
Revisiting the main plugin file
Let’s wrap everything in a Plugin class, this time just to avoid naming collisions.
namespace Pressidium\Limit_Login_Attempts;

if ( ! defined( 'ABSPATH' ) ) {
    exit;
}

class Plugin {

    /**
     * Plugin constructor.
     */
    public function __construct() {
        // ...
    }

}
new Plugin();
public function __construct() {
    add_action( 'plugins_loaded', array( $this, 'init' ) );
}

public function init() {
    // Initialization
}
public function __construct() {
    $this->require_files();
    add_action( 'plugins_loaded', array( $this, 'init' ) );
}

private function require_files() {
    require_once __DIR__ . '/includes/Sections/Section.php';
    require_once __DIR__ . '/includes/Pages/Admin_Page.php';
    require_once __DIR__ . '/includes/Pages/Settings_Page.php';
    // ...
}
public function init() {
    $options       = new Options();
    $hooks_manager = new Hooks_Manager();

    $settings_page = new Settings_Page( $options );
    $hooks_manager->register( $settings_page );
    // ...
}
So, we instantiated this Plugin class at the end of the file, which is going to execute the code in its constructor.
In the constructor we’ll hook into the plugins_loaded action, which fires once activated plugins have loaded.
We’ll also call a require_files() method to load all of our PHP files.
Finally, we’ll initialize our plugin by creating some objects in our init() method.
NOTE: The following snippet contains only a small part of the main plugin file. We remind you that you can read the actual file at the plugin’s GitHub repository.
Organizing the files
Keeping your files organized is vital. So following the namespace hierarchy to organize our directories and files, we ended up with this structure:
.
├── includes
│   ├── Hooks
│   │   ├── Actions.php
│   │   ├── Filters.php
│   │   └── Hooks_Manager.php
│   ├── Pages
│   │   ├── Admin_Page.php
│   │   └── Settings_Page.php
│   ├── Sections
│   │   ├── Fields
│   │   │   ├── Elements
│   │   │   │   ├── Checkbox_Element.php
│   │   │   │   ├── Custom_Element.php
│   │   │   │   ├── Element.php
│   │   │   │   ├── Number_Element.php
│   │   │   │   └── Radio_Element.php
│   │   │   └── Field.php
│   │   └── Section.php
│   └── WP_Options.php
├── prsdm-limit-login-attempts.php
└── uninstall.php
Conclusion
Hopefully, you are now more familiar with what Object Oriented programming has to offer and are excited to start applying what you learned on your own projects!
However, we barely scratched the surface of what object-oriented programming is and has to offer. Getting good at a new skill takes practice, so , starting from this tutorial, go ahead and start building your own OOP WordPress plugins.
Happy coding!
See Also
- Part 1 – WordPress and Object-Oriented Programming – An Overview
- Part 2 – WordPress and Object Oriented Programming: A Real World Example
- Part 3 – WordPress and Object Oriented Programming: A WordPress Example – Defining the Scope
- Part 4 – WordPress and Object Oriented Programming: A WordPress Example – Design
- Part 5 – WordPress and Object Oriented Programming: A WordPress Example – Implementation: The Administration Menu
- Part 6 – WordPress and Object Oriented Programming: A WordPress Example – Implementation: Registering the Sections
- Part 7 – WordPress and Object Oriented Programming: A WordPress Example – Implementation: Managing WordPress Hooks
- Part 8 – WordPress and Object Oriented Programming: A WordPress Example – Implementation: Options
Start Your 14 Day Free Trial
Try our award winning WordPress Hosting!


