

Welcome back to our series on Object Oriented Programming.
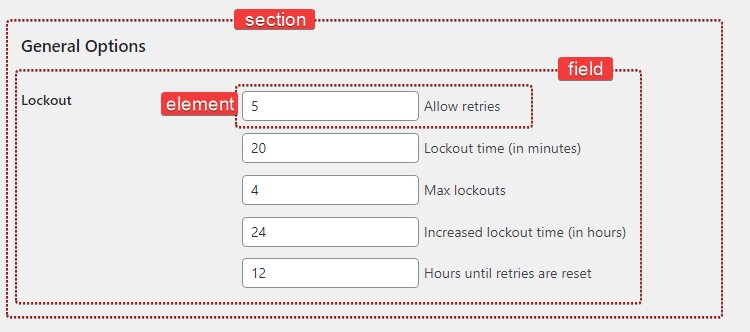
As we explained in the Design part of the series, an admin page consists of sections. Each section contains one or more fields, and each of those fields contain one or more elements.
How would that look in code?
public function register_sections() {
    $my_section = $this->register_section( /* ... */ );
    $my_field   = $my_section->add_field( /* ... */ );
    $my_element = $my_field->add_element( /* ... */ );
}
Alright, that seems easy to use and we can already tell that we’ll probably need to create three new classes: Section, Field, and Element.
class Section {}class Field {}class Element {}Let’s take a moment and ask ourselves what we know so far about these classes.
$my_section->add_field()→ TheSectionclass should be able to add (and store) a newFieldobject$my_field->add_element()→ TheFieldclass should be able to add (and store) a newElementobject.
We start by storing our Field objects in an array, as we would normally do:
class Section {

    /**
     * @var Field[] Section field objects.
     */
    protected $fields = array();
This $fields variable is a class member and it’s what we call a property. Properties are PHP variables, living in a class, and they can be of any data type (string, integer, object, etc.).
We’ll also write the add_field() method to create and add a new field.
public function add_field() {
    $field = new Field( /* ... */ );

    $this->fields[] = $field;

    return $field;
}
This method creates a new Field object, adds it to the fields property and returns that newly-created object. Pretty straightforward.
Let’s repeat the same process for the Field class as well.
class Field {

    /**
     * @var Element[] Field elements.
     */
    private $elements = array();

    /**
     * Create a new element object.
     *
     * @return Element
     */
    private function create_element() {
        return new Element( /* ... */ );
    }

    /**
     * Add a new element object to this field.
     */
    public function add_element() {
        $element = $this->create_element();

        $this->elements[] = $element;
    }

}
That’s a start! What’s next?
The Section Class
We need to call add_settings_section(), when a new section is created. Once again, the constructor method is a great way to perform our initialization. Let’s add it in the class:
class Section {

    // ...

    public function __construct() {
        add_settings_section(
            $this->id,
            $this->title,
            array( $this, 'print_description' ),
            $this->page
        );
    }

}
It seems that a Section needs a slug-name to identify it (used in the id attribute of tags). It can also have a title, a description, and belongs to a specific page.
class Section {

    /**
     * @var Field[] Section field objects.
     */
    protected $fields = array();

    /**
     * @var string Section title.
     */
    public $title;

    /**
     * @var string Section id.
     */
    public $id;

    /**
     * @var string Slug-name of the settings page this section belongs to.
     */
    public $page;

    /**
     * @var string Section description.
     */
    public $description;
We could set the title of the section, by doing something like this:
$section = new Section();
$section->title = __( 'Hello world', 'prsdm-limit-login-attempts' );
Well, that’s not quite right. Even though the code above it’s perfectly valid, it doesn’t actually do what we expect it to do.
The constructor method is executed when a new Section object is created. So add_settings_section() will be called before we even get a chance to set the title. As a result, the section won’t have a title.
Try our Award-Winning WordPress Hosting today!


The title needs to be available during the initialization of our object, so we need to do this in the constructor.
class Section {

    /**
     * @var string Section title.
     */
    private $title;

    public function __construct( $title ) {
        $this->title = $title;
        // ...
    }

    // ..
Beware that $this->title refers to the title class property, where $title refers to the constructor’s argument.
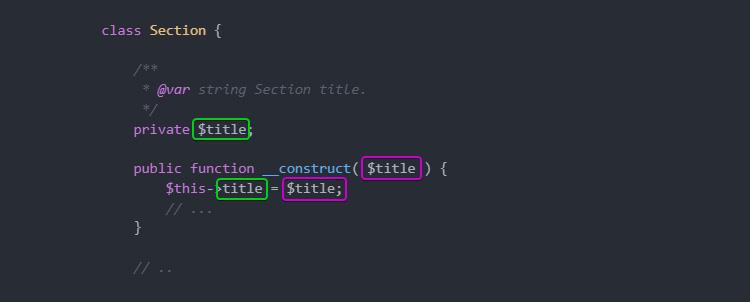
Here, we also take advantage of the visibility. Since our $title property will only be accessed by the class that defined it, we can declare it private. Therefore, we prevent it from being accessed outside the class.
Oh, and we also have to add a print_description() method which is going to, well, print the section’s description.
/**
 * Print the section description.
 */
public function print_description() {
    echo esc_html( $this->description );
}
Putting all together, our Section class looks like this.
class Section {

    /**
     * @var Field[] Section field objects.
     */
    protected $fields = array();

    /**
     * @var string Section title.
     */
    private $title;

    /**
     * @var string Section id.
     */
    private $id;

    /**
     * @var string Slug-name of the settings page this section belongs to.
     */
    private $page;

    /**
     * @var string Section description.
     */
    private $description;

    /**
     * Section constructor.
     *
     * @param string $id          Section id.
     * @param string $title       Section title.
     * @param string $page        Slug-name of the settings page.
     * @param string $description Section description.
     */
    public function __construct( $id, $title, $page, $description ) {
        $this->id          = $id;
        $this->title       = $title;
        $this->page        = $page;
        $this->description = $description;

        add_settings_section(
            $this->id,
            $this->title,
            array( $this, 'print_description' ),
            $this->page
        );
    }

    /**
     * Print the section description.
     */
    public function print_description() {
        echo esc_html( $this->description );
    }

    /**
     * Create and add a new field object to this section.
     */
    public function add_field() {
        $field = new Field( /* ... */ );

        $this->fields[] = $field;

        return $field;
    }

}
The Field Class
In a similar way to Section, we can now proceed and build the Field class, which is going to utilize the add_settings_field() WordPress function.
class Field {

    /**
     * @var Element[] Field elements.
     */
    private $elements = array();


    /**
     * @var string ID of the section this field belongs to.
     */
    private $section_id;

    /**
     * @var string Field description.
     */
    private $description;

    /**
     * Field constructor.
     *
     * @param string $id          Field ID.
     * @param string $label       Field label.
     * @param string $page        Slug-name of the settings page.
     * @param string $section_id  ID of the section this field belongs to.
     * @param string $description Field description.
     */
    public function __construct( $id, $label, $page, $section_id, $description ) {
        $this->section_id  = $section_id;
        $this->description = $description;

        add_settings_field(
            $id,
            $label,
            array( $this, 'render' ),
            $page,
            $this->section_id
        );
    }

}
Here, we’d also like to provide default values for the ID, label, and description of the field. We can do this by passing an options array to the constructor and use the wp_parse_args() WordPress function to parse those options.
class Field {

    /**
     * @var int Number of fields instantiated.
     */
    private static $number_of_fields = 0;

    // ...

    /**
     * Field constructor.
     *
     * @param string $section_id  ID of the section this field belongs to.
     * @param string $page        Slug-name of the settings page.
     * @param array  $options     Options.
     */
    public function __construct( $section_id, $page, $options = array() ) {
        self::$number_of_fields++;

        $options = wp_parse_args(
            $options,
            array(
                'label'       => sprintf(
                    __( 'Field #%s', 'prsdm-limit-login-attempts' ),
                    self::$number_of_fields
                'id'          => 'field_' . self::$number_of_fields,
                'description' => ''
            )
        );

        $this->section_id  = $section_id;
        $this->description = $options['description'];

        add_settings_field(
            $options['id'],
            $options['label'],
            array( $this, 'render' ),
            $page,
            $this->section_id
        );
    }

}
The wp_parse_args() function will allow us to merge the user defined values (the $options array) with the default values.
array(
    'label'       => sprintf(
        __( 'Field #%s', 'prsdm-limit-login-attempts' ),
        self::$number_of_fields
    'id'          => 'field_' . self::$number_of_fields,
    'description' => ''
)
We also have to set unique labels for each field. We can handle this by setting the label to a prefix ('field_') followed by a number, which will be increased every time a new Field object is created. We’ll store this number in the $number_of_fields static property.
/**
 * @var int Number of fields instantiated.
 */
private static $number_of_fields = 0;
A static property can be accessed directly without having to create an instance of a class first.
'id' => 'field_' . self::$number_of_fieldsThe self keyword is used to refer to the current class and, with the help of the scope resolution operator :: (commonly called “double colon”), we can access our static property.
That way, in the constructor, we always access the same $number_of_fields property, increasing its value each time an object is created, which results in a unique label attached to each field.
Going forward, the render() method, after printing the description (if one exists), iterates through all the elements and renders each one of them.
public function render() {
    if ( ! empty( $this->description ) ) {
        printf(
            '<p class="description">%s</p>',
            esc_html( $this->description )
        );
    }

    foreach ( $this->elements as $key => $element ) {
        $element->render();
    }
}
Putting it all together…
class Field {

    /**
     * @var int Number of fields instantiated.
     */
    private static $number_of_fields = 0;

    /**
     * @var Element[] Field elements.
     */
    private $elements = array();

    /**
     * @var string ID of the section this field belongs to.
     */
    private $section_id;

    /**
     * @var string Field description.
     */
    private $description;

    /**
     * Field constructor.
     *
     * @param string $section_id  ID of the section this field belongs to.
     * @param string $page        Slug-name of the settings page.
     * @param array  $options     Options.
     */
    public function __construct( $section_id, $page, $options = array() ) {
        self::$number_of_fields++;

        $options = wp_parse_args(
            $options,
            array(
                'label'       => sprintf(
                    /* translators: %s is the unique s/n of the field. */
                    __( 'Field #%s', 'prsdm-limit-login-attempts' ),
                    self::$number_of_fields
                'id'          => 'field_' . self::$number_of_fields,
                'description' => ''
            )
        );

        $this->section_id  = $section_id;
        $this->description = $options['description'];

        add_settings_field(
            $options['id'],
            $options['label'],
            array( $this, 'render' ),
            $page,
            $this->section_id
        );
    }

    /**
     * Create a new element object.
     *
     * @return Element
     */
    private function create_element() {
        return new Element( /* ... */ );
    }

    /**
     * Add a new element object to this field.
     */
    public function add_element() {
        $element = $this->create_element();

        $this->elements[] = $element;
    }

    /**
     * Render the field.
     */
    public function render() {
        if ( ! empty( $this->description ) ) {
            printf(
                '<p class="description">%s</p>',
                esc_html( $this->description )
            );
        }

        foreach ( $this->elements as $key => $element ) {
            $element->render();
        }
    }

}
The Element Class
Going forward, we’ll build the Element class in a similar fashion!
We’ll start writing the class like this:
class Element {

    /**
     * @var int Number of elements instantiated.
     */
    private static $number_of_elements = 0;

    /**
     * @var string Element label.
     */
    private $label;

    /**
     * @var string Element name.
     */
    private $name;

    /**
     * @var mixed Element value.
     */
    private $value;

    /**
     * Element constructor.
     *
     * @param string $section_id Section ID.
     * @param array  $options    Options.
     */
    public function __construct( $section_id, $options = array() ) {
        self::$number_of_elements++;

        $options = wp_parse_args(
            $options,
            array(
                'label' => sprintf(
                    /* translators: %s is the unique s/n of the element. */
                    __( 'Element #%s', 'prsdm-limit-login-attempts' ),
                    self::$number_of_elements
                ),
                'name'  => 'element_' . self::$number_of_elements
            )
        );

        $this->label = $options['label'];
        $this->name  = $options['name'];
        $this->value = '';
    }

    /**
     * Render the element.
    */
    public function render() {
        ?>

        <fieldset>
            <label>
                <input
                    type="number"
                    name="<?php echo esc_attr( $this->name ); ?>"
                    id="<?php echo esc_attr( $this->name ); ?>"
                    value="<?php echo esc_attr( $this->value ); ?>"
                />
                <?php echo esc_html(); ?>
            </label>
        </fieldset>

        <?php
    }

}
Make sure you’re escaping your output—like we’re doing here, using the esc_attr() and esc_html() WordPress functions—to prevent any cross-site scripting attacks. Even though we’re rendering our elements only in admin pages, it’s still a good idea to always escape any output data.
NOTE: Cross-site scripting (or XSS) is a type of security vulnerability typically found in web applications. XSS enables attackers to inject client-side code into web pages viewed by other users. A cross-site scripting vulnerability may be used by attackers to bypass access controls such as the same-origin policy.
When we were gathering the plugin’s requirements, we noticed that there are multiple element types—checkboxes, radio buttons, number fields etc. When we came up with our design, we made the decision to build an Element class meant to be extended. So, we know we’re going to end up with a child class for each element type.
The output should differ depending on the element type, so we’ll turn render() into an abstract method. That means, of course, that the class itself should also be abstract.
abstract class Element {

    /**
     * @var int Number of elements instantiated.
     */
    private static $number_of_elements = 0;

    /**
     * @var string Element label.
     */
    protected $label;

    /**
     * @var string Element name.
     */
    protected $name;

    /**
     * @var mixed Element value.
     */
    protected $value;

    /**
     * Element constructor.
     *
     * @param string $section_id Section ID.
     * @param array  $options    Options.
     */
    public function __construct( $section_id, $options = array() ) {
        self::$number_of_elements++;

        $options = wp_parse_args(
            $options,
            array(
                'label' => sprintf(
                    /* translators: %s is the unique s/n of the element. */
                    __( 'Element #%s', 'prsdm-limit-login-attempts' ),
                    self::$number_of_elements
                ),
                'name'  => 'element_' . self::$number_of_elements
            )
        );

        $this->label = $options['label'];
        $this->name  = $options['name'];
        $this->value = '';
    }

    /**
     * Render the element.
     */
    abstract public function render();

}
For example, a Number_Element class would look like this:
class Number_Element extends Element {

    /**
     * Render the element.
     */
    public function render() {
        ?>

        <fieldset>
            <label>
                <input
                    type="number"
                    name="<?php echo esc_attr( $this->name ); ?>"
                    id="<?php echo esc_attr( $this->name ); ?>"
                    value="<?php echo esc_attr( $this->value ); ?>"
                />
                <?php echo esc_html(); ?>
            </label>
        </fieldset>

        <?php
    }

}
Similarly, we can build a Checkbox_Element, a Radio_Element, and even a Custom_Element class for the rest of our elements.
Notice that we’re building our classes so they can all be used in the same way. Calling the render() method on any child of Element will output some HTML.
That’s an example of polymorphism, one of the core concepts of object-oriented programming.
Polymorphism
“Polymorphism” means literally “many forms” (from the greek words “poly” meaning “many”, and “morphe” meaning “form”). An Element child class can have many forms, since it can take any form of a class in its parent hierarchy.
We can use a Number_Element, a Checkbox_Element, or any other subtype in any place an Element object is expected, since all child objects can be used in the exact same way (i.e. calling their render() method), while still being able to behave differently (the output will differ for each element type).
As you can probably tell, polymorphism and inheritance are closely related concepts.
Substitutability
The Liskov Substitution Principle (or LSP), the “L” in S.O.L.I.D., states:
“In a computer program, if S is a subtype of T, then objects of type T may be replaced with objects of type S (i.e., an object of type T may be substituted with any object of a subtype S) without altering any of the desirable properties of the program.”
In layman’s terms, you should be able to use any child class in place of its parent class without any unexpected behavior.
Factories
Let’s go back to our Field class, where we currently have a create_element() method creating a new Element.
/**
 * Create a new element object.
 *
 * @return Element
 */
private function create_element() {
    return new Element( /* ... */ );
}

/**
 * Add a new element object to this field.
 */
public function add_element() {
    $element = $this->create_element();

    $this->elements[] = $element;
}
A method that returns a new object is often called a simple factory (not to be confused with “factory method”, which is a design pattern).
Knowing that any subtype is usable in place of the Element parent class, we’ll go ahead and modify this factory, so it will be able to create objects of any child class.
/**
 * Create a new element object.
 *
 * @throws Exception If there are no classes for the given element type.
 * @throws Exception If the given element type is not an `Element`.
 *
 * @param string $element_type
 * @param array  $options
 *
 * @return Element
 */
private function create_element( $element_type, $options ) {
    $element_type = __NAMESPACE__ . '\\Elements\\' . $element_type;

    if ( ! class_exists( $element_type ) ) {
        throw new Exception( 'No class exists for the specified type' );
    }

    $element = new $element_type( $this->section_id, $options );

    if ( ! ( $element instanceof Element ) ) {
        throw new Exception( 'The specified type is invalid' );
    }

    return $element;
}

/**
 * Add a new element object to this field.
 *
 * @param string $element_type
 * @param array  $options
 */
public function add_element( $element_type, $options ) {
    try {
        $element = $this->create_element( $element_type, $options );
        $this->elements[] = $element;
    } catch ( Exception $e ) {
        // Handle the exception
    }
}
We start by prefixing the element type with the current name:
$element_type = __NAMESPACE__ . '\\Elements\\' . $element_type;The __NAMESPACE__ magic constant contains the current namespace name.
Then, we make sure that there’s a class for the specified element type:
if ( ! class_exists( $element_type ) ) {
    throw new Exception( 'No class exists for the specified type' );
}
Next, we create a new object:
$element = new $element_type( $this->section_id, $options );And lastly, we make sure that the newly-created object is indeed an instance of Element:
if ( ! ( $element instanceof Element ) ) {
    return;
}
Extending
It’s worth pointing out that we’ve built our plugin to be extensible. Adding different kinds of pages, sections, elements is as easy as creating a new class that extends Admin_Page, Section, Element etc. These base classes do not include any code that needs to be changed to add a new page, section, or element.
The Open/Closed Principle (or OCP), the “O” in S.O.L.I.D., states:
“Software entities (classes, modules, functions, etc.) should be open for extension, but closed for modification.”
This means that we should be able to extend a class like Admin_Page and reuse it, but we shouldn’t have to modify it to do that.
Conclusion
In this article, we registered our sections, fields, and elements. While implementing these, we took a closer look at what polymorphism is and why it’s useful. We’ve also glanced over a couple of S.O.L.I.D. principles, the “Liskov Substitution Principle” and the “Open/Closed Principle”.
Stay with us for Part 7 of our Objected Oriented Programming Series, where we’ll take a closer look at how we can improve the way we manage our WordPress hooks.
See Also
- Summary of the series
- Part 1 – WordPress and Object-Oriented Programming – An Overview
- Part 2 – WordPress and Object Oriented Programming: A Real World Example
- Part 3 – WordPress and Object Oriented Programming: Α WordPress Example – Defining the Scope
- Part 4 – WordPress and Object Oriented Programming: a WordPress Example – Design
- Part 5 – WordPress and Object Oriented Programming: a WordPress Example – Implementation: The Administration Menu
- Part 8 – WordPress and Object Oriented Programming: A WordPress Example – Implementation: Options
Start Your 14 Day Free Trial
Try our award winning WordPress Hosting!


