

For many years now eCommerce has seen a year-on-year rise in sales. Thanks in part to the global Covid pandemic, this trend accelerated sharply in 2020/2021 with an estimated $4.5 trillion in sales. It’s likely this trend will continue. So, if you’re looking to get in on a slice of the action, the first thing you’ll need to do is to build an eCommerce website. Fortunately, building an online store has now become easier than ever by using WordPress and WooCommerce.
In this article we’ll run through how you can setup a brand new eCommerce website from scratch using WordPress and WooCommerce all hosted on Pressidium in less than 60 minutes. Let’s get going!
What is WooCommerce?
WooCommerce is an eCommerce plugin that runs on WordPress (if you’re not 100% sure what WordPress is then check out this article). It adds all the functionality typically needed to your website for you to sell online quickly and easily.
WooCommerce is owned by Automattic, the company behind WordPress. Thanks to this heavyweight backing it’s an incredibly well developed plugin that continues to improve and grow. There is a sizeable extensions library that provides both free and paid for extensions that allow you to add further functionality to your WooCommerce store. It’s estimated that well over a million eCommerce stores use WooCommerce including some big name brands. Combined with the power of WordPress, WooCommerce is an excellent choice for anyone looking to setup an eCommerce store. And, even better, it’s free to use!
Building your WooCommerce Store
Now we know what WooCommerce is, let’s go through the steps you’ll need to take to get your eCommerce website running. You’ll have no difficulty in getting the essential components of your store up and running within the hour. Of course, certain things like domain name propagation and so on might take longer. However, as this article will hopefully demonstrate, launching a new eCommerce store really isn’t that difficult.
Step One: Purchasing a Domain Name
You’re going to need a domain name if you don’t already have one. This article certainly isn’t detailed enough to get into the nitty-gritty of branding but, suffice to say, it’s best to go with a domain name that reflects your brand, is easy to spell, and uses an extension (e.g. .com) that is suitable for your target audience. In other words, using a .co.uk domain (which is the extension for domains used by businesses based in the United Kingdom) probably wouldn’t be suitable if your business was selling to customers in Canada!
To buy a domain name you’ll need to use a registrar. There are hundreds to choose from but we’d recommend checking out Namecheap.

Head to their site, use the search tool to find a domain and then purchase it.
Step Two: Hosting
To run your WooCommerce store website you’re going to need to purchase some hosting. It’s well worth investing a few extra $$’s in hosting even at such an early stage of your venture. Good quality managed WordPress hosting can actually save you money in the long run as well as serious amounts of time and stress! Don’t make the mistake of thinking all hosting is created equal and that you’ll be fine with a bare bones hosting package… you really won’t be! Before committing your hard earned cash to a hosting plan, check out our latest guide to WordPress hosting so you can make an informed decision.
It perhaps won’t come as a surprise that for this example, we’ll be using Pressidium Managed WordPress hosting!
Step Three: Spinning up your WordPress Site
So, you’ve bought your hosting and logged into your shiny new account Dashboard. What you do next will depend very much on the host you’ve chosen. Ideally, spinning up your new site will only take a matter of moments. If it doesn’t then perhaps think about getting a refund and trying an alternate host!
Try our Award-Winning WordPress Hosting today!


If you’re using Pressidium then simply click on the ‘New Site’ button you’ll see at launch, fill in some core information about the site and press ‘Create Website’.
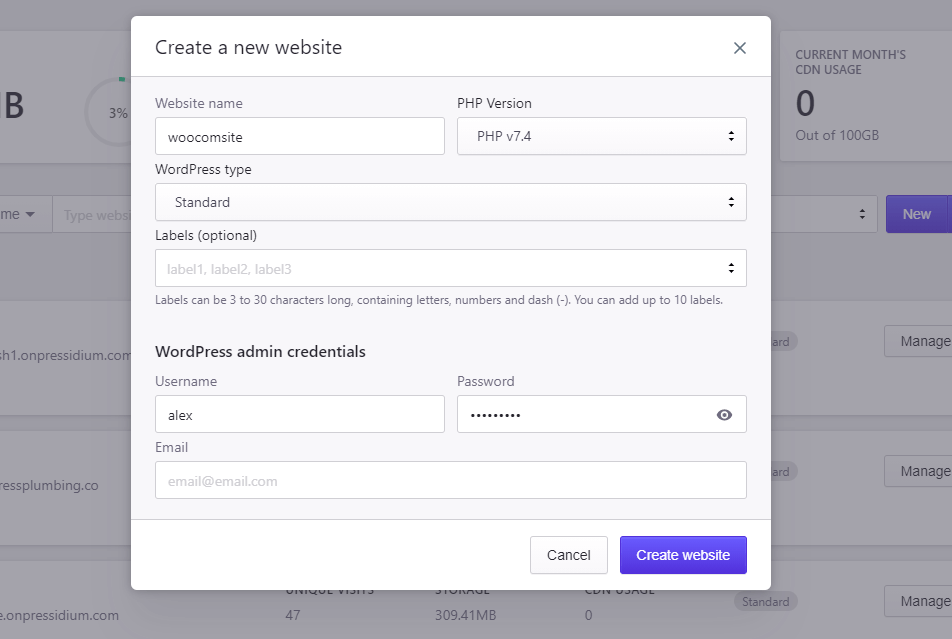
That’s it… sit back and in just a couple of minutes, you’ll get an email letting you know your new website is ready to go.
Step Four: Install & Configure WooCommerce
Ok, we’re really getting somewhere now. Head to your shiny new WordPress install and log in. Head to ‘Plugins > Add New’ and search for WooCommerce.
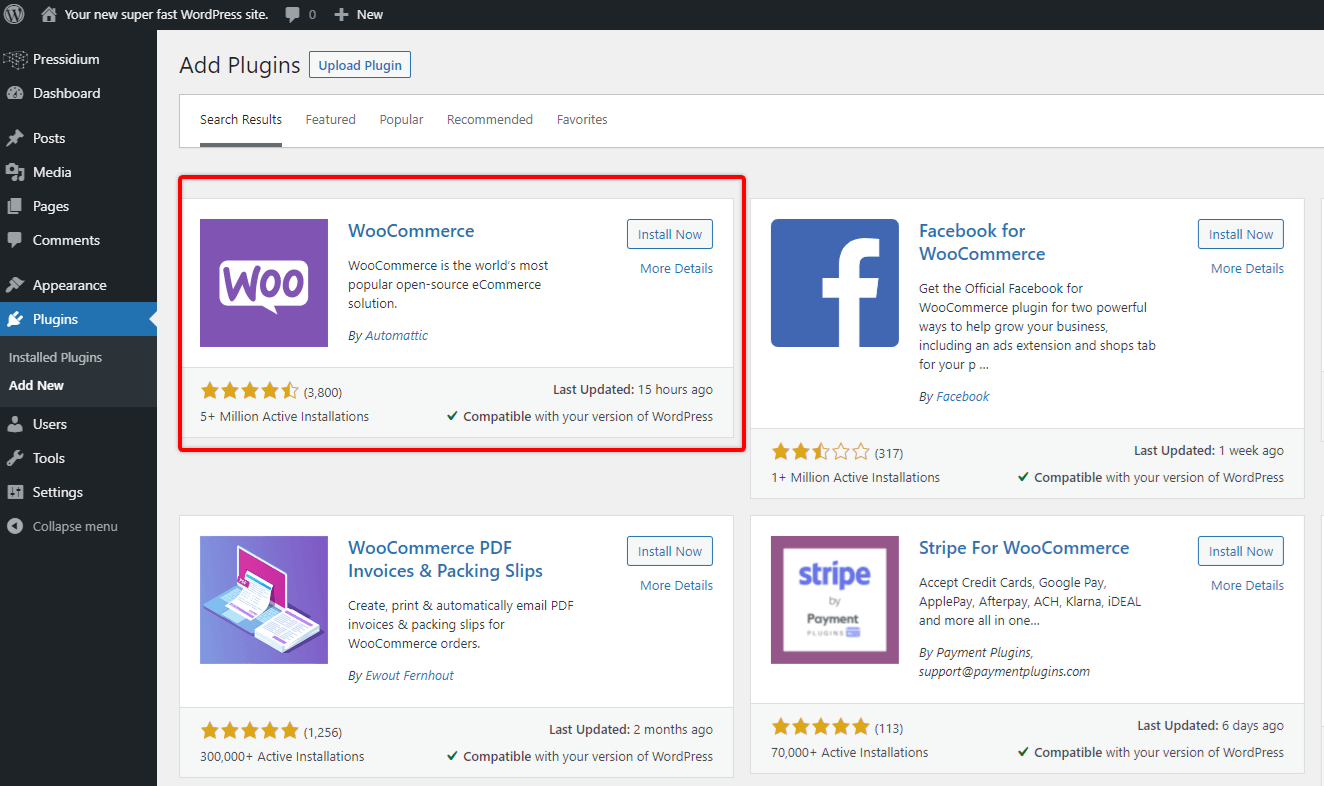
Click on ‘Install now’ and then ‘Activate’. WooCommerce will now load a setup Wizard. Follow the steps in this carefully. You’ll first be asked for your address… this is mandatory as WooCommerce uses this info to best customize your store but don’t worry, it won’t be made publicly visible and you can edit it at a later date.
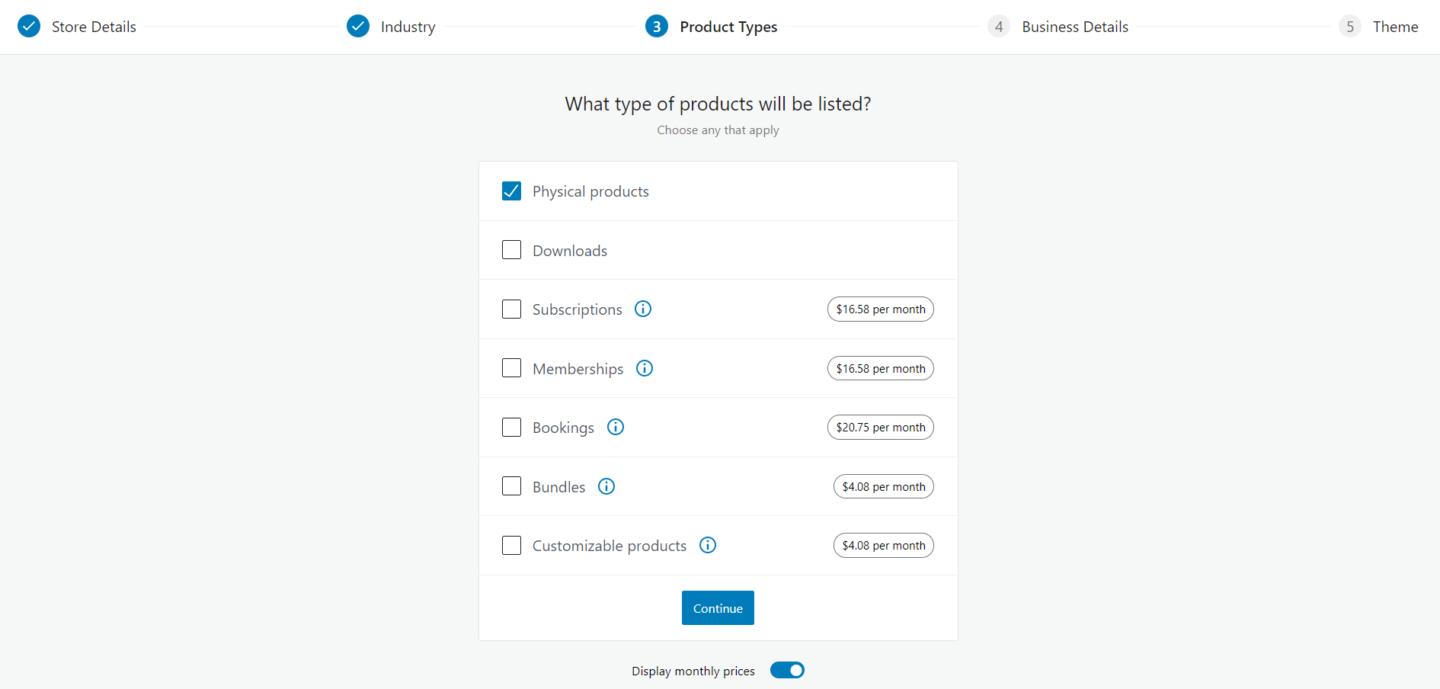
The next step will be to choose the Industry your store will operate in. After this you’ll be asked what type of products will be listed. You’ll see options that include:
- Physical products
- Downloads
- Subscriptions
- Memberships
- Bookings
- Bundles
- Customizable products
Alongside these options, some will display a fee (e.g. $16/month). Now, right at the beginning of this article we said WooCommerce was free to use. And it is. We also mentioned however that they provide a large Extensions library. The fee you see alongside certain product listing options is for a particular extension that can handle this type of product.
WooCommerce is actually pretty awesome… not only can you sell physical products through your store (and WooCommerce don’t charge for this functionality) but you can also sell things like subscriptions that are billed to the customer weekly, monthly or annually. It wasn’t long ago that building this kind of functionality was seriously tricky. WooCommerce has taken the headache away of configuring your WordPress website to handle these kind of transactions and the fee they charge is nothing compared to the amount of time and money you’d need to invest to add this kind of functionality to your site manually.
Don’t worry if at this stage you’re not quite sure what service you want to offer. You’re free to add in any extension you wish at a later date, For now, we’re just going to select ‘Physical Products’ and move onto the next step.
On the next step you’ll see a pre-filled checkbox that says ‘Add recommended business features to my site’. You can click a small arrow alongside this to reveal what these are.
- Accept credit cards with WooCommerce Payments
- Get automated sales tax with WooCommerce Tax
- Enhance speed and security with Jetpack
- Level up your email marketing with MailPoet
It’s the first two that are most interesting. Clearly you’re going to want to be able to take payments on your new eCommerce website. Traditionally this was actually surprisingly hard to do and involved third party apps and payment accounts. Now however, WooCommerce have made this incredibly easy with their own payment solution’ WooCommerce Payments’. Whilst you may ultimately choose to use another payment processor in the future, for now, WooCommerce Payments is the quickest and easiest way of adding that vital functionality to your website.
Next on the list is WooCommerce Tax. Odds are you’re going to need to collect sales tax. This can be a nightmare with different rates depending on the location of your customers. Once again, WooCommerce has made a radiationally hard task super easy.
With at least these two plugins installed you can now head to the next step.
Step Five: Install a Theme
With a good chunk of the nitty-gritty out of the way you’ll now need to choose a theme for your new eCommerce store. A theme is what controls how your site will look. WooCommerce offer a huge array of suitable themes for your website, many of which are free. You can test out a live demo of these themes before selecting one. And don’t worry, swapping to a new theme at a later date is relatively straightforward.
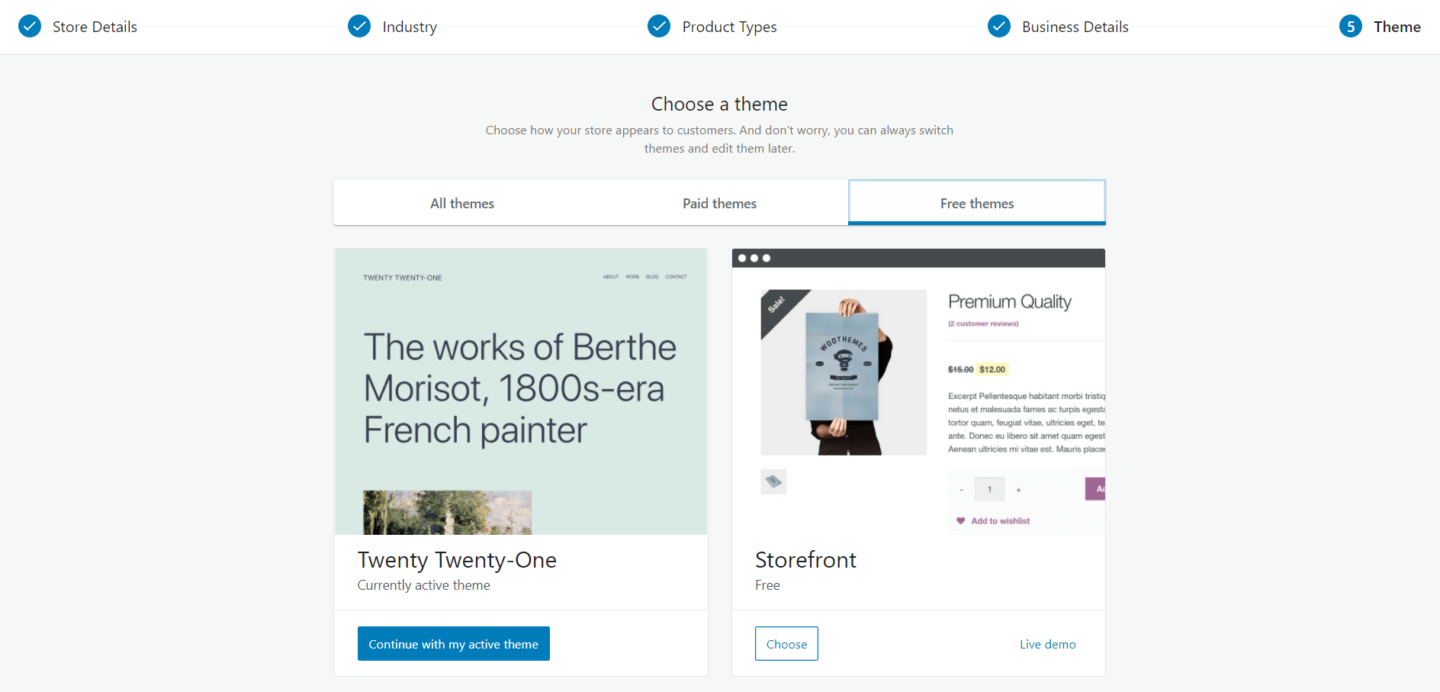
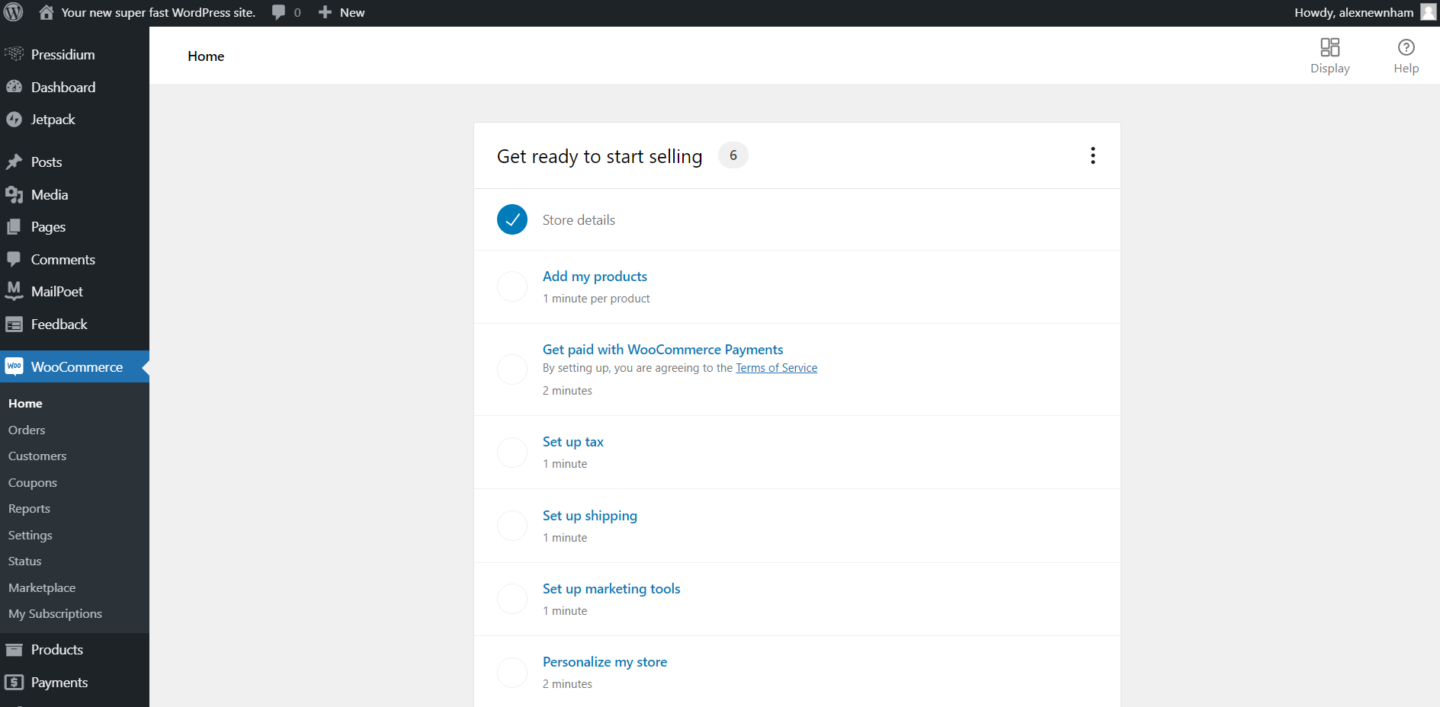
We’re going to select ‘Storefront’ which is a good all-round theme to get going with. With that done you’ll be directed to the WooCommerce control panel where you can begin the exciting process of fine tuning your WooCommerce store! Again, WooCommerce have provided an easy-to-use Wizard that walks you through the process of finalizing the setup of your store. This includes:
- Adding products
- Setting up payments
- Designing your store
- Configuring shipping and tax
We’re not going to run through each of these steps as they’re pretty self-explanatory. WooCommerce allows you to keep things nice and simple or, if you wish, you can deep dive into a more complex configuration. That’s one of the cool things about WooCommerce. It’s simple enough to launch an eCommerce store within 60 minutes but powerful enough to provide all the advanced features you need to take your store to the next level.
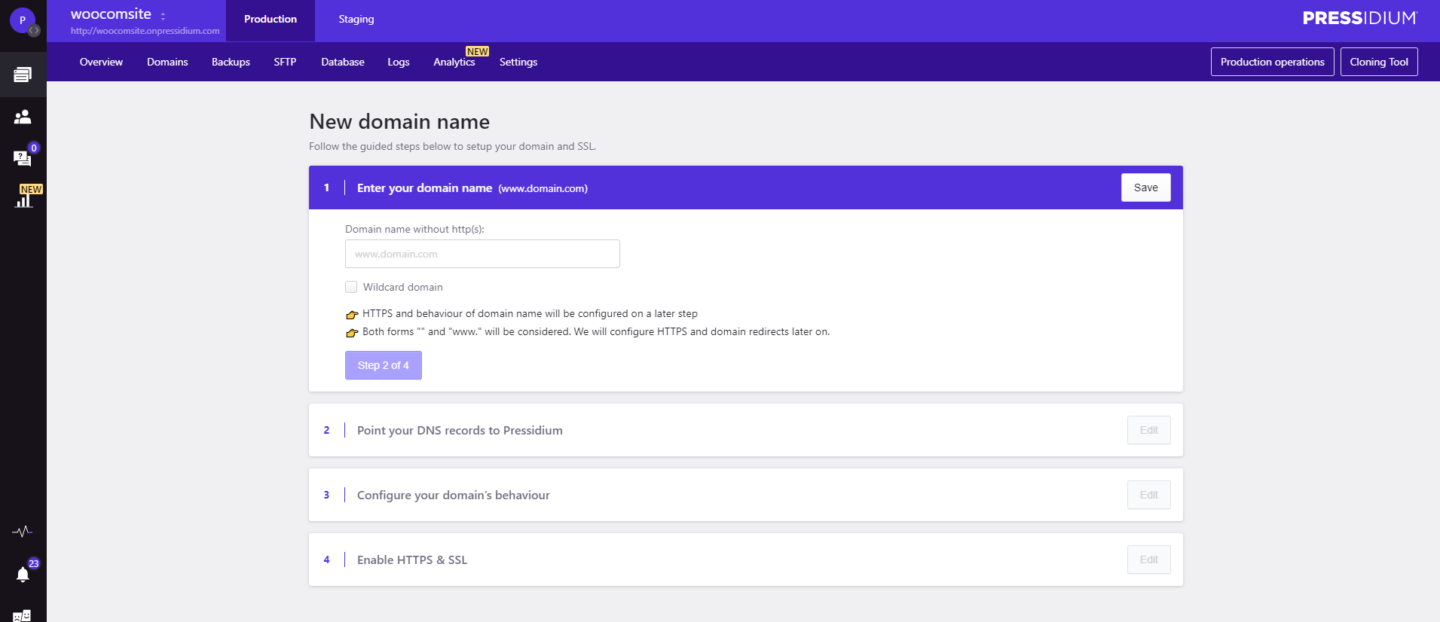
Step Six: Pointing your domain
With your initial setup done, the final step in getting your site live is to configure your domain name. To do this you’ll need to log into your hosts control panel and also your domain registrar’s control panel. If you’re hosting on Pressidium we’ve made configuring your domain super simple. Follow these instructions here.
With that done your site should now be live! Congratulations and welcome to the exciting world of eCommerce. We wish you every luck with your new venture!
Start Your 14 Day Free Trial
Try our award winning WordPress Hosting!


